Certification Objective 9.01: Establishing Standards
In this section, we will begin by discussing documentation standards ranging from standards for initial requirements documents to those for final support documentation and end user documentation. The examination will cover the types of documents used in a project and their purpose. Next, we will discuss user interface standards. The effective application of proper user interface design is an essential task for the developer because the user interface is the only part of the application most users will see, and all opinions will be formulated based on that small portion of the application. Last, we will examine standards for testing, which determine if the project requirements have been met and are correct.
Documentation Standards
Solutions documents come in many forms. There is user documentation, project documentation, and developer documentation. The development of documentation standards is important for providing a consistent look and feel for developers, users, and others in the organization.
Fundamentally, the creation of documentation is a business decision, not really a technical one. Although it may sound strange, documentation takes time and resources. To the stakeholders, that time and those resources are money that could be spent in other ways. Therefore, the stakeholders decide the types of documentation that will satisfy their needs, and those types can be determined using an adopted business methodology or can be custom defined.
Documentation is a communication tool. When working with groups of people, face-to-face discussions are not always possible. For this reason, documentation is a great support mechanism for communicating with users and stakeholders. However, without verbal communication, documents can be misleading because in order to understand them fully requires interpretation.
| Exam Watch | Documentation is not a replacement for face-to-face discussions. |
Another purpose of documentation is to help verify that you understand the information. Basically, you are creating a written expression of your understanding of the problem or solution. Because writing it down requires you to think through logical steps and solutions, it can help you discover issues that were not previously considered. For example, creating code comments before coding helps you think about what you are trying to achieve and to determine if the approach you are taking is the correct way to achieve it.
| Exam Watch | Creating documentation is a process for thinking about how to solve a solution or problem. |
User Documentation
User documentation explains how the solution works. You can gather much of the information needed for this explanation from the use cases defined for the project and from the user interface. The goal is to provide the information in a way that assists the user in performing specific tasks. For example, if a user is looking for help on how to create a user account, the documentation should provide a path that details how to perform that task. Further, user documentation usually includes common elements such as a table of contents, a glossary, and a quick index.
You can produce user documentation in different formats. Hypertext Markup Language (HTML) is one option, and a number of third-party tools are available to create documentation in HTML format. HTML documentation can be a great tool for users who are in different locations because it is easy to deploy. It can be time-consuming to generate and maintain, however, so you should take into consideration the available resources for those tasks.
Another option is to create external Help files. Windows forms support this type of help by using the HelpProvider component. HelpProvider is a .NET native object that resides in the System.Forms.HelpProvider namespace. Identified in the following table are key properties and methods of the HelpProvider component.
| Property or Method | Description |
|---|---|
| HelpNamespace property | Specifies the name of the Help file |
| SetHelpKeyword method | Provides the key information, from the Help file specified by HelpNamespace, for retrieving the help associated with this control |
| SetHelpString method | Specifies the Help string associated with the specified control |
HTML Help Workshop (Hhw.exe) is a Help authoring tool with an easy-to-use graphical interface for creating Help project files, HTML topic files, contents files, index files, and everything else you need to put together a Help system or Help web site. This tool supports creating a resource .DLL file for language-specific information. This option is more difficult to deploy because it requires more developer interaction and therefore is not a standalone solution.
The last type of format for user documentation is a traditional manual document. In a manual document, screen shots are incorporated and instructions are contained within some type of binder. Manual documents share some common characteristics with the other documentation methods described here, such as a table of contents, a glossary, and a quick index. This option requires no developer interaction but can be difficult to distribute due to the labor and time required to copy, bind, and mail each copy. There are ways to make this easier, however, such as by creating electronic copies of the manual and distributing them via company e-mail.
| Exam Watch | You can use distribution methods other than the web and Help files. For example, using e-mail to distribute help documentation. |
Project Documentation
Project documentation provides a high-level analysis of the business and solution. Project documents describe each phase of the project from inception to completion. One example of a project document is the vision/scope document, which defines the system at a high level with defined boundaries. Also in this document are cost estimates, a risk analysis, staffing requirements, and the project milestones. A typical project also contains other types of project documents that detail project tasks, requirements, high-level use cases, and testing procedures. The project team creates project documents during various phases.
Requirements Documents
Requirements documents are one of the first sets of documents created when starting a project. These types of documents detail what the solution is required to accomplish. Documents such as use cases, UML, and data flow diagrams, on the other hand, are considered architecture documents. Architecture documents detail how the solution, in technical terms, is going to be solved.
Functional Specifications
The functional specification is the basis for building the master project plan and schedule. It is maintained as a detailed description, as viewed from the user perspective, of what the solution will look like and how it will behave. Note that a functional specification can be changed only with customer approval.
Interface Documents
An interface document details how different systems interact. This information should contain sample data because it helps with the creation of testing and support documentation for determining if the system is working properly. An interface document may be a simple document or a very complex one, depending on the systems involved. For example, when working with web services, you need to provide documentation to the developer that explains the methods available from the web service. For some systems, there is an interchange between different types of data files. By having examples, the developer and support personnel have an idea of how to create code to accommodate the interface.
Support Documents
Support documents range from administrator user documents to deployment scripts. The purpose of support documents is to give other types of users, such as technical support personnel, network administrators, and security administrators, information on how to use the solution. Each type of user has different perspectives on roles and responsibilities as far as a solution is concerned.
Technical support personnel care about how the application functions for users but also need a more detailed view about how the processes work and how to fix users’ problems. This type of documentation may also include specialized tools for support personnel or details about how to execute specific scripts to fix problems. For example, the solution could need some customized security maintenance tools to be created for support.
-
Deployment Documents Network administrators are concerned about how to install and deploy the application. Deployment documents detail how to deploy the solution into the testing and production environments, which in a typical company is not done by developers. Network administrators or testing personnel set up and deploy to the testing and production environments for the solution. This separation of environments is necessary to allow the testing of the deployment process before going to the production environment.
-
Security Documents Security administrators want to know how to manage the security of the solution. Security documentation is similar to user documentation except that it details only administrative tasks, such as how to add new users. Security documents detail the security functionality within the application and explain how to implement it. The project team and users define security roles and permissions to determine who needs access to all or various parts of the solution.
Developer Documentation
Developer documentation is created specifically for developers, to provide them details on how to create the solution, and it can come in several forms: physical documents, electronic documents or diagrams, and code comments. These documents cover the whole spectrum of the development process, ranging from the approval of the solution concept to project deployment. They include functional specification documents, use cases, system and component diagrams (UML and/or data flow diagrams), system operational documents, and source code.
Developer Response Documents
Another type of developer-specific document is one that takes the project tasks and turns them into developer language. This document is called a response document. From this type of document, developers can be assigned tasks and responsibilities. The purpose of a response document is to take the tasks defined from a project point of view and turn them into developer-sensible types of tasks, which is also a useful way to determine overlaps in task responsibilities and components. The general structure of a response document is as follows:
| Section | Description |
|---|---|
| Task name | This usually includes a unique identifier associated with the requirement being solved, along with the requirement name. |
| Task description | This generally is a short summary of the requirement being solved. This description can be technical or nontechnical. |
| Dependencies | These identify other tasks and external systems that are required to complete the task. |
| Steps required | This section lists the steps required to complete this development task, including steps for SQL, steps for other non-code dependencies, and programming steps. |
Code Comments
Code comments should be self-documenting, meaning that they should make clear the purpose of the code. Comments should make the code understandable for other developers. Here are some key commenting techniques recommended by Microsoft:
-
Keep comments up-to-date when modifying code.
-
Put boilerplate comments before the start of each method. For example:
/* Developer: [Developer] Date: [Date] Method Name: Purpose: Example of Sample Formatted Boilerplate Template */
-
Avoid adding comments at the end of a line of code; however, end-of-line comments are appropriate for variable declarations. For example:
int iCounter = 0; //This is an acceptable place for a comment. versus if ( sStatus == "Employee ReHire" ) // This is a bad place for a comment.
-
Avoid using lines of asterisks in your code comments because it can be very cluttering. Use white space instead.
-
Before development, clean up comments to avoid confusion during future maintenance.
-
Use comments to detail complex sections of code.
-
Use complete sentences when writing comments.
-
Avoid extraneous comments.
-
Use comments to explain the intent of the code.
-
When bugs are found, comment them and note what caused the bug as well as the fix for it.
-
Use a uniformed style in commenting code; that is, the code should have the same look and feel throughout.
-
Use white space to separate comments from comment delimiters. For example:
//This is a sample comment (incorrect). // This is a sample comment (correct; notice the use of white space).
XML Documentation
C# has additional documentation features that allow for the creation of XML documentation files. The C# compiler option to generate the XML comments is /doc. The standard C# comments begin with // for inline comments or /* … */ for code blocks. In the source code, the comments start with /// instead of the standard C# comments. To use the generated .xml file for use with the VS.NET IntelliSense feature, the filename of the .xml file should be the same as the assembly you want to support and the .xml file should be in the same directory as the assembly.
If you were compiling the assembly from the command line, you would use the following syntax for C#:
csc XMLsample.cs /doc:XMLsample.xml
or this syntax for VB:
vbc XMLsample.vb /doc:XMLsample.xml
This can also be accomplished in the Visual Studio environment by following these steps:
-
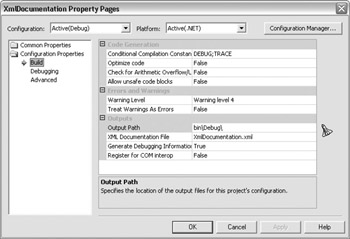
Open the project’s Property Pages dialog box.
-
Click the Configuration Properties folder.
-
Click the Build property page.
-
Modify the XML Documentation File property.
We will perform these steps later in the XML documentation example. A feature to be aware of in the environment setup is incremental builds. Incremental builds allow the assembly to be built more quickly by examining only the changes since the last build and compiling those items. Because the entire project is not being rebuilt, the XML documentation file property is ignored.
| Exam Watch | The /doc switch will be ignored in a compilation that uses /incremental; use /incremental- to ensure that the XML documentation file is up-to-date. |
The following table lists the XML documentation tags most commonly used in user documentation. The compiler will process any tags that are valid XML. The documentation tags require delimiters to indicate where the documentation comments begin and end.
| <c> | <para> | <see> |
| <code> | <param> | <seealso> |
| <example> | <paramref> | <summary> |
| <exception> | <permission> | <value> |
| <include> | <remarks> | |
| <list> | <returns> |
The default /// delimiter format can be seen in documented examples in the Microsoft Developer Network (MSDN) and in the C# project templates. A feature of the Visual Studio integrated development environment (IDE) for the automatic insertion of the <summary> and </summary> tags is called smart comment editing. This feature is activated after typing /// at the appropriate location in the code. The common syntax for block comments is /* … */.
Following are the tags for the XML documentation, including an example of each tag:
-
The <summary> tag is one of the main tags. This tag is used to describe members, and it is the primary source of information about the type in IntelliSense. This information is also displayed in the Object Browser and Code Comment Web Report.
Syntax: <summary>description</summary>
Example:
/// <summary> My Method is a method in the class. /// <para>This creates a second paragraph. /// See cref="System.Console.WriteLine"/> for information. /// </para> /// <seealso cref="MyClass.Main"/> /// </summary>
-
The <value> tag describes a property.
Syntax: <value>property-description</value>
Example:
/// <value> Name accesses the value of the name data member.</value> public string Name
Exam Watch When using the Visual Studio .NET development environment, it will add a <summary> tag for the new property, so you will need to add the <value> tag.
-
The <c> tag indicates that text within a description should be marked as code.
Syntax: <c>text</c>
Example:
/// <summary><c>MyMethod</c> is a method in the <c>MyClass</c> class. /// </summary>
-
The <code> tag indicates multiple lines as code.
Syntax: <code>content</code>
Example:
<code> int x = 1; int y = 5; </code>
-
The <example> tag lets you specify how to use a method or other members. This tag is commonly used with the <code> tag.
Syntax: <example>description</example>
Example:
/// <summary> /// Summary Text /// </summary> /// <example> /// <code> /// class MyClass /// { /// public static int Main() /// { /// return GetZero(); /// } /// } /// </code> /// </example> -
The <exception> tag lets you specify which exceptions can be thrown. This tag is generally applied to a method definition.
Syntax: <exception cref="member">description</exception>
The compiler checks that the given exception exists, translates it into a member in the XML, and must be in double quotation marks.
Example:
/// <exception cref="System.Exception">Thrown when …</exception>
-
The <include> tag lets you use an external comment file to describe the types and members in your source code. This is an alternative to placing documentation comments directly in your source code file. The <include> tag uses the XML XPath syntax.
Syntax: <include file='filename' path='tagpath[@name="id"]' />
-
Filename is the name of the file containing the documentation. The filename is enclosed in single quotation marks. The path can be included with the filename.
-
Tagpath is the path of the tags in the filename that leads to the specific tag name. The filename is enclosed in single quotation marks.
-
Name is the name specifier in the tag that precedes the comments; if the name is specified, the id is also used.
-
Id identifies the tag that precedes the comments. The id is enclosed in double quotation marks.
Example:
///<include file='xml_include_tag.doc'path='root/node[@name="test"]/*'/>
-
The <list> tag allows the creation of multiple types of lists to appear in the XML. The list can create a bullet, a number, or a table type.
Syntax:
<list type = "bullet" | "number" | "table" >
  <listheader>
  <term>term</term>
  <description>description</description>
  </listheader>
  <item>
  <term>term</term>
  <description>description</description>
  </item>
</list>
The <listheader> block is used to define the heading row of either a table or a definition list. When defining a table, the <term> element is the only one that needs to be used. Each item in the list is specified with a <list> block. When creating a definition list, you need to use both <term> and <description>.
Example:
/// <remarks> A sample bulleted list /// <list type="bullet"> /// <item> /// <description>Item 1.</description> /// </item> /// <item> /// <description>Item 2.</description> /// </item> /// </list> /// </remarks>
-
The <para> tag is used inside another tag such as <summary, <remarks>, or <return> to add structure to the text. This is necessary because all of the text will run together regardless of how the comments are presented in the code.
Syntax: <para>content</para>
Example:
<summary> <para> This is an example of a paragraph of Text </para> <para> This is an another paragraph of text. These will be separated. </para> </summary>
-
The <param> tag specifies parameters used in a method declaration. The text for the <param> tag is used in Visual Studio IntelliSense, in the Object Browser, and in the Code Comments Web Report.
Syntax: <param name="name">description</param>
Example:
///<param name="Int1"> Used to indicate status.</param> public static void MyMethod(int Int1)
-
The <paramref> tag provides a way to specify that a word is a parameter. The name of the parameter in the syntax is enclosed in double quotation marks.
Syntax: <paramref name="name"/>
Example:
/// <remarks> MyMethod is a method. /// The <paramref name="Int1"/> parameter takes a number. /// </remarks>
-
The <permission> tag allows the documentation of the access of a member. The System.Security.PermissionSet lets you specify access to a member.
Syntax: <permission cref="member">description</permission>
Example:
/// <permission cref="System.Security.PermissionSet"> Everyone can access this method. </permission>
-
The <remarks> tag is used to add additional information within a <summary> tag or alone. This information is displayed in the Object Browser and in the Code Comments Web Report.
Syntax: <remarks>description</remarks>
Example:
/// <summary> /// Primary Information /// </summary> /// <remarks> /// Some Additional Information /// </remarks>
-
The <returns> tag is used to identify the return value from a method declaration.
Syntax: <returns>description</returns>
Example:
/// <returns>Returns Zero.</returns> public static int GetZero()
-
The <see> tag specifies a link within text. The member in the syntax must appear within double quotation marks.
Syntax: <see cref="member"/>.
Example:
<see cref="GetZero()"/>
-
The <seealso> tag specifies text that can appear in the See Also section.
Syntax: <seealso cref="member"/>
Example:
<seealso cref="GetZero()"/>
You may notice that the default XML documentation has much functionality built into it. In the next exercise, we will practice creating an XML document and view how to create a Web Comments Code Report.
Exercise 9-1: Create XML Documentation and Comment Web Pages
-
Create a new project by selecting File | New. The New Project dialog box appears.
-
From the New Project dialog box, select Visual C# Projects from the Project Types pane, and select Class Library from the Templates Pane.
-
In the Name field, give the project the name XMLDocumentation.
-
Within the Solution Explorer, right-click Class1.cs and rename it to Employee.cs.
-
Modify the code to match the following lines:
using System; using System.Text; namespace XmlDocumentation { /// <summary> /// Summary description for Class1. /// </summary> public class Employee { private string _FirstName; private string _LastName; private DateTime _HireDate; public Employee () { FirstName = "Hello"; LastName = "World"; HireDate = DateTime.Now; } public string FirstName { get { return _FirstName;} set { _FirstName = value;} } public string LastName { get { return _LastName; } set { _LastName = value; } } public DateTime HireDate { get { return _HireDate; } set { _HireDate = value; } } public bool FireEmployee() { return true; } public void SomeMethod() { this.ToString(); FireEmployee(); } public override string ToString() { StringBuilder sb = new StringBuilder(); sb.Append("Name:"); sb.Append(LastName); sb.Append(", "); sb.Append(FirstName); sb.Append("\n"); sb.Append("Hire Date:"); sb.Append(HireDate); return sb.ToString(); } } } -
Compile the code to make sure everything runs properly.
-
When you hover your mouse over the methods in SomeMethod( ) and ToString( ), they should look like the following two illustrations. The properties in the ToString( ) method have the same characteristics, they will display IntelliSence help.


-
To start getting more interaction with IntelliSence, we need to start adding XML documentation comments. Let’s start with the class, modifying the code description to look like the following above the class declaration:
/// <summary> /// Summary description for EmployeeFinish. /// </summary>
-
Add the following code description above the _FirstName variable.
/// <summary> /// Instance variable to hold the FirstName /// </summary> private string _FirstName;
-
Add the following code description above the _LastName variable.
/// <summary> /// Instance variable to hold the LastName /// </summary> private string _LastName;
-
Add the following code description above the _HireDate variable
/// <summary> /// Instance variable to hold the HireDate /// </summary> private DateTime _HireDate;
-
Add the following description above the Employee constructor declaration.
/// <summary> /// Constructor for the Class /// </summary> /// <remarks> /// The FirstName, LastName, and HireDate are set to /// initial values. /// </remarks> /// <example>private EmployeeFinish e = new EmployeeFinish()</example>
-
Add the following description above the FirstName, LastName, and HireDate properties and replace <Property Name> with the appropriate bolded property name being described.
/// <summary> /// <Property Name> Property Construction /// </summary> /// <value>Value tag to display the <Property Name> </value>
-
Add the following code description above the FireEmployee( ) method.
/// <summary> /// Function to Fire the Employee and reset /// Values /// </summary> /// <returns>If the FireAction was performed successfully.</returns>
-
Add the following above the SomeMethod( ) method.
/// <summary> /// Test Method /// <seealso cref="EmployeeFinish.ToString()"/> /// </summary>
-
Add the following code description above the ToString( ) method.
/// <summary> /// Override the String.ToString functionality to return /// a custom set of information. /// </summary> /// <remarks> /// <list type="bullet"> /// <term>List Term 1</term> /// <description>ListItem 1</description> /// </list> ///</remarks> /// <returns>Returns a formatted string of values</returns>
-
We have finished adding code comments.
-
Next we want to create code comments Web Reports that can be distributed to give information to other developers.
-
Set up the project properties as shown in the following illustration. By having the XML documentation filename mirror the project file, the created assembly and the XML documentation file will move to other projects when a reference is created. IntelliSence will use the XML documentation file for the descriptions of the accessible properties and methods.
-
Press OK to save the settings.
-
Press Tools | Build Comment Web Pages. The Build Comment Web Pages dialog box appears.
-
Point the destination for the output to your project directory by clicking the Browse button. Then click OK to start the build process.
-
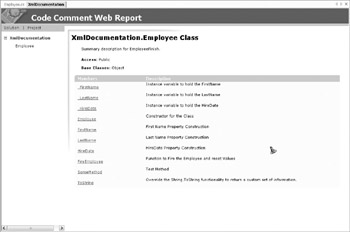
The documentation automatically shows up in your browser. It shows the solution structure and shows the comments that were added to the properties and methods. The following illustration shows an example of the finished output from the web report.
In this exercise, you saw how XML documentation works and viewed the Web Comments Code Report. Although the main tag that you used in this example was the <summary> tag, you should note that there are other options not used in the exercise.
Coding Standards
This section looks at some common developer coding principles necessary for you to succeed. Each organization has its own variation of some type of standard that it has either developed or discovered. Many problems with the development and maintenance of an application come from following behind another developer and making modifications. Some of these problems can be addressed by applying generic standards for naming and formatting of code, and by applying some best practices.
Naming Conventions
The readability of source code has a direct impact on how well a developer comprehends the solution. The code maintainability affects the ease with which other developers can make changes to existing software. By using solid coding techniques and practices, the quality of the code is improved. Here are some suggestions for naming conventions:
-
Begin each name with an alphabetical character, a digit, or an underscore. This is required by Microsoft.
-
Begin each separate word in a name with a capital letter, such as searchLastName.
-
Begin function and method names with a verb, such as hideShowPanel.
-
Begin class and property names with a name, such as EmployeeLastName.
-
Begin interface names with the prefix I, followed by a noun or a noun phrase, such as IComponent, or by describing a behavior. Do not use underscores, and use abbreviations sparingly. Underscores are usually used for internal variables, and abbreviations can make variables difficult to understand.
-
Begin event handler names with a noun describing the type of event followed by EventHandler, such as MouseEventHandler.
-
Include the “EventArgs” suffix in names of event arguments classes, such as DragEventArgs.
-
Use a prefix in present or past tense, such as ListAdd or ListAdded, if an event refers to an action carried out before or after something else.
-
Avoid using names in an inner scope that are the same as names in an outer scope. For instance, if you create a variable name Date, it would conflict with using the Date function alone and you would have to call the date function by calling System.Date.
-
Use Pascal casing for routine names and camel casing for variables. Pascal casing is when the first letter of each word is capitalized. Camel casing is the same as Pascal casing except that the first word is lowercase. Examples are shown here:
Pascal casing example: CalculateSummaryTotal Camel casing example: calculateSummaryTotal
Exam Watch Pay attention to the conventions required for naming variables and methods.
Routine Conventions
Some guidelines for creating method and function names are as follows:
-
Avoid elusive names that make it difficult to determine the purpose of the method or function. It is redundant to include class names in the name of a class property, such as Employee.EmployeeLastName. Use Employee.LastName instead. In .NET, since we can do function overloading, the overloaded functions should perform similar tasks.
-
For routine conventions, use a verb-noun method, such as EmployeeUpdate( ), when naming routines that perform operations on a given object.
Variable Conventions
General guidelines for creating variable names include the following:
-
Append computation qualifiers (Avg, Sum, Min, and Max), when appropriate, to the end of variable names.
-
Use “Is” in Boolean variables, which implies a True/False value.
-
Avoid using terms such as Flag when naming status variables. For example, instead of documentFlag, use a more descriptive name such as documentFileFormat.
-
Give meaningful names even to short-lived variables.
-
Use single-letter variable names such as x and y for short-loop indexes only.
Exam Watch Use constants in place of literal numbers and strings for ease of maintenance and understanding.
Tables Conventions
When naming tables, the following conventions are useful:
-
Express the name in singular form. For example, use Customer instead of Customers.
-
Avoid using the table name in column name fields. For example, instead of CustomerFirstName, use FirstName.
-
Make column names data-type neutral. By not having the data type as part of the name, if the data type changes in the future, the column will not have to be renamed.
Exam Watch Avoid making field names too long, because you will have to type them and because you lose the uniqueness of names when they are too long.
SQL Server
Microsoft SQL Server has some conventions to make Transact Structured Query Language (TSQL) easier to understand. Some those are listed here:
-
Avoid prefixing stored procedures with sp. This prefix is reserved for identifying system-stored procedures.
-
Do not use fn_ as a prefix. This prefix is reserved for identifying built-in functions.
-
Avoid using xp_ as a prefix. It is reserved for identifying system-extended stored procedures.
-
When writing SQL statements, use uppercase for keywords and mixed case for tables, columns, and views.
-
Put each major SQL clause on a separate line to make the statements easier to read and edit.
Formatting Conventions
The purpose of formatting of code is to make it logical and understandable. If you take the time to format your code properly, you and other developers will be able to maintain and decipher your code easily. When using opening and closing braces, there are two styles you can follow: block and slanted. Block style is when you align braces vertically, as shown here:
for ( i = 0; i < 100; i++ ) { . . . } Slanted style is when the opening brace appears at the end of the line and the closing brace appears at the beginning of the line, as shown here:
for ( i = 0; i < 100; i++ ) { . . . } This style is most commonly seen in C++ and Java. The style you choose should be based on your preference, but you must use that same style throughout your source code.
One of the first techniques of formatting is to establish a standard amount for the indention of your code and follow this standard for all of your code. The indenting of code makes it easier to follow. For example, the following code lines:
If … Then If … Then … Else End If Else … End If
are better formatted like this:
If … Then If … Then … Else … End If Else … End If
The second part of this code listing is much easier to read than the first one.
The aforementioned formatting techniques can be automated by properly setting up the Visual Studio IDE. In the IDE environment, under Tools | Options, the Text Editor shows options that allow the formatting of your code based on the type of source code or all source code. The following illustration shows the formatting options available for Text Editor, All Languages.
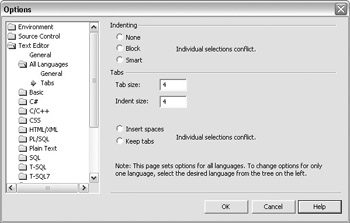
This screen allows the setting of default options for the Text Editor. You might see the message “Individual selections conflict” displayed next to the Indenting or Tabs options. This indicates that one or more individual languages have indenting or tab selection types that differ from the other languages. For example, the message displays if Visual Basic has Smart indenting selected while Visual C++ has Block indenting selected. This message alerts you that selecting a particular indenting or tab type in this dialog box affects all languages and sets their indenting or tab types to whatever you select here.
There are three indenting settings: None, Block, and Smart. When None is selected, no automatic indention occurs when you press ENTER to move to a new line of text. The cursor starts in the first column of the next line. The Block setting automatically indents to the same tab stop on the next line when ENTER is pressed. The Smart setting creates new lines of text based on the formatting rules established for the respective language. For example, if you were writing a loop in VB, the new line after the loop statement would indent to the right one tab stop.
The tab settings specify the tab size and indent size. These indicate the number of spaces entered when indenting is necessary and when the TAB key is pressed. The Insert Spaces option, if selected, inserts space characters instead of tab characters when the TAB key or indent button is pressed. If Keep Tabs is selected, tab characters are inserted instead of spaces when possible. Tab characters are not possible if the Tab Size and Indent Size settings are not the same. If the indent size is not an even multiple of the tab size, space characters will fill the remaining space.
| Exam Watch | Remember that with the Tab Size and Indent Size settings, the number of characters used depends on the indent style selected. |
VB-Specific Formatting Options
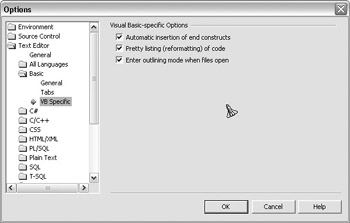
Under Text Editor | Basic | VB Specific, there are three additional formatting options for Visual Basic.NET. The first is Automatic Insertion of End Constructs, when you type the first line of a procedure declaration and press ENTER; the editor adds the matching End Sub, Function line. If a property is used, it will automatically create the appropriate get and set statements. For example, if you enter:
Public Property LastName As String
the Code Editor will reformat the code and add the following:
Public Property LastName() As String Get End Get Set(ByVal Value As String) End Set End Property
The Pretty Listing (Reformatting) Of Code option allows the text editor to align your code on the correct tab location. The Enter Outlining Mode When Files Open option allows you to view the document in outlining mode. For more information about outlining code, view the MSDN documentation under Outlining Code. The following illustration displays the Visual Basic–specific formatting options.
C#-Specific Formatting Options
The C#-specific options provide additional C#-specific indentation and outlining features. The Leave Open Braces On Same Line As Construct option determines the brace style as either block or slanted style, which was demonstrated earlier. The Indent Case Labels option indents case statements for a switch statement. (By default the case statements are aligned with the first character in the switch statement.) The Automatically Format Completed Constructs And Pasted Source option will format typed code constructs automatically. As the constructs are closed, the inner content is formatted. This option will also format automatically any code pasted into the editor. The Smart Comment Editing option allows you to activate the XML documentation tags when /// is typed. The following illustration shows the C#-specific formatting options.
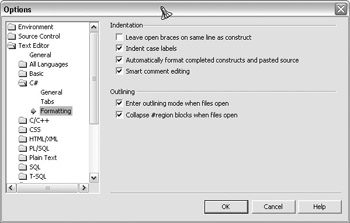
| Exam Watch | Remember that /// starts smart comment editing in C#. |
General Recommendations
Here are some recommended formatting techniques that you should follow regardless of the language you’re using:
-
Use a monotype font when publishing hardcopy versions of source code.
-
Establish a maximum line length for comment and code to avoid having to scroll to the right on the source code editor and to allow for clean presentation of hardcopy.
-
Use spaces before and after most operators. An example of an operator that cannot have spaces is a += operator. Spacing would create a compiler syntax error.
-
Use white space to provide organizational clues to source code. This creates paragraphs of code, which aid others in comprehending it.
-
When having to break a line of code over several lines, make continuation obvious by placing the concatenation operator at the end of the line.
-
Avoid placing more than one statement per line. One example of an exception to this is a C# for loop, as shown here:
for ( i = 0; i < 100; i++)
As you see in this section, there are many formatting standards that you can apply to make your code more readable and maintainable for other developers. These techniques and conventions take time and practice. However, by using the environment properly you can save many hours in the commenting and formatting of your code.
User Interface Standards
User interface standards help define and promote consistency within the user experience. The user experience is the end-to-end relationship that the user has with your application. This extends to the type of help provided and controls, layout styles, and colors used. You should be able to view a section of an application, and it should have a consistent look and feel so you cannot tell who created that section of the application. Good interface design adheres to the following design principles: the user should feel in control, and the interface should be direct, consistent, forgiving, aesthetic, and simple, as well as provide feedback.
User in Control
The user should always feel in control of, rather than being controlled by, the software. In this model, the user plays an active role instead of being reactive. For example, users should be able to choose or control automated tasks and be able to personalize aspects of the interface based on their skill and preferences. This could be user preferences for colors, fonts, and other options. The software should be as interactive and responsive as possible. For these reasons, the developer should avoid using modes when possible. A mode is a state that excludes general interaction. Sometimes a mode is the best or only design alterative. In these instances, make sure the mode is obvious, is visible, is the result of an explicit user choice, and is easy to cancel. Some examples of this design goal in action would be to create modeless secondary windows in which the user can perform actions while long-running processes execute in the background.
| Exam Watch | The user interface should allow users to make decisions about what they want to perform. |
Directness
Directness is when the design of the software allows users to change indicators that have special meaning and see how their actions affect the objects on the screen. Graphic information and choices reduce the mental workload of the user. An example of this would be to use, or allow the user to assign, custom icons to simulate status for a given action that has meaning to them. Familiar metaphors provide a direct and intuitive interface for user tasks. Metaphors support user recognition rather than recollection. Users remember a meaning associated with a familiar object more easily than they remember the name of a particular command. An example of a metaphor would be a magnifying glass being used to represent the ability to search for a specific item.
| Exam Watch | Use visual clues that the user will understand. |
Consistency
Consistency allows users to transfer existing knowledge to new tasks, learn new things more quickly, and focus more attention on tasks. When different elements of the interface are presented in a similar format, the user does not have to spend time trying to figure out the differences. This promotes a sense of a familiar and predictable interface. Consistency is applied to the whole interface, like names of commands, visual presentation, operational behavior, and placement of elements. Following are two tips for implementing consistent graphical interface items:
-
Present command functions using a consistent set of commands and interfaces. For example, avoid implementing a Copy command that immediately carries out an operation in one situation but in another situation displays a dialog box requiring user interaction to set a destination.
-
Use graphics that are consistent with what their metaphors imply so it is easy for the user to associate the correct behaviors with the objects. For example, a wastebasket icon is more intuitive than an incinerator icon to represent a repository that allows you to recover the objects placed in it.
Exam Watch Find someone that is graphically oriented to design a common color scheme or allow users to change colors externally in the solution.
Forgiveness
Forgiveness refers to the ability to learn by trial and error. An effective interface allows for interactive discovery. It provides an appropriate set of choices and warns users about potential situations where they could damage the system or data. Users very commonly make mistakes, so an effective design avoids situations that are likely to result in errors. An effective design also accommodates potential user error by making it easy for the user to recover from incorrect choices.
| Exam Watch | Users will always make mistakes, so design interfaces that allow them to recover. |
Aesthetics
The graphical interface design is an important part of an application’s interface. The interface should not have too many visual elements on the screen because everything on the screen is competing for the user’s attention. The interface should provide a coherent environment that clearly facilitates the user’s understanding.
Simplicity
Interfaces should be easy for the user to learn. An effective interface balances maximizing functionality and maintaining simplicity. One way to provide simplicity is to reduce the amount of information in the presentation. Use simple and direct description and phrases. By building on the user’s existing knowledge and experiences, things that are familiar often seem simpler than things that are not. You can help users manage visual complexity by using progressive disclosure. Progressive disclosure is when, with the use of careful organization, you present information only at the appropriate time. Instead of displaying a very large screen full of information, successive groups of information are added gradually as the user steps through the process.
| Exam Watch | It is much easier to add information to the screen gradually than give the user a screen full of information and expect them to understand. |
Feedback
Effective feedback helps confirm that the software is responding to input and communicates details that distinguish the nature of the action; it is timely in that it is presented as close to the point of the user’s interaction as possible. Even when the application is processing a particular task, it should provide the user with information about the state of the process. If it is an option, it should show the user how to cancel the process. Feedback allows the user to feel confident that the application is running while a process is executing.
| Exam Watch | Provide users with visual clues during long processes so they know that the application is still running. |
Checklist for a Good Client Interface
The following checklist applies the user interface principles discussed above. By applying these user interface principles, the user will determine whether the solution is a success or a failure.
-
Your application installs easily in a minimum number of steps.
-
Your application installation does not require the system to restart.
-
Users do not have to read a Readme file before using your application.
-
User-generated data files are stored by default in the My Documents folder.
-
Your application avoids cryptic file names that are visible to users.
-
Your application does not create folders outside of the Program Files folder.
-
Your application does not write files to the root of the hard disk.
-
If your application uses a disk cache, it also registers itself with the Disk Cleanup utility.
-
Your application does not include entries to its Help, Readme, and Uninstall files on the Start menu.
-
Your application does not install icons to the Windows desktop without the user’s permission.
-
If your application is run at startup, it loads without displaying splash screens and dialog boxes.
-
Your application does not use the taskbar notification area for status, launching applications or utilities, or querying properties. It uses the notification area only to alert the user of an important change.
-
Your application appropriately applies the color choices the user selected in Display Properties in Control Panel.
-
Your application is accessible from the keyboard.
-
Your application works correctly if the user increases the size of the default font.
-
Your application supports the standard set of keyboard shortcuts, where applicable.
-
Your application’s uninstall process leaves no remaining files or registry entries other than files created by the user.
-
Your application does not use jargon in its user interface text. It uses industry-specific or technical terms only if they are clearly understood by the user.
-
Your application adjusts appropriately when the user changes the display resolution or configures the display for multiple monitors.
Web Standards
Web standards use the above user interface concepts in the design of web sites. In addition, web sites require some specific content. For example, every page should include the name and e-mail address of a responsible person or entity (for example, support@myweb.com) or a link to a support page. To ensure that users can navigate back to the beginning, include a graphical or text link. Some design standards require the inclusion of a link to the home or parent page on all pages.
The use of style guides or templates help to provide visual consistency across pages. Use logical tags as they are intended rather than as graphical devices; for example, use the <H1> tag to create a true heading and not just to just accomplish bold text. The best way to divide the presentation into parts is to use Cascading Style Sheets (CSS). Avoid using too many graphics that may slow down your site. For a consistent look and feel, add navigational aids for users, such as “Table of Contents,” “Return to Top,” and “Next/Previous Page” for the individual pages, as appropriate. When writing text, be sparing in the use of bold, italics, and so on.
Some other suggested content is as follows:
-
Include a copyright statement.
-
Use a warning statement if a link will lead to a large document or image.
-
Include a “What’s New” section or link on the home page.
| Exam Watch | Including footers containing contact links on every page is important so the user can contact you if there is a problem. |
| Exam Watch | Names of action button should be consistent so the meanings are apparent. |
Testing Standards
Testing is the process of checking an application to ensure that it fulfills the requirements for the solution. This is also a way to ensure that the application meets the appropriate customer expectations. The purpose of testing is to reduce the cost of developing the application. Finding mistakes early can result in a considerable financial savings later, because it can cost 40 to 100 times more to resolve design mistakes later in the development process than correcting them during development. Ensuring that the application works the way the user expects it to work helps reduce the unpredictability of the application. Further, the user will require fewer hours of training and less support if the application tested properly. The primary goal of testing is to gain the customer’s loyalty and word-of-mouth market share.
Requirements-based testing provides the basis for all testing on the solution. The purpose is to identify the bugs that create or cause inappropriate behavior in the application. While creating requirements for testing, it helps to follow these simple rules:
-
All requirements should be unambiguous and interpretable only one way.
-
Requirements must be testable in a way that ensures that the application compiles.
-
Requirements should be binding because those requirements are things the customers needs.
Unit Testing
Unit testing is the process of taking the smallest pieces of an application and testing their individual functionality. Unit testing has proven its value by catching a large percentage of bugs. The basic concept is to test the units separately before integrating them into other modules and then testing among modules.
| Exam Watch | A known tool for performing unit testing is NUnit. |
A common way to use unit testing is to create testing fixtures (or harnesses) and testing stubs. The fixture simulates the calling of an assembly, which could be a DLL or an EXE file. The stub simulates the execution of individual functionality of the called assembly. The fixture and stub together are considered a unit. The unit is built around a single class or file. The creation of fixtures and stubs requires an investment of time, but the advantage is that together they automate the testing process. This process is the execution of tests against the code to determine the quality of the application, as well as the meeting of the stated requirements. By automating the testing process, you can discover errors when integrating components and errors in complex parts of the application. This type of testing allows for the retesting of code later on, after a large amount of code has been added. This is very helpful when there are multiple developers working on a solution. If there are components that are shared between parts of the application, the automated testing can determine if code has been broken in the process of integrating functionality.
Integration Testing
After the unit test for the components has been created and run, integration testing begins. In its most basic form, an integration test consists of two units that have been tested individually already and then are combined together to perform a task. This intercommunication is the integration that needs to be tested. Eventually all of the modules making up a task or process are tested together. The goal is to identify problems that occur when units are combined. Integration testing can be done in a variety of ways, but here are the three most common strategies:
-
The top-down approach requires that the highest-level modules be tested and integrated first. This allows high-level logic and data flow to be tested early in the process, and it tends to minimize the need for creating testing fixtures. However, the need for stubs can create problems when utilities are tested late in the development cycle. Later in the process, stubs are harder to create to test specific functionality if the utility being tested was designed incorrectly. Another disadvantage of this approach is that it provides poor support for early releases of limited functionality.
-
The bottom-up approach requires the lowest-level units to be tested and integrated first. These units are frequently referred to as common utility modules (or components). By using this approach, these modules are tested early in the development process and the need for stubs is minimized. This approach, like the top-down approach, provides poor support for early releases of limited functionality.
-
The umbrella approach requires that functional data and control-flow paths are tested and integrated first. The inputs are tested at the lowest level, as in the bottom-up approach. The outputs are then integrated in the top-down manner. This approach supports the early release of limited functionality. This approach minimizes the need for creating testing fixtures and stubs. The drawback of this approach is that it requires more regression testing because it is less systematic.
Exam Watch Integration testing causes more applications to fail than when it is not used, because the details involved can be very complex.
Regression Testing
When modifying an existing implementation of an application, you will want to perform regression testing. This is the rerunning of a test against the modified code to determine whether everything works as planned. Providing adequate coverage without wasting time should be a primary consideration when conducting regression tests. Some strategies and factors to consider during this process include the following:
-
Test fixed bugs promptly. The programmer might have handled the symptoms but not have gotten to the underlying cause.
-
Watch for side effects of fixes. The bug itself might be fixed, but the fix might have created other bugs.
-
Write a regression test for each fixed bug.
-
If two or more tests are similar, determine which test is less effective and get rid of it.
-
Identify tests that the program consistently passes and archive them.
-
Focus on functional issues, not on those related to design.
-
Make changes (small and large) to data and find any resulting corruption.
-
Trace the effects of the changes on program memory.
The most effective approach to regression testing is to develop a library of tests made up of a standard battery of test cases that can be run every time you build a new version of the program. Automated tests, as well as test cases involving boundary conditions and timing, almost definitely belong in your library. Periodically review the regression test library to eliminate redundant or unnecessary tests. Duplication is quite common when more than one person is writing test code. An example of this duplication is the concentration of tests that often develop when a bug or its variants are particularly persistent and are present across many cycles of testing. Numerous tests are sometimes written by different developers and added to the regression test library. These multiple tests are useful for fixing the bug, but when all traces of the bug and its variants are eliminated from the program, select the best of the tests associated with the bug and remove the rest from the library.
There are many types of tools available to handle this type of testing. The tools and tests you use depend on whether you are testing web or Windows client applications.
Standards help to create a consistent environment, as well as rules and the knowledge of what to expect. When new developers are added to the team, it is much easier to work from a practical set of standards that are clearly defined than to try to do a cold assessment of how the processes, documents, and user interface should be integrated.
| Exam Watch | Standards are a tremendous help when working with new developers or multiple teams of developers. |
EAN: 2147483647
Pages: 94