Certification Objective 4.03: Transforming Functional Specifications into Technical Specifications
The technical specifications are a set of reference documents that in the development phase is used to determine the scope of work and define development tasks. These documents may consist of artifacts that detail the class specifications, component models, metrics, and network topologies. Also included are interface definitions, configuration files, dynamic link library (DLL) and assembly names, strong names keys, and deployment elements.
This is a living document that is completed after the conceptual, logical, and physical design phases are complete. It is updated during the development process as components are completed. The sections that would be included in the technical specifications document include items listed in Table 4-1.
| Elements | Description |
|---|---|
| Architecture overview | Describes the architecture that will be implemented by the solution |
| Object model | Describes the object model of the solution |
| Interfaces | Contains the code and details of methods of each interface in the solution |
| Code flow | Describes the operation of each method in the solution |
| Error codes | Describes the error codes used in the solution for error handling |
| Error logging | Describes how various errors will be handled and logged in the solution |
| Configuration | Describes how the solution will be registered on the destination computer |
| Supporting documentation | Lists the documents that describe the solution, such as the functional specifications, and their locations |
| Issues | Describes any known issues with the solution |
During the planning phase, the following design goals should be considered: scalability, availability, reliability, performance, interoperability, and localization. These elements affect the design of the solution because some of the elements will be required, and others will be based on resources available. Other considerations are based upon the available technologies, knowledge, and skills of the development and support staff.
Scalability
Scalability is defined as the capability to increase resources to produce an increase in the service capacity. This means that a solution can add resources to handle additional demands without modifying the solution itself. A scalable solution must balance between software and hardware used to implement an application. The adding of resources is supposed to create a positive benefit, but it is possible to create negative results and show no increase in capacity or even cause decreases. For example, an application that implements load balancing, which is allowing the application to balance the load between multiple servers, can have a minimal gain if lengthy datasets are generated in response to the user’s request.
Approach
There are two common approaches to scalability. The first is called scaling up. This refers to achieving scalability by improving the user’s processing hardware. This translates into adding more memory, processors or migrating to larger servers. The primary goal is to increase hardware resources. However, there can be a maximum level achieved where the capacity makes no change. Typically, you can scale up without making application changes to source code.
The second approach is called scaling out. This refers to the distributing of the processing load across multiple servers. The collection of computers continues to act as the original configuration. The application should be able to execute without needing information about the server where it is located. This concept is called location transparency. Scaling out is a way to increase the fault tolerance of the application.
Guidelines
To design for scalability, use the following guidelines:
-
Design processes so that they do not wait. Processes should not wait longer than necessary. A process can be categorized as synchronous or asynchronous. A synchronous process waits for another process to complete before it continues. This is also known as a blocking call.
A synchronous process can encounter bottlenecks for resources. These bottlenecks can affect the performance and scalability of the application. The solution to this problem is creating asynchronous processes. This is also called a non-blocking call.
An asynchronous process spawns multiple processes that can finish at different times. Long running operations can be queued for completion later by other processes.
-
Design processes so that they do not compete for resources. The biggest causes of problems involve competition for resources. This condition is also known as a race condition. The resource could be memory, processing time, bandwidth, or database connections. There are two ways to handle this problem; one is by first sequencing resource usage to the most available resources and then to the least available resources last. The second option is to acquire resources as late as possible.
-
Design processes for commutability. Commutative operations are multiple processes that execute in any order and still obtain the same result. An example of this would be an operation that does not involve transactions. A busy site could create transaction tables that are updated periodically by the transaction records, allowing the database to reduce record locks. As shown in the following illustration, an example of a commutative operation would be as follows: when a product is ordered, instead of directly updating the Products table, the amount ordered is entered into the ProductTransactions table. Another process at predetermined time intervals will update the Products table with the appropriate values. This allows the application to process without having to lock the records when an update needs to be performed when a product is ordered. The locking for the transaction will happen less frequently in this scenario.

-
Design components for interchangeability. An interchangeable component is designed to release its resources, move into a pool managed by a resource manager, and to be reusable by a new client. Pooling, for Open Database Connectivity (ODBC), allows a set amount of database connections to be available when needed. This eliminates the time and cost required to create and destroy these objects after every use. These types of pools are controlled by resource managers. Resource managers are the controlling mechanisms for specific types of resources. These types of components are designed to be stateless—in other words, they do not need to save information between calls to the component.
-
An example of interchangeable components is a component designed for COM+ component pooling or using Open Database Connectivity (ODBC) connection pooling. With these types of object pooling, you can set the minimum and maximum pool size, and create timeout settings.
-
Partition resources and activities help prevent bottlenecks in the system. Partitioning activities can also ease the demand on resources such as processors and bandwidth. An example would be using Secure Sockets Layer (SSL) to provide a secure connection. SSL requires a high amount of overhead, and because of this you might decide to only provide SSL support for pages that require high security. This would allow you to create separate servers for handling SSL sessions. The drawback is that the system would be more complex and might require significant overhead for operating. In this situation, partitioning could be created by using many small components instead of using a few large components and by limiting the amount of cross-device communication.
Availability
Availability is a measure of how often the application is available to handle service requests as compared to the planned runtime. For some applications, high availability means that the application needs to work 24 hours a day, 7 days a week. Availability takes into account repair time because an application that is being repaired is not available for use. Advances in hardware and software have increased the quality of high-availability applications.
| Exam Watch | Availability does not address business continuation issues such as backups and alternative sites. |
The following table shows the measurements used for calculating availability.
| Name | Calculation | Definition |
|---|---|---|
| Mean Time Between Failure | Hours/failure count | Average length of time the application runs before failing |
| Mean Time To Recovery | Repair hours/failure count | Average length of time needed to repair and restore service after a failure |
The formula for calculating availability is:
Availability = (MTBF / (MTBF + MTTR)) x 100
An example of this would be a 24/7 web site that has two errors a week that each require an hour to fix. The resulting calculation would look like the following, based on a year’s time:
((8736 / 104) / ((8736 / 104) + .5)) x 100 = 99.4%
A common way to describe availability is by using 99.*. You will notice from our example the application is down for 104 hours during the year, but the percentage is still high, so these numbers can be deceiving. To determine the level of availability that is appropriate for your application, you need to answer these questions:
-
Who are the customers of the application? What are their expectations from the application?
-
How much downtime is acceptable?
-
Do internal company processes depend on the service? An example would be to perform data maintenance during the hours of 2:00 A.M. and 4:00 A.M. because the user population is not using the application and the impact is minimized.
-
What are the schedule and budget for developing the application?
Designing for availability is intended to prevent and detect errors before they happen. Availability can be ensured by providing multiple routes to application processes and data. Use only tested and proven processes that support the application throughout the solution life cycle. Some techniques used for designing for availability include:
-
Reduce planned downtime by using rolling upgrades. Rolling upgrades refers to taking a specific server down in a cluster, updating the component, and bringing the server back online. A cluster consists of multiple computers that are physically networked and logically connected using cluster software. The other server during this time is taking the workload without the user experiencing any downtime. This is usually used for applications that scale out.
-
Reduce unplanned downtime with clustering. Clustering is technology for creating high-availability applications. Clustering allows a multiple server web site to withstand failures with no interruption in service. This allows one of the machines in a cluster to be taken down for repairs and the other machines in the cluster will take its responsibilities. This can cause a slight delay for the customers connected. Cluster software can provide this functionality if the service and application have been designed to be cluster-aware and assigned to a cluster.
-
Use network load balancing. Network load balancing (NLB) is used to distribute traffic evenly across available servers, such as in web farms. The farm has multiple web servers and NLB balances the load between the web servers, so if one is busy the next one in the list is used instead. If one of the machines needs to be taken down for maintenance, other machines can be assigned to the farm to prevent an interruption of service.
-
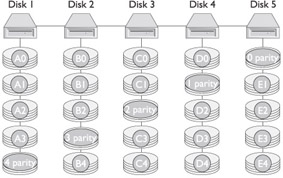
Use a redundant array of independent disks (RAID) for data stores. RAID uses multiple hard drives to store data in multiple places. If a disk fails, the application is transferred to a mirrored image and the application continues running. The failed disk can be replaced or recovered without stopping the application, which defines RAID 0. Another type of RAID is RAID 5, which is like RAID 0 except it is striping with parity. The following illustration demonstrates how RAID 5 is stored. For high performance database systems a combination of RAID 0 and RAID1 can be used, known as RAID 10, which combines striping and mirroring.
-
Isolate mission-critical applications. This is an application that consumes many resources and is of vital importance to the organization. Each of the resources that the mission-critical application requests can affect the performance and availability of applications sharing the same resources. It is recommended that mission-critical applications use dedicated infrastructures and networks to prevent resource contentions between resource intensive applications.
-
Use queuing. Queuing enables your application to communicate with other applications by sending and receiving asynchronous messages. Queuing guarantees message delivery, regardless of connectivity that exists. Queuing allows an application to manage peak workloads that require a lot of hardware. More routes set up for the messages allows for successful and immediate message completion.
Reliability
Reliability of an application refers to the ability of the application to provide accurate results. Reliability and availability are very closely related. While availability measures the capacity to handle all requests, reliability measures how long the application can execute and produce expected results without failing. Unreliable systems are difficult to maintain or improve because the failure points are typically hidden throughout the system.
Reliability of the application is dependent upon the availability of individual components, because all of the systems are related. Application failures can occur for many reasons:
-
Erroneous code
-
Inadequate testing
-
Change management problems
-
Operations errors
-
Lack of ongoing monitoring and analysis
-
Lack of quality software engineering processes
-
Interaction with external services or applications
-
Changing operation conditions, such as usage level or workload changes
-
Unusual events, such as security failures and broadcast storms
-
Hardware failures, such as disk, controllers, and so on
-
Environmental problems (power, cooling, fire, flood, or natural disasters)
When considering the design for reliability of a solution, you have to examine the expected usage of the solution. Create a profile for the expected usage and design the solution from the profile. This profile should include how particular services are provided, an evaluation of failure scenarios, and designs for preferred alternatives. The profiles should consider the application’s interactions with other applications, as well.
It is difficult to determine reliability problems for systems that have not been developed, but analyzing currently running applications in the organization can give clues to issues. Such analysis reveals the failure frequency and distribution, root causes and possible improvements for existing systems. This information can be used to create a reliable solution.
Creating a high-reliability application depends on the development and testing during the development and stabilization stages of the life cycle. A reliable solution ensures that the data input is correct and expected results happen consistently. The following tasks can help you create a reliable application:
-
Putting reliability requirements in the specifications.
-
Using a good architectural infrastructure.
-
Including management information in the application.
-
Using redundancy.
-
Using quality development tools.
-
Using reliability checks that are provided by the application.
-
Implementing error handling.
-
Implementing graceful degradation. Graceful degradation refers to the process of adding functionality to your application to enable compatibility with earlier technologies, mainly browsers.
Performance
Performance is defined by metrics such as transaction throughput and resource utilization. Performance is typically defined in terms of response times for users. To determine your performance goals, you should answer the following questions:
-
What is the business goal? An example of this would be the solution should handle more orders each week, with an expected increase in revenue. This can then be converted into a performance goal for each functional area.
-
What is the critical functionality of the solution? Identifying critical features allows you to prioritize the system design. You might decide to degrade the performance of a low priority feature to maintain or increase the performance of a higher priority features.
-
What are the features required by different sets of users? Because of varying expectations, the performance requirements of the application can differ. You need to determine the relationship between each functional area and performance goal. For example, in a solution that uses database stores, the organization expects the solution to store valid data quickly. This converts into a performance goal of the solution that the database has fast inserts and updates to the database. Creating profiles helps in partitioning and developing accurate tests for the solution.
Exam Watch For testing, performance goals must be expressed in a way that is measurable in your testing routines.
Performance requirements must be defined before the team proceeds to the developing phase. Good performance requirements must identify project constraints, determine services that the application will perform, and specify the load on the application.
-
Identifying constraints Constraints in the project include budget, schedule, infrastructure, and the choice of development tools or technologies. You need to design an application so that it meets its performance goals within the limitations of the constraints. For example, a processor intensive application might not be able to be designed if the user’s hardware cannot support the application. Instead of changing some aspects of a project to improve performance, you can modify aspects of the project to improve performance.
-
Determining features The features of an application correspond to use cases and usage scenarios. For each usage scenario that affects the performance of the application, specify what the user does and how the system responds. This includes how databases and other system services are accessed. This information can help create tests for measuring performance that resemble actual usage of the application as closely as possible.
-
Specifying the load You can specify the load of the application as the number of clients that will use the application. In addition, examine how the load might vary over time. You can use the load to define the performance metrics of the application.
Selecting a Development Strategy
Before the development phase begins, it is important to verify the development and test environments. The test environment should ideally mirror the production environment. It is important to maintain separation between the production environment and the development and test environments to prevent occurrences in development and testing from affecting live production systems.
The development plan describes the solution development process. It identifies the tasks necessary to create and assemble the components of the solutions. This complements the functional specifications that provide the technical details of what will be developed. The plan also provides consistent guidelines and processes to the teams creating the solution. Some of the key sections of the development plan are:
-
Development objectives Defines the primary drivers that were used to create the development approach and the key objectives of that approach.
-
Overall delivery strategy Describes the overall approach to delivering the solution.
-
Tradeoff approach Defines the approach for making design and implementation of tradeoff decisions.
-
Key design goals Identifies the key design goals and the priority of each goal.
-
Development and build environment Describes the development and build environment and how it will be managed.
-
Guidelines and standards Lists and provides references to all standards and guidelines to be used for the project.
-
Versioning and source control Describes how versioning and source control will be managed.
-
Build process Describes the incremental and iterative approach for developing code and for builds of hardware and software components.
-
Components Provides a high-level description of the set of solution components and how they will be developed.
-
Configuration and development management tools Identifies all the development tools the team will use during the project.
-
Design patterns Identifies the design patterns or templates that the team will use for this project and their sources.
-
Development team training Identifies the training necessary to ensure that the development team will successfully develop the solution.
-
Development team support Identifies the various types of support the development team will require, the sources of that support, the amount of support of each type that the team will require, and the estimated schedule for support.
The development plan includes strategies for auditing and logging, error handling, integration, globalization, localization, data storage, and state management. These priorities are included in various aspects of the sections of the development plan. The validation of the development plan is to make sure that all of the business rules for the solution are achieved.
Select Strategies for Auditing and Logging
Application monitoring is used to ensure that the application is functioning correctly and performing at an optimal level. Automated monitoring enables identification of failure conditions and potential problems. The auditing of an application is typically the responsibility of administrators within the operations team, and the operations team must establish guidelines and procedures for application monitoring. Communicating these procedures to the development team allows both teams to work together to log and monitor information that can assist problem discovery and diagnosis.
Error logging is closely related to monitoring and is a development function. The development team must communicate with the operations team to inform them of the types of error logs generated by the application. Together, both teams must decide on the appropriate logging mechanisms, then develop and monitor applications accordingly.
| Exam Watch | Understanding the use of error logging and performance monitors as an important method of collecting information. |
A monitoring plan defines the processes by which the operational environment will monitor the solution. It describes what will be monitored, how it will be monitored, and how the results of monitoring will be reported and used. Once the details of the monitoring process are completed, they will be incorporated into the functional specifications and then included in the solution design. Some key sections of the monitoring plan are:
-
Resource monitoring identifies scarce resources that need monitoring and determining of thresholds.
-
Performance monitoring defines the metrics to be gathered for the performance evaluation of components in the solution.
-
Trend analysis is the examination of the data to determine how parts of the system are used under various situations.
-
Detecting failures describes how the development, operations, and maintenance teams will use the functional specifications and user acceptance criteria to detect failure incidents.
-
Event logs describe how the system will capture information and how it will be reviewed.
-
What tools are necessary for the teams to use to detect, diagnose, and correct errors and to improve a solution’s performance.
Select Strategies for Error Handling
The reporting of errors is contained in the monitoring plan. The terms error and exception are often used interchangeably. In fact, an error, which is an event that happens during the execution of code, interrupts or disrupts the code’s normal flow and creates an exception object. When an error interrupts the flow, the program tries to find an exception handler—a block of code that tells it how to react—that will help it resume the flow. In other words, an error is the event; an exception is the object that the event creates.
The level of exception handling depends on the level of monitoring required. There are several methods for handling these errors. First, a generic catchall error handling would catch all errors that occur in the solution. This could allow a centralized handler to report the error, but it would be unable to respond to the action and gracefully recover. The second option is to code the application where no exceptions are thrown outside of the class that the error resides in. The drawback with this method is that you would have to have all of your functions return some type of status and it would not allow for bubbling of event handling. The last option is a combination of these two methods. You can create a global error handler that is used for reporting purposes and acceptable graceful solution actions, while the handling of errors can be either thrown to the calling client or handled inside of the respective block of code and performing alternative actions instead.
Select Strategies for Integration
Integration is the interaction of heterogeneous applications, meaning the application needs to interact with existing applications. This can also be called interoperability. Interoperability reduces operational cost and complexity and takes advantage of existing investments. When designing for interoperability, you gain the follow advantages:
-
Reduces operational cost and complexity. The customer can continue to work in mixed environments for the near future. A mixed environment is where applications are using different operating systems and platforms.
-
The ability for different systems to operate in the same environment together reduces the cost of developing and supporting a heterogeneous infrastructure.
-
Enables diverse deployment. A business requirement can state that the application must support external applications that exist on other platforms. An interoperable application enables the organization to continue using the diverse applications that address specific requirements.
-
Uses existing investments. Typically, customers have large and diverse ranges of systems installed in their environments and move to a new platform gradually. In a typical environment, a new application must be able to interact with previous applications and might be web aware and need access from a different hosting environment such as an IBM mainframe.
-
Extends the functionality of existing applications and protects the investments that the organizations have made.
To integrate heterogeneous applications, you need to consider the following types of interoperability:
-
Network interoperability Refers to the ability of multiple vendor systems to communicate with each other without having to use common protocols. Implementing technologies or standards such as HTML, XML, or web services to make use of the Internet can make your applications independent of programming language, platform, and device.
-
Data interoperability Refers to the ability of applications to access and use data stored in both structured and unstructured storage systems such as databases, file systems, and e-mail stores. Enterprise applications often require the sharing of data between disparate data sources and multiple applications. Published data exchange standards, such as cascading style sheets, OLE DB, and XML, allow data access to both Windows-based and non-Windows–based data sources.
Exam Watch Integration between systems is a very important concept. Most commonly integrations are accessing an existing mainframe.
-
Applications interoperability Refers to the infrastructure required to ensure interoperability between applications written for different platforms and languages. These new applications need to work with a wide variety of existing applications. One of the methods of enabling application interoperability is by using Common Language Specification (CLS). CLS is a standard that is currently met by more than 20 different languages, including C#, VB.NET, J++, and COBOL.
-
Management interoperability Refers to the tasks of user account management, performance monitoring, and tuning for heterogeneous applications in the organization.
Select Strategies for Globalization
Globalization is the process of designing and developing an application that can operate in multiple cultures and locales. Culture and locale are defined by rules and data that are specific to a given language and geographical area. Globalization involves:
-
Identifying the cultures and locales that must be supported
-
Designing features that support those cultures and locales
-
Writing code that executes property in all the supported cultures and locales
Globalization enables applications that can accept, display, and output information in different language scripts that are appropriate for various geographical areas. To globalize these functions, you use the concept of cultures and locales. These rules include information about:
-
Character classification
-
Data and time formatting
-
Numeric, currency, weight, and measure conventions
-
Sorting rules
Some of the issues that you need to consider while planning for globalization are:
-
Language issues are the result of differences in how languages around the world differ in display, alphabets, grammar, and syntactical rules.
-
Formatting issues are the primary source of issues when working with applications originally written for another language, culture, and locale. Developers can use the National Language Support (NLS) APIs in Microsoft Windows or the System.Globalization namespace to handle most this automatically. These factors include addresses, currency types, dates, paper sizes, telephone numbers, time formats, and units of measure.
The following best practices provide some information about globalization practices:
-
Use Unicode as your character-encoding standard to represent text including all application process data, whether text or numerical. Different cultures and locales might use different data encoding techniques.
-
Unicode is a 16-bit international character-encoding standard that covers values for more than 45,000 characters that are defined out of a possible 65,535. It allows each character in all the required cultures and locales to be represented uniquely.
When implementing a multilingual user interface, you design the user interface to open in the default UI language, and offer the option to change to other languages, users who speak different languages can quickly switch to the preferred interface. This is a common practice for web applications. For .NET Windows applications, the Windows operating system can change its locale and the .NET application will automatically change, provided support for the locale has been added.
Cultural and political issues include disputes related to maps, which can induce governments to prevent distribution in specific regions. To avoid such issues:
-
Avoid slang expressions, colloquialisms, and obscure phasing in all text.
-
Avoid maps that include controversial regional or national boundaries.
Select Strategies for Localization
Localization is the process of adapting a globalized application to a specific locale, using separate resources for each culture that is to be globalized. A resource file contains culture-specific user interface items that are provided to an application as a text file, a .resx file, or a .resource file. An application prepared for localization has two conceptual blocks: the data block and the code block. The data block contains all user-interface string resources. The code block contains the application code that is applicable for all cultures and locales and accesses the correct resources file for the culture currently selected in the operating system. To create a localized version of an application, ensure that the code block is separate from the data block and the application code can read data accurately, regardless of culture and locale. Some issues to consider are:
-
String-related issues Strings are the text displayed in the various elements in an application’s user interface, such as menus and dialog boxes. For example, an error statement comprised of multiple concatenated strings in one language could be rearranged in a totally different order for another, making the concatenated result incorrect.
-
User interface issues:
-
The length of a message might differ in different languages.
-
Menu and dialog boxes might become larger because of localization.
-
Icons and bitmaps must use symbols that are internationally accepted and convey the same meaning.
-
The keyboards used in different locales might not have the same characters and keys.
-
UI controls should not be hidden or used as parts of strings.
-
Some best practices to consider are:
-
Examine Windows messages that indicate changes in the input language, and use that information to check spellings, select fonts, and so on.
-
Detect the culture that your application uses to handle the formatting and change it to correspond to the culture that the user interface application supports.
-
Store all user interface elements in resource files so they are separate from the program source code.
-
Use the same resource identifiers throughout the life of the project. Changing identifiers makes it difficult to update localized resources from one version to another.
-
Avoid text in bitmaps and icons. By having text in the image, the image will have to be recreated for each locale supported, instead of having a neutral image with the text located in resource files.
-
Test localized applications on all language variants of the operating system.
Select Strategies for Data Storage
Data storage or data store is typically a database in which data is organized and stored. Data requirements for the solution specify how data will be structured, stored, accessed, and validated in the solution. With the requirements in mind, a technology for storing the data needs to be selected. The physical data model of a database management system (DBMS) defines the internal structure that the DBMS uses to keep track of data. The various types of physical data models that commonly exist are:
-
Flat-file A flat-file database access stores all data in a single file as a set of rows and columns. There is no relationship between multiple flat-file databases because each database exists without knowledge of any other database. They can provide fast updates and retrieval because they support an indexing method called the indexed sequence access method (ISAM). Legacy mainframe databases, as an example, implement ISAM storage technology.
-
Hierarchical Hierarchical databases store a wide range of information in a variety of formats. Examples of this include Microsoft Exchange and the Windows Registry. This type of storage is extensible and flexible. This option is good when the information storage requirements vary greatly.
-
Relational In a relational model database, data is stored in multiple tables and columns. Relational databases combine the advantages of both flat-file and hierarchical databases by providing good performance and flexibility of storage. The relational model tends to be the most popular because tables can be linked together with unique values. Data integrity is maintained by applying rules and constraints.
Select Strategies for State Management
State management is the process by which information over multiple requests is maintained. State management is most commonly used in ASP.NET but does not have to exclusively be used there. ASP.NET provides multiple ways to maintain state between server round trips. Choosing among the options for state management depends on your application. Some criteria to consider include:
-
How much information do you need to store?
-
Does the client accept persistent or in-memory cookies?
-
Do you want to store the information on the client or server?
-
Is the information sensitive?
-
What sorts of performance criteria do you have for your application?
.NET supports various client-side and server-side options for state management. Client-side options are the ViewState property, hidden fields, cookies, and query strings. These options are ASP.NET specific. Server-side options include application state, session state, and the database. These options are not available for WinForm applications; a WinForm application can use client-side XML files for state management.
| Exam Watch | Application state, session state, and using the database are not options for handling state for Windows forms. These are ASP.NET specific options. |
Client-side state management conserves the use of server resources. These options tend to have minimal security but faster server performance because demand on server resources is minimal. There are limits on how much information can be stored using the client-side options. Table 4-2 summarizes client-side state management options and suggested uses.
| Method | Use When |
|---|---|
| View state | You need to store small amounts of information for a page that will post back to itself and provide a basic level of security. |
| Hidden fields | You need to store small amounts of information for a page that will post back to itself and security is not an issue. |
| Cookies | You need to store small amounts of information on the client and security is not an issue. |
| Query string | You are transferring small amounts of information from one page to another and security is not an issue. |
| XML file | You need to store application user settings and security settings. |
Server-side options for storing page information tend to have higher security than client-side, but they require more server resources. Table 4-3 summarizes server-side state management options and when you should consider using them.
| Method | Use When |
|---|---|
| Application state | You are storing infrequently changed global information that is used by many users, and security is not an issue. Do not store large quantities of information in application state. |
| Session state | You are storing short-lived information that is specific to an individual session, and security is an issue. Do not store large quantities of information in session state. |
| Database | You are storing large amounts of information, managing transactions, or the information must survive application and session restarts. |
Selecting a Deployment Strategy
The deployment plan describes the factors necessary for a problem-free deployment and transition to ongoing operations. It includes the processes of preparing, installing, training, stabilizing, and transferring the solution to operations. These processes include details of installation scenarios, monitoring for stability, and verifying the soundness of the new solution. Deployment is the beginning of the realization of business value for a given solution.
Some key sections of the deployment plan are:
-
Deployment scope Describes the solution architecture and scale of deployment.
-
Seats Describes the magnitude of the deployment in terms of sites, number of workstations, countries, and regions.
-
Components Lists and describes the components to be deployed and any critical dependencies among them.
-
Architecture Describes the solution’s architecture and how it might affect deployment.
-
Deployment schedule Identifies the critical dates and anticipated schedule for the deploying phase.
-
Installation Defines how the overall deployment will occur.
-
Deployment resources Identifies the workforce that will be needed to complete the deployment and the sources of the personnel.
-
Solution support Describes how the users will be supported during the deployment.
-
Help desk Describes the support provided to users and applications by the help desk team.
-
Desktop Describes any changes in current workstation application support that might be required during deployment.
-
Servers Describes any changes in current server support that might be required during deployment.
-
Telecommunications Describes any changes in current telecommunication support that might be required during deployment.
-
Coordination of training Describes how end-user and support staff training is coordinated with the deployment schedule.
-
Site installation process Describes the four phases of site installation: preparation, installation, training, and stabilization.
Select Strategies for Deployment, Such as Coexistence Strategies
The .NET framework provides a number of basic features that make it easier to deploy a variety of applications. These features include:
-
No-impact applications This feature provides application isolation and eliminates DLL conflicts. By default, components do not affect other applications.
-
Private components by default By default, components are deployed to the application directory and are visible only to the containing application.
-
Controlled code sharing Code sharing requires you to explicitly make code available for sharing rather than being the default behavior.
-
Side-by-side versioning Multiple versions of a component or application can coexist, you can choose which versions to use, and the Common Language Runtime enforces versioning policy. This type of versioning is only available for when the assemblies are installed into the global assembly cache.
-
XCOPY deployment and replication Self-described and self-contained components and applications can be deployed without registry entries or dependencies.
-
On-the-fly updates Administrators can use hosts, such as ASP.NET, to update program DLLs, even on remote computers.
-
Integration with the Microsoft Windows Installer Advertisement, publishing, repair, and install-on-demand are all available when deploying your application.
-
Enterprise deployment This feature provides easy software distribution, including using Active Directory.
-
Downloading and caching Incremental downloads keep downloads smaller, and components can be isolated for use only by the application for zero-impact deployment.
-
Partially trusted code Identity is based on the code rather than the user, policy is set by the administrator, and no certificate dialog boxes appear.
The deployment of a .NET application can be divided into two phases: packaging and distribution. Packaging is the creating of a manifest of required files necessary for distribution. Distribution is the actual process of moving the required files to the appropriate location(s) necessary for the solution.
The .NET framework has the following options for packaging applications. First as a single assembly, or as a collection of private assemblies, which allows the use of .dll or .exe files in their original state. Second, as cabinet (.cab) files, which are a compressed version of the required files. This option makes the distribution or download less time consuming. Lastly, as a Microsoft Windows Installer 2.0 package or in another installer format, which creates .msi files that can be used with Windows Installer.
After preparing the package, the files need to be distributed. There are three primary ways to distribute applications. The first option is the simplest, using XCOPY or FTP. Because Common Language Runtime applications do not require registry entries and are self-describing, the files can just be copied to the appropriate directory, where the application will be running from. The second is a code download, which can be accomplished by using web installers that allow the user to copy files to the client or enable automatically updating applications a location to download updates. Lastly, by using an installer application, you can install, repair, or remove .NET framework assemblies in the global assembly cache and in private directories.
There are three common deployment scenarios: the deployment of an ASP.NET application, a Windows Forms application, and a Windows Forms control by downloading the application to the client. The first, an ASP.NET application, is a package containing the application and .DLLs. These are distributed by XCOPY or FTP. The second, a Windows Forms application, is packaged into a Microsoft Windows Installer package (.msi) and distributed with Windows Installer. The last, a Windows Forms control or other code, is packaged into compressed CAB files (.cab) or compiled libraries (.dll) and the distribution is a file download from the source.
Windows Installer
One of the tools that has been mentioned as a distribution means is the Windows Installer. This is a powerful tool for the setup and distribution of assemblies. The Windows Installer packages can install assemblies to the global assembly cache or to a specific application location. The ability to isolate applications is an important part of the .NET framework. Isolating applications allows for multiple versions of components that need to be distributed.
Windows Installer has the following features that support Common Language Runtime assemblies:
-
Installation, repair, or removal of assemblies in the global assembly cache (GAC). The global assembly cache allows for .NET assemblies to be shared between multiple applications.
-
Installation, repair, or removal of assemblies in private locations designated for particular applications.
-
Rollback of unsuccessful installations, repairs, or removals of assemblies.
-
Install-on-demand of strong-named assemblies in the global assembly cache.
-
Install-on-demand of assemblies in private locations designated for particular applications.
-
Patching of assemblies.
-
Advertisement of shortcuts that point to assemblies.
Windows Installer treats an assembly built with the Microsoft .NET framework as a single Windows Installer component. All the files that constitute an assembly must be contained by a single Windows Installer component that is listed in the component table of the Installer. When installing assemblies into the global assembly cache, the Installer does not use the same directory structure and file versioning rules that it uses to install regular Windows Installer components. Instead, assemblies are added and removed from the global assembly cache as a unit—that is, the files that constitute an assembly are always installed or removed together. With private assemblies, these files can be removed and updated individually. Windows Installer uses a two-step transactional process to install products containing assemblies, which enables the installer to roll back unsuccessful installations.
Assembly Versioning
All versioning of assemblies that use the Common Language Runtime is done at the assembly level. The specific version of an assembly and the versions of dependent assemblies are recorded in the assemblies manifest. The default policy is for the runtime to only use versions they were built and tested with. This can be overridden by creating an explicit version policy in the configuration files. These configuration files are the application configuration file, the publisher policy file, and the machine configuration file.
The runtime performs the following steps to resolve an assembly-binding request. This is where the application locates and loads dependent assemblies.
-
Checks the original assembly reference to determine the version of the assembly to be bound.
-
Checks for all applicable configuration files to apply version policy.
-
Determines the correct assembly from the original assembly reference and any redirection specified in the configuration files, and determines the version that should be bound to the calling assembly.
-
Checks the global assembly cache, codebases specified in configuration files, and then checks the application’s directory and subdirectories using the probing rules.
Exam Watch Versioning is done only on assemblies with strong names.
Each assembly has a version number. As such, two assemblies that differ by version number are considered by the runtime to be completely different assemblies. This version number is physically represented as a four-part number with the following format:
<major version>.<minor version>.<build number>.<revision>
For example, version 1.2.200.0 indicates 1 as the major version, 2 as the minor version, 200 as the build number, and 0 as the revision number.
The version number is stored in the assembly manifest along with other identity information, including the assembly name and public key, as well as information on relationships and identities of other assemblies connected with the application. When an assembly is built, the dependency information for each assembly that is referenced is stored in the assembly manifest. The runtime uses these version numbers, in conjunction with configuration information set by an administrator, an application, or a publisher, to load the proper version of a referenced assembly. The runtime distinguishes between regular and strong-named assemblies for the purposes of versioning. Version checking only occurs with strong-named assemblies. A strong-named assembly adds a public key and a digital signature to the assembly. A strong-named assembly is guaranteed to be globally unique.
Exercise 4-1: Creating Strong-Named Assemblies and Versioning Assemblies
In this exercise, you will examine how versioning works with .NET. The .NET framework allows applications to support multiple versions of dependent assemblies. This allows the application to determine which version of the assembly it needs to execute.
-
Start Visual Studio .NET.
-
Select File | New | Project | Visual Basic Projects | Windows Application.
-
Change the name of the project to WinVersioningApp and change the location to c:\.
-
Click More and make sure that Create Directory For Solution is checked.
-
In New Solution Name, type Versioning and click OK. A new project and solution is created.
-
Select File | Add Project | New Project | Visual Basic Projects | Class Library.
-
In the Name field, type VersionLibrary and click OK. The solution now has two projects, VersionLibrary and WinVersioningApp.
-
Modify the AssemblyVersion line of AssemblyInfo.vb in the VersionLibrary project to resemble the following example. The AssemblyInfo.vb file contains descriptive information about the assembly being built. It can contain information about who built it and why and strong-name assembly keys. The change that will be made will prevent the version number from automatically incrementing.
From <Assembly: AssemblyVersion("1.0.*")> To <Assembly: AssemblyVersion("1.0.0.0")> -
Add the following code to the Class1.vb. The code should look like the following illustration.
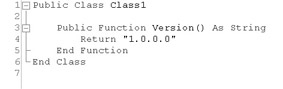
Public Function Version() as String Return "1.0.0.0" End Function
-
To create a strong-name key for the VersionLibrary project, select Start | All Programs | Microsoft Visual Studio .NET | Visual Studio .NET tools | Visual Studio .NET Command Prompt. A command prompt window will display. This window has set up the path environment for the DOS environment for .NET.
-
Type cd\ and press ENTER.
-
Type SN -k StrongName.snk and press ENTER. This creates a key file for creating strong-named assemblies.

-
Copy StrongName.snk to your project directory c:\Versioning\VersionLibrary.
-
Add the following line at the end of the AssemblyInfo.vb file in VersionLibrary. This syntax indicates where the StrongName.snk file is located. After the project is built, the assembly is two levels down from the project, the signing of the assembly is performed, and the correct location of the signing key must be found.
<Assembly: AssemblyKeyFile("..\\..\\StrongName.snk")> -
Right-click VersionLibrary project and select Build. The ClassLibrary project should build with no problems.
-
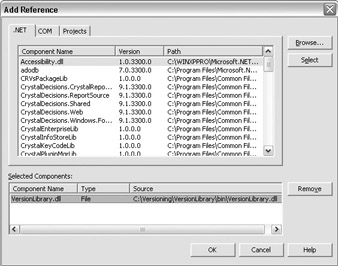
In WinVersioningApp, create a reference to VersionLibrary.
-
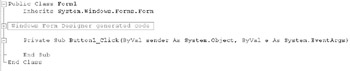
Add a button to Form1.vb on the WinVersioningApp project and double-click on the button in the designer.
-
In the event handler, type the following:
Private Sub Button1_Click(ByVal sender As System.Object, ByVal e As System.EventArgs) Handles Button1.Click Dim ox As New VersionLibrary.Class1() MsgBox(ox.Version) End Sub
-
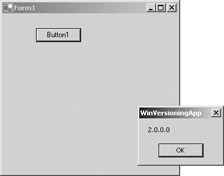
Build and run WinVersioningApp. Click the button on the screen (shown as Button1 in the following illustration) and a message box should appear with 1.0.0.0 as the displayed text.

-
In the .NET command prompt window, locate the path to your VersionLibrary .dll assembly and add the file to the global assembly cache. Type the following command:
GACUTIL /i VersionLibrary .dll
-
Version 1.0.0.0 is now in the global assembly cache. Change the version number in the Assemblyinfo.vb file on VersionLibrary to 2.0.0.0.
-
Change the Version function in Class1 to return “2.0.0.0” and build VersionLibrary and not the solution, by selecting the VersionLibrary project and selecting Build | Build VersionLibrary.

-
Close Visual Studio.NET and run WinVersioningApp again. It still displays 1.0.0.0 when the button is clicked on the form.
-
In the .NET command prompt window, execute the following command where the VersionLibrary.dll is located.
GACUTIL /i VersionLibrary.dll
-
Type the following command in the command window. This command lists all components installed into the global assembly cache that start with the name VersionLibrary.
GACUTIL /l VersionLibrary
-
A list displays the two VersionLibrary .dll that you created, each with different version numbers.
-
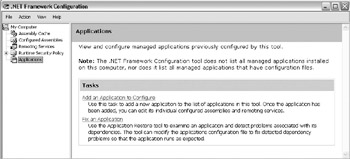
Select Start | All Programs | Administrative Tools | Microsoft .NET Framework Configuration. This .NET administrative tool allows for the viewing and configuring of .NET assemblies and code access security policies.
-
Select Application | Add An Application To Configure. A dialog box appears showing all .NET applications that have run on your machine.
-
Select WinVersioningApp.exe | Expand Node By WindowsApplication.exe.
-
Select Configured Assemblies | Action Menu Item | Add.
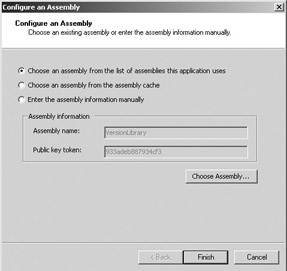
-
Select Choose Assembly. In the window that opens, select the first item (“Choose an assembly from the list of assemblies this application uses”), then click Choose Assembly. Highlight VersioningLibrary and click Select. Click Finish.
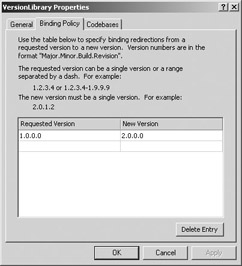
-
The VersionLibrary Properties window is displayed. Click the Binding Policy tab. Under Requested Version, enter 1.0.0.0. Under New Version, enter 2.0.0.0. Click OK to close the window.
-
Run WinVersioningApp. This time, the result from the button click will be 2.0.0.0 instead of 1.0.0.0.
In this exercise, you created a solution with a Windows application and a class. You added assemblies into the global assembly cache and then rebinded the assembly’s dependent files to other versions.
Side-by-Side Execution
Side-by-side execution is the ability to run multiple versions of the same assembly simultaneously. Components that can run side by side do not have to maintain backward compatibility. This allows applications to use newer components when necessary. For example, a component called Employee supports side-by-side executing. Between version 1.0.0.1 and 1.0.0.2 some incompatibilities were introduced. Multiple releases of the application have followed, and some releases support version 1.0.0.1 and others support 1.0.0.2. Each release can use the appropriate version needed while still having multiple versions of the Employee component installed. For side-by-side execution to occur, the necessary assemblies must be installed in the global assembly cache (GAC).
Support for side-by-side storage and execution of different versions of the same assembly is an integral part of versioning and is built into the infrastructure of the runtime. Because the assembly’s version number is part of its identity, the runtime can store multiple versions of the same assembly in the global assembly cache and load those assemblies at runtime. Although the runtime provides the ability to create side-by-side applications, it is not an automatic process.
There are two types of side-by-side execution:
-
Running on the same computer In this type of side-by-side, multiple versions of the same application run on the same computer at the same time without interfering with each other.
-
Running in the same process An application running in the same process means that single applications with multiple dependencies can run multiple versions of the same component. An example of this would be web applications.
Select Strategies for Licensing
License specifications provide details for the developing and deploying phases on the number of licenses necessary for compliance. It helps to determine the purchasing requirements early in the project for both hardware and software that will be required for the solution. Purchasing specifications developed early in the process ensure that there is sufficient time for the approval process and that vendors have sufficient time to deliver hardware so the schedule will not be affected. Depending on the type of solution and number of users who will use the solution, you need to specify the number of licenses of any software that might be used.
Another area of concern is licensing of your solution. If you are developing components, your components can be licensed to ensure that only valid users can develop and use them. There are other models for licensing, such as a one-time license, subscription models for a specific time period or number of uses, or licensing based on the number of users or processors.
Select Strategies for Data Migration
Data migration is the moving of data from an existing solution to a new solution. When data from an existing solution is identified as part of the new solution, data migration becomes a critical element. A well-tested migration is necessary to prevent the introduction of risks that were never accounted for during the planning. More information about risk planning is in Chapter 1.
A document called the migration plan describes the migration from the existing systems to the new solution. Migration is typically more important in infrastructure deployments, but can be just as important in application development projects. A migration plan includes the following sections:
-
Migration strategies Describe how the migration process will be guided. These strategies are generally geared towards multiple software releases and preparation for each. The strategy can be organized in sections to allow for multiple software releases of solution components.
-
Tools Identify what will be used to support the migration strategy.
-
Migration guidelines Describe the constraints, validations, and order for the data migration.
-
Migration process Describes the preparatory activities in addition to the migration stages necessary to complete the migration process.
-
Test environment Describes an environment that mirrors the production environment.
-
Rollback plan Describes how a customer can roll back to the prior configuration if problems occur during migration.
Exam Watch A common way to migrate data is to use Microsoft SQL Data Transformation Services (DTS) packages.
Selecting a Security Strategy
Designing security features and policies is one of the most important aspects of an application. To be able to design a secure application, you should be familiar with the principles of security. You should consider these principles when creating security strategies. For more information on security practices, refer to Security Best Practices in MSDN. The following are some security principles:
-
Whenever possible, you should rely on tested and proven security systems rather than creating your own custom solution.
-
You should never trust external inputs. Validate all data that is entered by users or submitted by other systems.
-
If your application receives unencrypted sensitive data from an external system, you should assume that the information is compromised.
-
Service accounts should have the least permissions required. A service account refers to a user account that services on the computer use to access resources. This account can be a local account or a network domain account for access to network resources.
-
Risk will increase with the number of components and the amount of data you have made available through the application, so you should minimize the amount of public method and properties available to users.
-
Do not enable services, account permissions, and technologies that you do not explicitly need. When you deploy the application on client or server computers, the default configuration should be secure. For example, if your web application needs to access network resources, the account used for IIS needs to have permission to access the minimum amount necessary.
-
Encrypting data implies having keys and a proven encryption algorithm. Secure data storage will prevent access under all circumstances.
Follow the STRIDE principles. Each letter in the STRIDE acronym specifies a different category of security threat: spoofing identify, tempering, repudiation, information disclosure, denial of service, and elevation of privilege. STRIDE is used to define a security thread model to predict and evaluate potential threats to the system. Most security threats are actually a combination of types. The threat model identifies all of the possible ways a user can violate the solution and use cases are created to identify these. Testing is created later to determine if the security threats are minimized or eliminated.
| A malicious user views and changes payroll data that travels between a web browser and the web server. List and categorize threats… | This type of action would fall into the categories of tampering and information disclosure. The user is viewing and editing restricted data. |
| Rank the risk of each threat… | Tampering is ranked higher than information disclosure. Both are important, but editing the restricted data is more critical. |
| Apply the threat model… | In applying the threat model, the site needs to encrypt data between the web browser and web server. This can be accomplished by creating public and private keys and encrypting the data. This will eliminate the risks of tampering and information disclosure. |
Selecting Strategies to Ensure Data Privacy
Signing code with a strong name defines the unique identity of code and guarantees that code has not been compromised. Code signing is the process of providing a set of code with credentials that authenticate the publisher of the code. The credentials of the code can be verified prior to installing and running the code. The purpose is to ensure that users know the origin of the code and to help prevent malicious users from impersonating the identity of a publisher. It also verifies that the code has not been changed by unauthorized sources since it was published.
When encrypting data, there are two types of keys available, private and public. Private key cryptography uses a single non-public key to cipher and decipher data. This is also called symmetric cryptography. The algorithms used encrypt blocks of data at a time. Based on the type of encryption used determines the number of bytes in the block.
Public key cryptography uses a private key and a public shared key that anyone can use. The public key and the private key are keyed pairs. Data ciphered with the public key can only be deciphered with the private key, and data signed with the public key can only be verified with the public key. This is known as asymmetric cryptography—one key is used to cipher and the other is used to decipher. Public key cryptography follows a different model as far as ciphering the data. It uses a fixed buffer size instead of a variable length like private key cryptography. For example, public keys could be used to send small amounts of data between two public systems.
Cipher refers to the process of disguising data before it is sent or stored. Data that has undergone encryption is called ciphertext. Data that has not been encrypted is referred to as plaintext. Decipher is the process of decrypting ciphertext into readable plaintext. The processes of encrypting and decrypting data rely on the techniques of hashing and signing data.
Hashing is the process of matching data of any length to a fixed-length byte sequence. The fixed-length byte sequence is called a hash. A hash is obtained by applying a mathematical function, called a hashing algorithm.
Signed data is a standards-based data type. Signed data consists of any type of content plus encrypted hashes of the content for zero or more signers. The hashes are used to confirm the identity of a data signer and to confirm that the message has not been modified since it was signed.
Code Access Security
Code access security allows code to be trusted to varying degrees, depending on the code’s origin, code’s evidence, or strong name signature, and on other aspects of the code’s identity. For example, code that is downloaded from your organization’s intranet and published by your organization might be trusted to a greater degree than code downloaded from the Internet and published by an unknown entity. The .NET framework allows you to include features in your application that request a specific level of security privilege from the system.
Select Strategies to Ensure Secure Access
Role-based security relates mostly to the spoofing identity security threat by preventing unauthorized users from performing operations that they are not authorized to perform. Role-based security allows code to verify the identity and role membership of the user.
The .NET framework supports role-based security by using the principal object. This object contains the security context of the current thread. The associated identity contains at the minimum the type of security protocol and the name of the user. Security is based on the security context of the Principal object. The IPrinciple object has two classes that implement this interface, GenericPrincipal and WindowsPrincipal. Each are both used to determine the user’s identity and any roles that they belong to.
Authentication
Authentication is the process of discovering and verifying the identity of a user by examining the user’s credentials and then validating those credentials against some authority. Examples of commonly used authentication mechanisms include the operating system, Passport, and application-defined mechanisms like NTLM and Kerberos authentication.
The WindowsPrincipal and WindowsIdentity objects contain information about the Windows accounts. If you are using Windows NT or Windows 2000 domain for authentication, these are the objects you want to use. The following code illustrates how to get access to the WindowsPrincipal:
[VB.NET] AppDomain.CurrentDomain.SetPrincipalPolicy( _ PrincipalPolicy.WindowsPrincipal) Dim MyPrincipal as WindowsPrincipal = __ CType(Thread.CurrentPrincipal, WindowsPrincipal) [C#] AppDomain.CurrentDomain.SetPrincipalPolicy( _ PrincipalPolicy.WindowsPrincipal); WindowsPrincipal MyPrincipal = (WindowsPrincipal) Thread.CurrentPrincipal;
The following table lists the supporting values that can be used for setting the principal policy.
| Value | Description |
|---|---|
| NoPrincipal | No principal or identity objects should be created. |
| UnauthenticatedPrincipal | Principal and identity objects for the unauthenticated entity. |
| WindowsPrincipal | Principal and identity objects that reflect the operating system token associated with the current execution thread should be created, and the associated operating system groups should be mapped into roles. |
| Exam Watch | The WindowsPrincipal is the most common principal used. It is used for Windows Authentication, otherwise use the GenericPrincipal. |
The GenericPrincipal and GenericIdentity are used for authorization independent of Windows NT and Windows 2000 domain. A classic example of this would be an application that requests user name and password for authorization, and the information is checked against a database or XML file. The following code shows how to use the GenericPrincipal is very similar to the WindowsPrincipal object.
[C#] GenericIdentity MyIdentity = new GenericIdentity("MyUser"); String[] MyStringArray= {"Manager","User"}; GenericPrincipal MyPrincipal = _ new GenericPrincipal(MyIdentity, MyStringArray}; Thread.CurrentPrincipal = MyPrincipal; [VB.NET] Dim MyIdentity as New GenericIdentity("MyUser") Dim MyStringArray as String() = {"Manager","User"} Dim MyPrincipal = new GenericPrincipal(MyIdentity,MyStringArray) Thread.CurrentPrincipal = MyPrincipal After you obtain the principal, it can be examined for validation.
Authorization
Authorization is the process of determining whether a user is allowed to perform a requested action. Authorization occurs after authentication and uses information about a user’s identity and roles to determine what resources that user can access. .NET’s role-based security can be used to implement authorization.
To validate where the user has permissions to perform specific actions in role-based security, is to use the PrincipalPermission object. This object determines what user and role has permission to perform the task. For example, the following code checks for the user Bob and that he is in the Manager role to perform the task. This is considered using an imperative security check.
[C#] PrincipalPermission princPerm = new PrincipalPermission("Bob","Manager"); [VB.NET] Dim princPerm As New PrincipalPermission("Bob","Manager") Another way this can be done is using a declarative security check, which uses attributes for it defintion. The syntax for this method is very similar to the previous code:
[C#] [PrincipalPermissionAttribute(SecurityAction.Demand, Name="Bob", Role = "Teller")] [VB.NET] <PrincipalPermissionAttribute(SecurityAction.Demand, Name := "Bob", Role := "Teller")>
If the user accessing the method did not satisfy the role or user conditions an exception would be thrown. The type of exception that is thrown is called the SecurityException.
| Exam Watch | There are two methods of verifying the user using role-based security, declarative (using attributes) or imperative (using code). |
Authorization Strategy
To design authentication and authorization strategies for your application, you need to perform the following steps:
-
Identify the resources that the application provides to the clients. An example of a resource would be web server resources such as web pages and web services.
-
Select an authorization strategy. There are two authorization strategies: role-based and resource-based. Role-based has users assigned to roles and the user is verified against the authorized roles to determine if the requested operation can be performed. In a resource-based strategy, individual resources are secured by using Windows access control lists (ACLs). The application impersonates the caller prior to accessing resources, which allows the operation system to perform standard access checks. Impersonation is the act of performing an action using a different security context than the calling user’s.
-
Choose the identity or identities that should be used to access resources across the layers of your application. There are four types of identities that can be used:
-
Original caller’s identity Assumes an impersonation or delegation model in which the original caller identity can be obtained and then flowed through each layer of your system.
Exam Watch Impersonation allows a component to pass the calling user’s security context to determine if the user can use network resources.
-
Process identity This is the default case. Local resources access and downstream calls are made using the current process identity.
-
Service account Uses a fixed service account. For example, for database access this might be a fixed user name and password presented by the component connecting to the database. When a fixed Windows identity is required, use an Enterprise Services server application. This allows a centralized location for a component. The machine that is running the service can determine the user name and password independently.
Exam Watch Service accounts can secure parts of an application that must access network resources.
-
Custom identity When you do not have Windows accounts to work with, you can construct your own identities that can contain details that relate to your own specific security context.
-
-
To support per-user authorization, auditing, and per-user data retrieval, you might need to flow the original caller’s identity through various application tiers and across multiple computer boundaries.
-
Selecting an authentication approach is based upon the nature of your application’s user base, the types of browsers they are using, and whether they have Windows accounts, and your application’s impersonation/ delegation and auditing requirements.
-
Decide how to flow the identity and security context at the application level or at the operating level. To flow identity at the application level, use method and stored procedure parameters, for example, adding the user name into the database queries. Operating system identity flow supports Windows auditing, SQL Server auditing, and per-user authorization based on Windows identities.
Selecting an Operations Strategy
The operations strategy deals with the daily activities to run the system. Security administration is responsible for maintaining a safe computing environment by developing, implementing, and managing security controls. System administration is responsible for the day-to-day task of keeping enterprise systems running and for assessing the impact of planned releases. Network administration is responsible for the design and maintenance of the physical components that make up the organization’s networks, such as servers, routers, switches, and firewalls. Service monitoring and control observes the health of specific IT services and acts when necessary to maintain compliance. Storage management deals with on-site and off-site data storage for the purpose of data restoration and historical archiving and ensures the physical security of backups and archives.
These objectives are geared around predefined service-level agreements (SLA) negotiated by the project team and support team. A service-level agreement is defined as an agreement between the service provider and the customer that defines the responsibilities of all participating parties and that binds the service provider to provide a particular service of a specific agreed-upon quality and quantity. It constrains the demands that customers can place on the service of those limits that are defined by the agreement.
Select Strategies for Data Archiving and Data Purging
Data archiving is determining what needs to be backed up, when, and how often. The key requirements to be met for the backup process are defined by the application and the organization. Requirements to consider are described in the following categories:
-
Size requirements The amount of required data storage needs to be determined for each data type. Understanding whether terabytes or megabytes of data are involved has a major influence on the specific strategy.
-
Data location The physical and logical location of the data to be backed up must be determined. In addition to simply identifying the physical location of the data, it must be ensured that backup devices can access the data to be backed up and restored. This will help in determining the types of devices required for performing backups, the media required, and the necessary time window.
-
Backup timetable How often the data needs to be backed up per data type needs to be determined. For example, application data can be backed up daily, system data every week, and critical database transactions twice a day.
While defining the backup requirements for different data types, planning should also occur on how the storage media should be secured and maintained. Based on requirements some information may need to be stored off-site. The strategies that you employ can be different for each application and server. For example, SQL Server 2000 employs the use of transaction logs that can be backed up to prevent the use of full backups. There are three types of backups that you can perform:
-
A full backup copies all selected files and marks each file as having been backed up, by clearing the archive attribute. For a full backup, only the most recent copy of the backup tape is required to restore all files. A full backup is usually performed the first time a backup set is created. It is a common practice to perform a full backup at regular intervals, such as every week or month. Intervals should be based on the relative dynamic nature of the data generated by the solution.
-
A differential backup copies only those files that are new or have been changed since the last full or incremental backup. This kind of backup does not mark files as having been backed up. If a combination of full and differential backups is used, files or tapes from both the last full and differential backups are needed to restore files and folders.
-
An incremental backup backs up only those files that are new or have changed since the last full or incremental backup. If a combination of full and incremental backups is used, the last normal backup set, as well as all incremental backup sets, is needed to restore data.
Exam Watch Incremental backups do not have the same behavior for SQL Server 2000.
Data purging is the elimination of unnecessary information that is not being used with the application. Over a period, solutions can generate a large amount of data. It has to be determined when it can be deleted because it is not useful anymore. The data can be removed or moved into an archive location for safekeeping. If the backup strategy is correct, the data can be removed without worry because it can be recovered if needed. There can be legal implications that require that the data be archived for long periods of time. For example, in the medical field, archived data and medical records must be preserved for various periods of time, such as seven years or longer based on the age of the client.
Select Strategies for Upgrades
It’s common for errors and modifications of solutions to happen, forcing upgrades for the application after it has been rolled out to the production environment.
Typically, applications are upgraded for the following reasons:
-
To apply bug fixes to remedy problems with your application
-
To provide enhancements for existing features
-
To provide new features or capabilities
One of the major advantages of the .NET architecture is that it provides comprehensive support for modifying or upgrading applications after they have been deployed. There are several primary methods for upgrading. First is to reinstall the application. Second is to use Windows Installer to create an update package to modify the necessary components. Windows Installer can perform the Add/Remove Program, Delete File, and Add New File functions. The deleting and adding of files to an already installed solution increases the maintenance and total cost of ownership for the solution. The third option is to create a side-by-side assembly functionality. The last option would be to have the application be able to be self-updating and download and install patches as necessary.
Create a Support Plan
Your support plan should address who will provide support, what level of support they need to provide, and how users can report problems. Determine who will support the users: will it be the project team, the help desk, or external resources? If the help desk provides the support, how will you train them? What will be the role of the project team?
Determine what service levels you can support. For example, must critical problems be resolved within a specified number of hours? During what hours must support be available to users?
Document the change management and problem management processes for the solution. Your process should address these issues:
-
How are change requests submitted, approved, tested, and implemented?
-
Where do users post their problems?
-
Can they report problems to an existing system or do you need a new mechanism, such as a web site, where users can log their problems and questions?
-
How will you review, prioritize, and fix problems?
-
What escalation process will you use to notify the appropriate personnel?
Creating a Test Plan
The test plan describes the strategy used to organize, and manage the project’s testing activities. It identifies testing objectives, methodologies and tools, expected results, responsibilities, and resource requirements. A test plan ensures that the testing process will be conducted in a thorough and organized manner and will enable the team to determine the stability of the solution. The test plan breaks the testing process into different elements, including unit testing, database testing, infrastructure testing, security testing, integration testing, user acceptance and usability testing, performance testing, and regression testing. These concepts are defined in Chapter 9 in more detail. All of these tests center around unit test. Each of them are at different levels and stages of the development process. Key sections of a test plan are:
-
Test approach and assumption Describes at a high level the approach, activities, and techniques to be followed in testing the solution.
-
Major test responsibilities Identifies the teams and individuals who will manage and implement the testing process.
-
Features and functionality to test Identifies at a high level all features and functionality that will be tested.
-
Expected results of tests Describes the results that should be demonstrated by the tests.
Exam Watch The expected results for a test can be specific results and answers or could be the visual cue of responses from the system.
-
Deliverables Describes the materials that must be made available or created to conduct the tests and that will be developed from the test to describe test results.
-
Testing procedures and walkthrough Describes the steps the testing team will perform to ensure quality tests.
-
Tracking and reporting status Defines the information that test team members will communicate during the testing process.
Exam Watch Reliable tracking of error and testing results help determine the quality of the product.
-
Bug reporting tools and methods Describes the overall bug reporting strategy and methodology.
-
Schedules Identifies the major test cycles, tasks, milestones, and deliverables.
The pilot plan describes how the team will move the candidate release version of the solution to a staging area and test it. The goal of the pilot is to simulate that equipment, software, and components that the solution will use when it is active. The plan also identifies how issues discovered during the pilot will be solved. The pilot helps the project team prove the feasibility of the solution approaches, experiment with different solutions, and obtain user feedback and acceptance on proposed solutions.
| Exam Watch | The pilot is a very important part of testing. You can determine what processes work and do not work before going to production. |
Creating a Training Plan
A training plan describes the appropriate level and type of training for all users. Training can be delivered before, during, or after installation. The training plan should follow these guidelines:
-
Deliver appropriate training for each user
-
Vary training based on users’ background and experience
-
Include a variety of media
-
Train local support staff
Consider alternatives to the traditional courseware approach to training, such as coaching sessions, and a mentoring program for advanced and support users.
EAN: 2147483647
Pages: 94