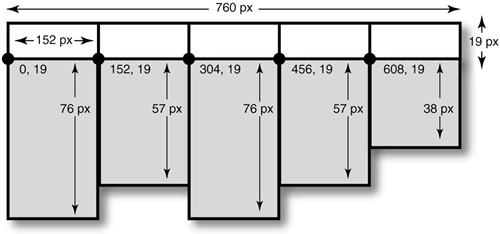
| Hopefully, the logic behind popup menus is straightforward. Making popup menus work practically in your layout can take some hard work. Believe it or not, the best approach is actually a mathematical one, so get out your scratch paper before you start coding and make a few sketches and calculations. Let's say you have a nav bar with five main categories. Let's say that you also know the nav-bar height is 19 pixels, and you want the nav bar to fit across an 800-width screen. Shave off 40 pixels for scrollbars and the like, and you have a nav bar of width 760. Divide it into five equal sections of 152 pixels each, as in Figure 10.5. Figure 10.5. Begin by sketching your rough nav-bar design and calculating the size of each table cell. 
TIP For these mathematics to add up the same way in Netscape and IE, be sure to set the following spacing attributes to 0: leftmargin, topmargin, marginwidth, and marginheight in the body tag; and border, cellpadding, and cellspacing in each table tag. |
Now for the layers. You know how wide each layer has to be: 152 pixels, just like the width of each table cell in the nav bar. You need to calculate the height of each layer, which depends on how many navigation choices you want it to have. Obviously, this number can vary from menu to menu. Since the nav bar is 19 pixels tall, make it easy on yourself and take 19 pixels as your default height per menu choice. A menu with three choices only needs to be 57 pixels tall (19 times 3), while a menu with seven choices needs to be 19 times 7, or 133 pixels tall. To line up the layers with the table cells, you express the location of each layer in offsets from the top and left sides of the browser window. Therefore, if your nav bar is 19 pixels tall, you want to position your layers vertically at 19 pixels from the top of the screen. Horizontally, you start at 0 (no offset from the left), and you position each new layer in increments of 152, as Figure 10.6 shows. Figure 10.6. Position the layers in offsets from the top and left sides of the browser window. 
TIP If you use images instead of text links inside your popup menus, be sure to build extra whitespace into the design of your graphics. This helps to make your menus feel less cramped. |
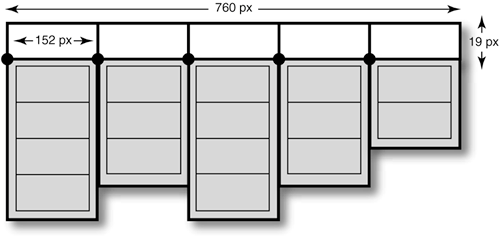
Finally, drop a table for the menu into each layer, using one row per menu item, as in Figure 10.7. Figure 10.7. Put a table inside each layer for the menus. Each menu item gets its own row in the table. 
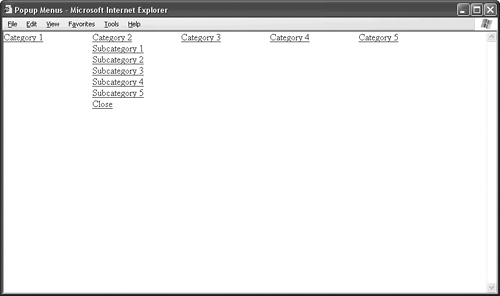
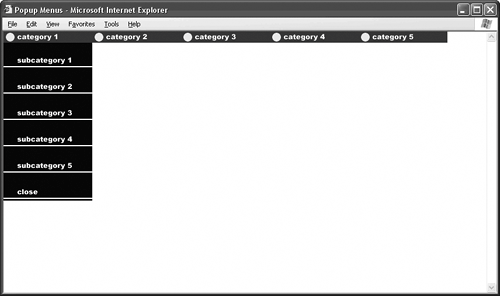
 | TOOL KITCreating Popup Menus This DHTML document shows you how to create a system of popup menus (see Figure 10.8). For simplicity's sake, the nav bar and the menus use text links. With border, cellpadding, and cellspacing at 0, the tables feel compact. Substitute images with plenty of vertical whitespace, and your layout looks better, as in Figure 10.9. You should adjust the heights of the layers, though, to accommodate the taller tables. [View full width] <html> <head> <title>Popup Menus</title> <script language="JavaScript"> function doShowHide(popupMenu) { /* This function launches when the visitor mouses over the  nav-bar choices. It receives the ID of the corresponding menu and nav-bar choices. It receives the ID of the corresponding menu and  makes this menu visible while hiding the other four. */ if (popupMenu == "menu1") { document.getElementById("menu1").style.visibility="visible"; document.getElementById("menu2").style.visibility="hidden"; document.getElementById("menu3").style.visibility="hidden"; document.getElementById("menu4").style.visibility="hidden"; document.getElementById("menu5").style.visibility="hidden"; } if (popupMenu == "menu2") { document.getElementById("menu1").style.visibility="hidden"; document.getElementById("menu2").style.visibility="visible"; document.getElementById("menu3").style.visibility="hidden"; document.getElementById("menu4").style.visibility="hidden"; document.getElementById("menu5").style.visibility="hidden"; } if (popupMenu == "menu3") { document.getElementById("menu1").style.visibility="hidden"; document.getElementById("menu2").style.visibility="hidden"; document.getElementById("menu3").style.visibility="visible"; document.getElementById("menu4").style.visibility="hidden"; document.getElementById("menu5").style.visibility="hidden"; } if (popupMenu == "menu4") { document.getElementById("menu1").style.visibility="hidden"; document.getElementById("menu2").style.visibility="hidden"; document.getElementById("menu3").style.visibility="hidden"; document.getElementById("menu4").style.visibility="visible"; document.getElementById("menu5").style.visibility="hidden"; } if (popupMenu == "menu5") { document.getElementById("menu1").style.visibility="hidden"; document.getElementById("menu2").style.visibility="hidden"; document.getElementById("menu3").style.visibility="hidden"; document.getElementById("menu4").style.visibility="hidden"; document.getElementById("menu5").style.visibility="visible"; } } function doHide(popupMenu) { /* This function launches when the visitor clicks the Close makes this menu visible while hiding the other four. */ if (popupMenu == "menu1") { document.getElementById("menu1").style.visibility="visible"; document.getElementById("menu2").style.visibility="hidden"; document.getElementById("menu3").style.visibility="hidden"; document.getElementById("menu4").style.visibility="hidden"; document.getElementById("menu5").style.visibility="hidden"; } if (popupMenu == "menu2") { document.getElementById("menu1").style.visibility="hidden"; document.getElementById("menu2").style.visibility="visible"; document.getElementById("menu3").style.visibility="hidden"; document.getElementById("menu4").style.visibility="hidden"; document.getElementById("menu5").style.visibility="hidden"; } if (popupMenu == "menu3") { document.getElementById("menu1").style.visibility="hidden"; document.getElementById("menu2").style.visibility="hidden"; document.getElementById("menu3").style.visibility="visible"; document.getElementById("menu4").style.visibility="hidden"; document.getElementById("menu5").style.visibility="hidden"; } if (popupMenu == "menu4") { document.getElementById("menu1").style.visibility="hidden"; document.getElementById("menu2").style.visibility="hidden"; document.getElementById("menu3").style.visibility="hidden"; document.getElementById("menu4").style.visibility="visible"; document.getElementById("menu5").style.visibility="hidden"; } if (popupMenu == "menu5") { document.getElementById("menu1").style.visibility="hidden"; document.getElementById("menu2").style.visibility="hidden"; document.getElementById("menu3").style.visibility="hidden"; document.getElementById("menu4").style.visibility="hidden"; document.getElementById("menu5").style.visibility="visible"; } } function doHide(popupMenu) { /* This function launches when the visitor clicks the Close  button at the bottom of the menu. It receives the ID of the button at the bottom of the menu. It receives the ID of the  current menu and then hides that menu. Easy as pie. */ document.getElementById(popupMenu).style.visibility="hidden"; } </script> </head> <body leftmargin="0" topmargin="0" marginwidth="0" marginheight="0"> <! First thing's first. Create the code for the popup menus. current menu and then hides that menu. Easy as pie. */ document.getElementById(popupMenu).style.visibility="hidden"; } </script> </head> <body leftmargin="0" topmargin="0" marginwidth="0" marginheight="0"> <! First thing's first. Create the code for the popup menus.  The menu itself is a table with six rows: one for each of the The menu itself is a table with six rows: one for each of the  five choices in the menu, plus a row for the Close link. If you five choices in the menu, plus a row for the Close link. If you  need fewer choices, delete table rows. If you need more choices, need fewer choices, delete table rows. If you need more choices,  add more table rows. Just be sure to put the table between div add more table rows. Just be sure to put the table between div  tags, which nests the element in a layer. Looking at the div tag, the id property gives the ID of the layer tags, which nests the element in a layer. Looking at the div tag, the id property gives the ID of the layer  , which is absolutely essential for the JavaScript functions above , which is absolutely essential for the JavaScript functions above  . In the style attribute, notice the position of the layer appears . In the style attribute, notice the position of the layer appears  as the offset from the top and left margins. The width and height give the physical dimensions of the layer. as the offset from the top and left margins. The width and height give the physical dimensions of the layer.  The width of 152 comes from the width of the nav bar (760 pixels) The width of 152 comes from the width of the nav bar (760 pixels)  divided by the number of main categories, five. The height of 114 divided by the number of main categories, five. The height of 114  is the height per menu choice (19 pixels) times the number of is the height per menu choice (19 pixels) times the number of  choices in the menu, six (including the Close link). The height choices in the menu, six (including the Close link). The height  of the layer changes depending on how tall each menu choice of the layer changes depending on how tall each menu choice  should be as well as how many choices total appear in the menu. should be as well as how many choices total appear in the menu.  The number 19 as the height of each menu choice isn't written in The number 19 as the height of each menu choice isn't written in  stone. As you tinker with the size and format of each menu to fit stone. As you tinker with the size and format of each menu to fit  your site, be sure to adjust the height values accordingly. Notice that the visibility is set to hidden, which makes the your site, be sure to adjust the height values accordingly. Notice that the visibility is set to hidden, which makes the  layer invisible by default. > <div style="position: absolute; left: 0px; top: 19px; layer invisible by default. > <div style="position: absolute; left: 0px; top: 19px;  width: 152px; height: 114px; visibility: hidden;"> <table width="152" border="0" cellpadding="0" cellspacing="0"> <tr> <td><a href="path01">Subcategory 1</a></td> </tr> <tr> <td><a href="path02">Subcategory 2</a></td> </tr> <tr> <td><a href="path03">Subcategory 3</a></td> </tr> <tr> <td><a href="path04">Subcategory 4</a></td> </tr> <tr> <td><a href="path05">Subcategory 5</a></td> </tr> <! This row contains the Close option at the bottom of the width: 152px; height: 114px; visibility: hidden;"> <table width="152" border="0" cellpadding="0" cellspacing="0"> <tr> <td><a href="path01">Subcategory 1</a></td> </tr> <tr> <td><a href="path02">Subcategory 2</a></td> </tr> <tr> <td><a href="path03">Subcategory 3</a></td> </tr> <tr> <td><a href="path04">Subcategory 4</a></td> </tr> <tr> <td><a href="path05">Subcategory 5</a></td> </tr> <! This row contains the Close option at the bottom of the  menu. Clicking this link launches the doHide function. The link menu. Clicking this link launches the doHide function. The link  passes along the ID of the menu to close. > <tr> <td><a href="javascript:doHide('menu1');">Close</a></td> </tr> </table> </div> <! This div element contains the second popup menu. It works passes along the ID of the menu to close. > <tr> <td><a href="javascript:doHide('menu1');">Close</a></td> </tr> </table> </div> <! This div element contains the second popup menu. It works  just like first. > <div style="position: absolute; left: 152px; top: just like first. > <div style="position: absolute; left: 152px; top:  19px; width: 152px; height: 114px; visibility: hidden;"> <table width="152" border="0" cellpadding="0" cellspacing="0"> <tr> <td><a href="path06">Subcategory 1</a></td> </tr> <tr> <td><a href="path07">Subcategory 2</a></td> </tr> <tr> <td><a href="path08">Subcategory 3</a></td> </tr> <tr> <td><a href="path09">Subcategory 4</a></td> </tr> <tr> <td><a href="path10">Subcategory 5</a></td> </tr> <tr> <td><a href="javascript:doHide('menu2');">Close</a></td> </tr> </table> </div> <! This div element contains the third popup menu. > <div style="position: absolute; left: 304px; top: 19px; width: 152px; height: 114px; visibility: hidden;"> <table width="152" border="0" cellpadding="0" cellspacing="0"> <tr> <td><a href="path06">Subcategory 1</a></td> </tr> <tr> <td><a href="path07">Subcategory 2</a></td> </tr> <tr> <td><a href="path08">Subcategory 3</a></td> </tr> <tr> <td><a href="path09">Subcategory 4</a></td> </tr> <tr> <td><a href="path10">Subcategory 5</a></td> </tr> <tr> <td><a href="javascript:doHide('menu2');">Close</a></td> </tr> </table> </div> <! This div element contains the third popup menu. > <div style="position: absolute; left: 304px; top:  19px; width: 152px; height: 114px; visibility: hidden;"> <table width="152" border="0" cellpadding="0" cellspacing="0"> <tr> <td><a href="path11">Subcategory 1</a></td> </tr> <tr> <td><a href="path12">Subcategory 2</a></td> </tr> <tr> <td><a href="path13">Subcategory 3</a></td> </tr> <tr> <td><a href="path14">Subcategory 4</a></td> </tr> <tr> <td><a href="path15">Subcategory 5</a></td> </tr> <tr> <td><a href="javascript:doHide('menu3');">Close</a></td> </tr> </table> </div> <! This div element contains the fourth popup menu. > <div style="position: absolute; left: 456px; top: 19px; width: 152px; height: 114px; visibility: hidden;"> <table width="152" border="0" cellpadding="0" cellspacing="0"> <tr> <td><a href="path11">Subcategory 1</a></td> </tr> <tr> <td><a href="path12">Subcategory 2</a></td> </tr> <tr> <td><a href="path13">Subcategory 3</a></td> </tr> <tr> <td><a href="path14">Subcategory 4</a></td> </tr> <tr> <td><a href="path15">Subcategory 5</a></td> </tr> <tr> <td><a href="javascript:doHide('menu3');">Close</a></td> </tr> </table> </div> <! This div element contains the fourth popup menu. > <div style="position: absolute; left: 456px; top:  19px; width: 152px; height: 114px; visibility: hidden;"> <table width="152" border="0" cellpadding="0" cellspacing="0"> <tr> <td><a href="path16">Subcategory 1</a></td> </tr> <tr> <td><a href="path17">Subcategory 2</a></td> </tr> <tr> <td><a href="path18">Subcategory 3</a></td> </tr> <tr> <td><a href="path19">Subcategory 4</a></td> </tr> <tr> <td><a href="path20">Subcategory 5</a></td> </tr> <tr> <td><a href="javascript:doHide('menu4');">Close</a></td> </tr> </table> </div> <! This div element contains the fifth popup menu. > <div style="position: absolute; left: 608px; top: 19px; width: 152px; height: 114px; visibility: hidden;"> <table width="152" border="0" cellpadding="0" cellspacing="0"> <tr> <td><a href="path16">Subcategory 1</a></td> </tr> <tr> <td><a href="path17">Subcategory 2</a></td> </tr> <tr> <td><a href="path18">Subcategory 3</a></td> </tr> <tr> <td><a href="path19">Subcategory 4</a></td> </tr> <tr> <td><a href="path20">Subcategory 5</a></td> </tr> <tr> <td><a href="javascript:doHide('menu4');">Close</a></td> </tr> </table> </div> <! This div element contains the fifth popup menu. > <div style="position: absolute; left: 608px; top:  19px; width: 152px; height: 114px; visibility: hidden;"> <table width="152" border="0" cellpadding="0" cellspacing="0"> <tr> <td><a href="path21">Subcategory 1</a></td> </tr> <tr> <td><a href="path22">Subcategory 2</a></td> </tr> <tr> <td><a href="path23">Subcategory 3</a></td> </tr> <tr> <td><a href="path24">Subcategory 4</a></td> </tr> <tr> <td><a href="path25">Subcategory 5</a></td> </tr> <tr> <td><a href="javascript:doHide('menu5');">Close</a></td> </tr> </table> </div> <! Here at last is the table that creates the nav bar. It's 19px; width: 152px; height: 114px; visibility: hidden;"> <table width="152" border="0" cellpadding="0" cellspacing="0"> <tr> <td><a href="path21">Subcategory 1</a></td> </tr> <tr> <td><a href="path22">Subcategory 2</a></td> </tr> <tr> <td><a href="path23">Subcategory 3</a></td> </tr> <tr> <td><a href="path24">Subcategory 4</a></td> </tr> <tr> <td><a href="path25">Subcategory 5</a></td> </tr> <tr> <td><a href="javascript:doHide('menu5');">Close</a></td> </tr> </table> </div> <! Here at last is the table that creates the nav bar. It's  the first (and only) visible element on the page. The rest of the the first (and only) visible element on the page. The rest of the  content is hidden in the invisible layers. > <table width="760" border="0" cellspacing="0" cellpadding="0"> <tr> <td width="152"> <! The onMouseOver event fires when the visitor moves the content is hidden in the invisible layers. > <table width="760" border="0" cellspacing="0" cellpadding="0"> <tr> <td width="152"> <! The onMouseOver event fires when the visitor moves the  mouse over the hotspot. In this case, the hotspot is the link for mouse over the hotspot. In this case, the hotspot is the link for  Category 1. The visitor mouses over the link, and the browser Category 1. The visitor mouses over the link, and the browser  launches doShowHide, sending along the ID of the corresponding launches doShowHide, sending along the ID of the corresponding  menu. > <a href="path26" onMouseOver="doShowHide('menu1');"> Category 1 </a> </td> <td width="152"> <a href="path27" onMouseOver="doShowHide('menu2');"> Category 2 </a> </td> <td width="152"> <a href="path28" onMouseOver="doShowHide('menu3');"> Category 3 </a> </td> <td width="152"> <a href="path29" onMouseOver="doShowHide('menu4');"> Category 4 </a> </td> <td width="152"> <a href="path30" onMouseOver="doShowHide('menu5');"> Category 5 </a> </td> </tr> </table> </body> </html> menu. > <a href="path26" onMouseOver="doShowHide('menu1');"> Category 1 </a> </td> <td width="152"> <a href="path27" onMouseOver="doShowHide('menu2');"> Category 2 </a> </td> <td width="152"> <a href="path28" onMouseOver="doShowHide('menu3');"> Category 3 </a> </td> <td width="152"> <a href="path29" onMouseOver="doShowHide('menu4');"> Category 4 </a> </td> <td width="152"> <a href="path30" onMouseOver="doShowHide('menu5');"> Category 5 </a> </td> </tr> </table> </body> </html>
Figure 10.8. This Toolkit creates a system of popup menus. 
Figure 10.9. Substitute the text links with your own images (adding plenty of vertical whitespace), and the menus don't feel as cramped. 
|
|
|


