10.3. Converting a Fixed-Width Layout into a Liquid Layout If you've leafed through Chapter 9, you may have noticed that creating liquid layouts is relatively easy. This is because all the cells of the table are related. They're all on the same grid, so to speak, connected in the larger framework of the table. When you change one, the rest follow. Think of it as an ecosystem. Think of it as a community. Insert your favorite metaphor from the political left here. You get no such luck with liquid layers. Each layer is an independent entity on the page, completely autonomous and unrelated to the others. When you liquefy one layer, nothing happens to any of the others. Therefore, you have to select each layer in turn and carefully modify its appearance attributes. Where the layer sits in relation to the other layers of the design determines how you go about positioning it in the context of a fluid layout. Some of these changes are so picky that the Property Inspector by itself isn't up to the task. For this, you need the help of Dreamweaver's CSS Styles panel, which Figure 10-8 shows. Choose Window  CSS Styles to open it. In fact, make the CSS Styles panel as tall as it can be by collapsing all the other panel groups on the screen. To do this, simply click the name of any expanded panel group. CSS Styles to open it. In fact, make the CSS Styles panel as tall as it can be by collapsing all the other panel groups on the screen. To do this, simply click the name of any expanded panel group. Figure 10-8. The CSS Styles panel 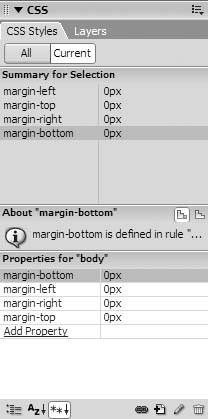
Begin on the right side of the layout, not the left side, and work your way from right to left and then from the top of the design to the bottom. So select the topmost layer that touches the right side of the layout, and ask yourself the following questions: | HOTKEY | Press Shift-F11 to toggle the CSS Styles panel. |
Does the selected layer stretch across the entire width of the layout, from the left side all the way to the right side, like the one that's selected in Figure 10-9? If so, see "Executing Plan A." Figure 10-9. The selected layer spans the entire width of the layout 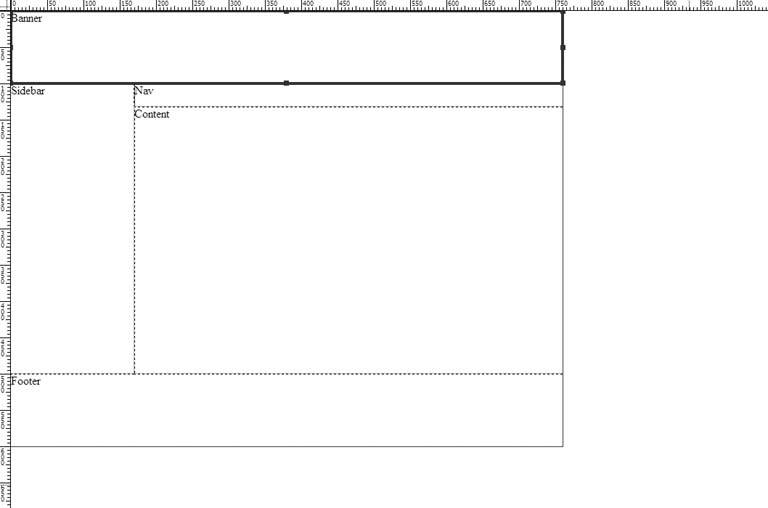 Is there another layer immediately to the left of the selected layer? Is the selected layer supposed to be fixed-width, like the one that's selected in Figure 10-10? If so, see "Executing Plan B." Figure 10-10. The selected layer is supposed to be fixed-width 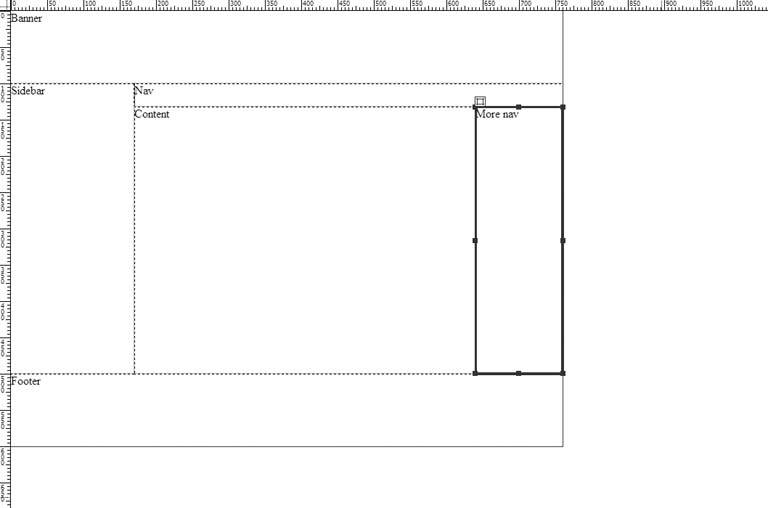 Is the selected layer supposed to be liquid, like the one that's selected in Figure 10-11? If so, see "Executing Plan C." Figure 10-11. The selected layer is supposed to be liquid  Does the layer sit against the left side of the layout, and is there a layer to its immediate right, like the one that's selected in Figure 10-12? If so, do nothing. You don't have to modify the properties of this layer.
Figure 10-12. This layer is flush left with another layer to its right 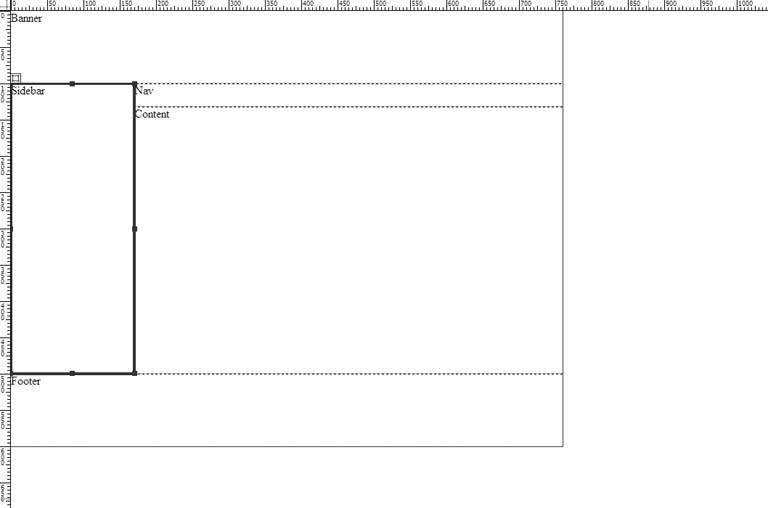
Repeat this process for each of the layers in your design. When you're done, choose File Save from the main menu. | TIP | If this procedure doesn't give you satisfactory results for your particular layout, you may be attempting something that is difficult to express in CSS by way of Dreamweaver. Try building your design with tables instead, or rethink the complexity of your layout. |
10.3.1. Executing Plan A To create a liquid layer that spans the entire width of the layout, follow these steps: In the Properties list of the CSS Styles panel (the lower list, not the upper list marked Summary), find the entry for Width. Click in the box to the right of this entry. Type 100 in the first field, and choose % from the menu under the second field, as Figure 10-13 shows. Figure 10-13. Liquefying a layer using the CSS Styles panel 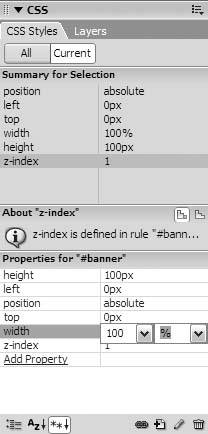
Do this, and Dreamweaver converts the layer from fixed-width to liquid. 10.3.2. Executing Plan B If you have a layer on the right side of your layout, and if you want this layer to remain fixed-width, follow these steps: In the Properties list of the CSS Styles panel (the lower list, not the upper list marked Summary), find the entry for Left. Select this property by clicking its name. Go to the bottom of the CSS Styles panel, and click the Delete CSS Property buttonthe one with the trashcan icon. Dreamweaver removes the Left property from the list and repositions your layer with zero left offset. Now click the Add Property link directly under the last item in the list of properties. The link changes to a drop-down menu. Choose Right from this menu, and two fields appear. Type 0 in the first field, and choose Pixels from the second, as Figure 10-14 shows. If Pixels is already selected, simply press Enter or Return. Figure 10-14. Making a flush-right fixedwidth layer 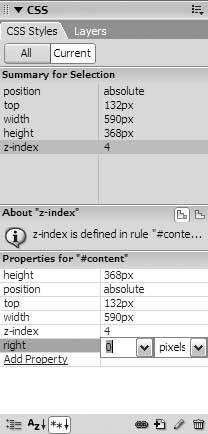 As a result, Dreamweaver pushes the layer to the right side of the document window. Why? Because you have just specified that this layer has no right offset value; that is, its correct position is 0 pixels from the right side of the browser window. Select the layer immediately to the left of the one that you just adjusted. Is the newly selected layer supposed to be liquid or fixed-width? If it's supposed to be liquid, proceed to Step 7. If it's supposed to be fixed-width, go back to Step 1but instead of setting the right offset to 0 in Step 4, set the right offset to clear the layer (or layers) on the right. So if you want to have two fixed-width layers side by side on the right side of your design, the rightmost layer requires a right offset of 0 pixels to position it on the far right of the browser window. However, the layer to its left needs a right offset so that the two layers don't overlap. If the rightmost layer has a width of 100 pixels, then 100 pixels is the correct right offset for the layer to its left. In the Properties list of the CSS Styles panel, find the entry for Width, and click in the box to the right of this entry. Two fields appear. Choose Auto from the menu under the first field, as Figure 10-15 shows. Figure 10-15. Setting the width of a layer to automatic 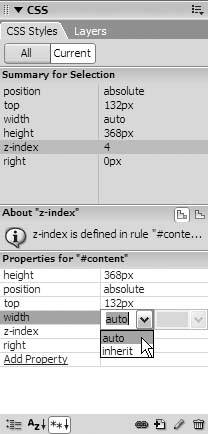 Click the Add Property link again, and choose Right from this menu. Set the right offset to the combined width (in pixels) of all the layers on the right side of the design.
Doing this prevents the liquid layer from overlapping the layer or layers on the right. Don't be alarmed if the width of your liquid layer shrinks to match the width of its contentin this case, the text label that you typed in the last section. This is a necessary side effect of layer liquefication, Dreamweaver-style. Happily, as you add content to the liquid layer, it'll fill out to its widest possible size. 10.3.3. Executing Plan C If you have a layer on the right side of your layout, and if you want this layer to be liquid, follow these steps: In the Properties list of the CSS Styles panel (the lower list, not the upper list marked Summary), find the entry for Width. Click in the box to the right of this entry. Two fields appear. From the dropdown menu under the first field, choose Auto. Now click the Add Property link directly under the list item in the Properties list. The link changes into a dropdown menu. Choose Right from this menu, and two fields appear. Type 0 in the first field, and choose Pixels from the second. If Pixels is already selected, simply press Enter or Return.
Again, the width of the liquid layer shrinks to fit its current content, and again this is all right. It will expand to fit whatever you put inside it. |