Hack 50 Becoming an Administrator for a Moment
|
Your Mac does its best to protect you from yourself and your family by requiring authentication, both in the GUI and on the command line, when you're about to do something potentially problematic. OS X, being a multiuser Unix system at its heart, tries to prevent you (or your family) from doing anything that might adversely affect your Mac. It does so by denying access to particular files that keep your system running and disallowing actions that it considers potentially harmful. Every now and again, however, you need to install a piece of software or touch a vital Unix configuration file to get something done. Before it'll let you do so, OS X will require that you authenticate yourself as an administrative user, known in Unix parlance as root. 50.1 Desktop RootWhile most applications can be installed simply by dragging them into the Applications folder, some require a little more tomfoolery. Application and package installers often need to create folders, drop files into place, and adjust configuration settings in restricted parts of the operating system. At these times you're either not allowed to continue if you're not listed as an administrative user of the system (take a look at the System Preferences Figure 5-9. Authenticate dialog You'll notice I've expanded the detail level by clicking on the Details arrow. In this case, the application asking for authentication is the standard Mac OS X Installer. Type in your password and the Installer will continue. What you've done, in effect, is become an administrator with full power over your system, if only for a moment. You've then granted the Installer similar power to do what it needs to do.
You'll also encounter times when you need to authenticate yourself to make a configuration change in the System Preferences or the like. If you find that you're unable to change some settings that seem as if they should be editable, look around the window for a little lock icon. If it's locked, you may need to unlock it (click on it) and authenticate yourself. If you feel the need to lock the settings again when you're done, click the lock again (see Figure 5-10). Figure 5-10. Locked settings50.2 Command-Line RootOn the command line [Hack #48], there is no fancy dialog for authenticating you as the root user. The sudo utility (substitute-user do) allows you to gain temporary root privileges on a per-command basis. To use sudo, simply preface the command you wish to run as root with sudo and a space, and sudo will prompt you for your (not root's) password. If you have administrator privileges, entering your password will run the sudoed command as if the root user were doing it.
Typical sudo use looks like this: % sudo apachectl restart Notes about sudo:
50.3 Enabling the Root AccountYou may find a reason at some point to enable the root account on your Mac. While it's a rare hack indeed that would require logging in as the root user, it does come up (e.g., [Hack #1]). To do so, launch NetInfo Manager (Applications Figure 5-11. Authenticating yourself to NetInfo Manager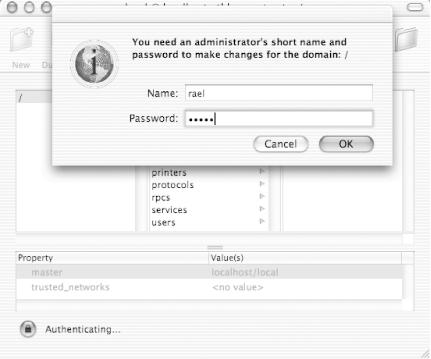 To enable the root user, select Security Figure 5-12. A warning about the root password not being set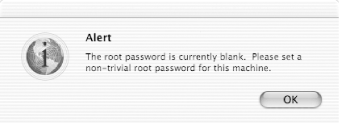 Figure 5-13. Setting the root password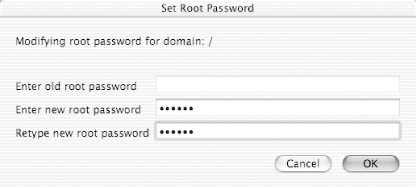 Click the lock icon again to disallow any further changes, and close NetInfo Manager. The root account is now active. To disable the account, follow the same steps, but select Security 50.4 Logging in as RootLog in as root just as you would log in as any other user. The only difference is that root won't appear in the list of users and their associated cute icons. Click Other, enter root as the Name, and enter the password you assigned to the root account as Password. Chris Stone and Rael Dornfest |


EAN: 2147483647
Pages: 161