Hack 100 Installing the PostgreSQL Database
|
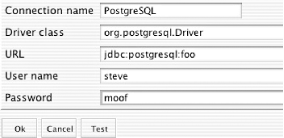
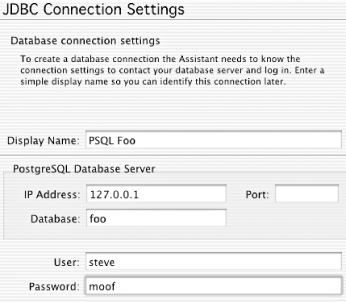
The PostgreSQL database has good third-party support from developers and passes the ACID (Atomicity, Consistency, Isolation, and Durability) test. What more could you want from an open source database? Are you a longtime Mac user curious about working with databases in the past but scared away by prohibitive prices? Are you new to Apple and would like to put your prior database experience to use on the Mac? If you're either, read on. I'm going to walk you through installing PostgreSQL (http://PostgreSQL.org) on Mac OS X (I'm using 10.1.4), as well as using SQL tools with it and connecting to PostgreSQL with Java. The Java bit is at the tail end of this piece so that if programming (or Java itself) isn't your thing you can easily skip it. I'm a new Mac user. I recently made the switch from Windows 2000 to Mac OS X and have become comfortable enough in my new environment to flex some of my database skills on this exciting new platform having worked with everything from MS Access to Oracle in the past. I've kept up with some of the high-level news about what is going on in the open source DBMS realm. So when I pondered which DBMS I should install on my Mac, PostgreSQL was the rather quick answer. It has good third-party support from developers, and it passes the ACID test (http://www.orafaq.com/glossary/faqglosa.htm). 100.1 InstallationIf you don't already have a current version of Apple's Developer Tools [Hack #55], now is the time to get and install them. We'll be using the compiler during installation of PostgreSQL. All right, now let's get PostgreSQL. You can download PostgreSQL 7.2.1 via FTP (ftp://ftp.us.PostgreSQL.org/v7.2.1/PostgreSQL-7.2.1.tar.gz) or HTTP (http://www.PostgreSQL.org/ftpsite/v7.2.1/PostgreSQL-7.2.1.tar.gz). I saved the file to my Desktop, but you can save it wherever you wish. Use StuffIt Expander to extract the files. To install PostgreSQL, open the Terminal [Hack #48] and navigate to the folder containing your newly unstuffed copy of the PostgreSQL source. The first step is to configure the installation. configure will sniff out the proper system variables to set for Mac OS X (10.1 or later is required). Several files will be created in the build tree to record these customizations. To run the configure script, you must type ./configure at the command line. However, we are not ready to run the script just yet. First, let's discuss a few switches we can append to customize our configuration. PostgreSQL will install into /usr/local/pgsql by default. Since we're installing to Mac OS, we want to change this directory to something more appropriate. You can do this by specifying the command-line option --prefix=/Users/Shared/PostgreSQL. Because I realize the audience for this hack is international, we're also going to include locale support. We do this by passing the argument --enable-locale. Additionally, if you plan to use your database with an interface that expects all strings to be in Unicode, you need to add the --enable-multibyte=UNICODE option. I'm turning on multibyte support because I plan to use PostgreSQL as the DBMS for some Java applications I'll be developing. If you're going to skip the Java portion of this hack, you can choose not to include this argument. Some other interesting options are --with-openssl, --with-perl, --enable-syslog, and --enable-debug. I won't be covering these options, in order to be brief, but I do recommend you look into them. Now is the time to run configure: % ./configure --prefix=/Users/Shared/PostgreSQL --enable-locale ` RETURN --enable-multibyte=UNICODE You'll know configure is complete when you get back to a command prompt. In order to actually begin building PostgreSQL, we need to execute GNU make from the command line by typing make (Apple has installed GNU make as the default make mechanism). The build process can last anywhere between five minutes and half an hour, according to documentation provided by PostgreSQL. The build on my 600MHz iBook lasted seven minutes. Once the build is complete, type make install to begin installing PostgreSQL. If you plan to do server-side program development such as creating custom functions, replace install with install-all-headers. If your install was successful, you'll see the following output: Thank you for choosing PostgreSQL, the most advanced open source database engine. Since we installed PostgreSQL to a location that is not searched for applications, we must add /Users/Shared/PostgreSQL/bin to our path. This can be handled by setting the appropriate environment variable [Hack #52] at the command prompt: % setenv PATH ${PATH}:/Users/Shared/PostgreSQL/bin You should type the following to reference the manual pages for PostgreSQL: % setenv MANPATH ${MANPATH}:/Users/Shared/PostgreSQL/man 100.2 Setting Up a DatabaseIn order to simplify things for the purpose of this hack, we're going to create the database as your own user, which should be set up as an administrator. However, for production systems, it is recommended that you create the database as a dedicated PostgreSQL user. Initialize the database cluster by typing the following: % initdb -D /Users/Shared/PostgreSQL/data PostgreSQL will begin this task by displaying feedback similar to this: The files belonging to this database system will be owned by user "steve". This user must also own the server process. It will then display the following feedback to indicate that it is finished: Success. You can now start the database server using: /Users/Shared/PostgreSQL/bin/postmaster -D /Users/Shared/PostgreSQL/data or /Users/Shared/PostgreSQL/bin/pg_ctl -D /Users/Shared/PostgreSQL/data -l RETURN logfile start This is just what we want to do. The first command will start the database server in the foreground. The second command uses a shell script that automates the commands needed to start the database server in the background. Start the database with the second command. Let's create our first database. Actually, PostgreSQL's first database (template1) was created when we initialized the database cluster. However, now we're going to create the first real database. % createdb foo Congratulations, you just created your first database! Its name is foo. That wasn't so hard. 100.3 Accessing the DatabaseLet's try accessing the database we just created. I'll touch on a couple of SQL tools for the Mac: ViennaSQL (http://vienna.sourceforge.net/) and SQL4X Manager J (http://www.macosguru.de/). I'll walk you through setting up ViennaSQL and connecting to foo with it. You'll also see a screenshot of the key-connection setup screen if you wish to use SQL4X Manager J instead. First, download the Java Archive (JAR) file for ViennaSQL (http://vienna.sourceforge.net/vienna.jar). Then download the JDBC driver for PostgreSQL (http://jdbc.PostgreSQL.org/download/pgjdbc2.jar). I renamed pgjdbc2.jar to PostgreSQL.jar and placed it in /Library/Java/Extensions. Now, add this JAR and the current directory to the classpath environment variable. % setenv CLASSPATH ${CLASSPATH}:/Library/Java/Extensions/PostgreSQL.jar:. You will need to edit [Hack #51] your PostgreSQL.conf file in order to activate TCP/IP sockets for PostgreSQL. The file is located in /Users/Shared/PostgreSQL/data/. You will see the following line near the top of the file, under the connection parameters section: tcpip_socket = false Uncomment the line by removing the pound symbol (#) and replace false with true. Open /Users/Shared/PostgreSQL/data/pg_hba.conf in a text editor. Scroll to the bottom of the host-based access file and enter the following to allow access to all databases from any computer on the local network: host all 192.168.0.0 255.255.0.0 trust Restart the postmaster by issuing the following command: % /Users/Shared/PostgreSQL/bin/pg_ctl -D /Users/Shared/PostgreSQL/data -l RETURN logfile -o -i restart Be sure to specify the -o and -i arguments to turn on IP sockets. OK, now start up ViennaSQL via its JAR file. Under File in the menu bar, select Configure. This will bring up the ViennaSQL Options window. Click on the Connection tab and create a new connection (see Figure 9-1). Fill in the Connection name with PostgreSQL. Type org.PostgreSQL.Driver in the Driver class text box. The URL should be jdbc:PostgreSQL:foo in our case. Then fill in the appropriate information for your current Mac OS user. Figure 9-1. Setting up a connection in ViennaSQL Click the Test button to verify that your connection is working, dismiss the Connection Test window, then click on the OK button in the New Connection window and the ViennaSQL Options window. There is a combo box in the top-righthand corner of ViennaSQL's main window; select PostgreSQL from that box. This will connect you to the database. Type the following SQL into the lower pane of ViennaSQL's window: CREATE TABLE books ( code CHARACTER(13) CONSTRAINT firstkey PRIMARY KEY, title CHARACTER VARYING(40) NOT NULL, author CHARACTER VARYING(40) NOT NULL, price DECIMAL(4,2), kind CHARACTER VARYING(10) ); Select Query and Execute from the menu bar. Then select Query and Commit from the menu bar. You've now created your first table. Congratulations again! Now, let's populate it with some sample data. Type the following lines of code in the lower pane, replacing what is already there: INSERT INTO books (code, title, author, price, kind) RETURN VALUES ('1-56592-846-6', 'Practical PostgreSQL', RETURN 'John C. Worsley, Joshua D. Drake', 44.95, 'database'); INSERT INTO books (code, title, author, price, kind) RETURN VALUES ('1-56592-616-1', 'Database Programming with JDBC and Java', RETURN 'George Reese', 34.95, 'java'); INSERT INTO books (code, title, author, price, kind) RETURN VALUES ('0-596-00160-6', 'Learning Cocoa', 'Apple Computer', 34.95, RETURN 'macintosh'); You'll need to execute and commit these statements just as you did the last one (see Figure 9-2). Figure 9-2. Executing and committing statements Now, in order to view the data we just inserted, let's check out some Java code! I've written some Java that will connect to our database and return some values from each row of the books table. Download connectPostgreSQL.java (http://www.macdevcenter.com/mac/2002/06/07/examples/connectPostgreSQL.java) to your desktop. Now, in the Terminal, switch to your Desktop folder and compile the source. Then, run the resulting Java class. Here's what I had to enter into the Terminal to accomplish this: % cd ~/Desktop % javac connectPostgreSQL.java % java connectPostgreSQL After pressing Return on the third command line, you should see output similar to this: Practical PostgreSQL costs 44.95 Database Programming with JDBC and Java costs 34.95 Learning Cocoa costs 34.95 And that's all I wrote. Well, almost. I've included some links in the See Also section for more information on PostgreSQL and some of the technologies that were touched on in this hack. 100.4 See Also
Michael Brewer |
EAN: 2147483647
Pages: 161