Adding Code to or Editing Recorded Macros
Suppose you've recorded a macro that enters a series of labels, sets their font, and then draws a border around them. Then you discover that you forgot a step or recorded a step incorrectly-you chose the wrong border format, for example. What do you do?
To add code to an existing macro, you can record actions in a temporary macro and then transfer the code to the macro you want to change. For example, to add to the CompanyAddress macro a step that sets the font options for the company's name to 14-point Cambria Bold Italic, follow these steps:
-
Switch to the worksheet containing the address you typed earlier, and select cell A6, which contains the name of the company.
-
Turn on the macro recorder. In the Record Macro dialog box, type the name MacroTemp, and then click OK.
-
Press Ctrl+1 (this is the fastest way to get to the Format Cells dialog box, assuming the current selection is a cell).
-
Click the Font tab, and then select 14-point Cambria Bold Italic. Click OK to apply the formats.
-
Click the Stop Recording button.
-
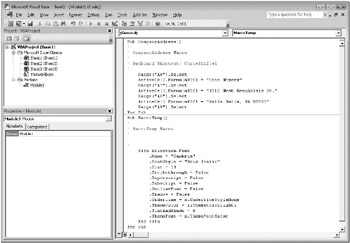
Click Macros in the Code group on the Developer tab. In the Macro dialog box, select MacroTemp, and click Edit. A window appears containing the original macro you recorded plus the MacroTemp macro, as shown in Figure 26-8.
-
Select all the code inside the MacroTemp macro-from the line beginning with With through the line beginning with End With-and then press Ctrl+C to copy it.
-
Scroll up to display the CompanyAddress macro.
-
Click at the beginning of the line that contains this statement:
Range("A7").Select -
Press Enter to create a blank line. Then position the insertion point at the beginning of the blank line.
-
Press Ctrl+V to paste.
-
Scroll down, and delete the entire MacroTemp macro, from the Sub statement to the End Sub statement.

Figure 26-8: The MacroTemp macro contains the formatting code you recorded.
The CompanyAddress macro now looks like this (with the comment lines removed):
Sub CompanyAddress() Range("A6").Select With Selection. Font .Name = "Cambria" .FontStyle = "Bold Italic" .Size = 14 .Strikethrough = False .Superscript = False .Subscript = False .OutlineFont = False .Shadow = False .Underline = xlUnderlineStyleNone .ThemeColor = 2 .TintAndShade = 0 .ThemeFont = xlThemeFontMajor End With ActiveCell.FormulaR1C1 = "Coho Winery" Range("A7").Select ActiveCell.FormulaR1C1 = "3012 West Beaujolais St." Range("A8").Select ActiveCell.FormulaR1C1 = "Walla Walla, Wa 98765" Range("A9").Select End Sub To test the macro, return to Excel, clear the company name and address you typed earlier when you recorded the macro, and then press Ctrl+Shift+A.
The With and End With statements that the macro recorder created when you recorded MacroTemp (the statements you subsequently copied into CompanyAddress) specify a group of properties belonging to an object-in this case, the font of the current selection. The With... End With construct provides a kind of shorthand for a series of VBA statements that would otherwise look like this, for example:
Selection.Font.Name = "Cambria" Selection.Font.FontStyle = "Bold Italic" Selection.Font.Size = 14
In the CompanyAddress macro, the ActiveCell object and the Selection object both refer to the same range on the worksheet, cell A6. Because you can apply a series of font-formatting options to an entire range, Excel records the action with Selection, rather than with ActiveCell. Enclosing the property assignments within the With... End With structure simplifies the code and also makes it run faster.
EAN: 2147483647
Pages: 260