Using the Macro Recorder
To make the macro recorder accessible, you need to display the Developer tab on the Ribbon. Click the Microsoft Office Button, and then click Excel Options. In the Popular category, select the Show Developer Tab In The Ribbon check box, and then click OK. To start the macro recorder, click Record Macro in the Code group on the Developer tab.
| Note | After you have exercised the option to include the Developer tab on the Ribbon, the Record Macro button appears on the status bar next to the word Ready as well as in the Code group on the Developer tab. It remains accessible there even if you subsequently clear the Show Developer Tab In The Ribbon check box in the Excel Options dialog box. You'll probably want to keep the Developer tab on your Ribbon, however, because the tab includes numerous other commands useful for working with macros. |
To see how the recorder works, try creating a simple macro that inserts a company name and address in a worksheet. Follow these steps:
-
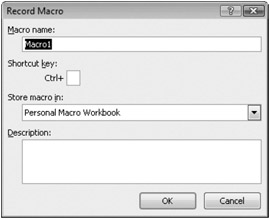
Click Record Macro in the Code group on the Developer tab. Excel displays the Record Macro dialog box shown in Figure 26-1.
-
Assign a name to the macro. You can accept the suggestion (Macrol) or type your own name. Let's use CompanyAddress. (The macro recorder doesn't permit space characters.)
-
Assign a key combination to the macro by typing a letter in the text box. If possible, use something related to the purpose of the macro so you'll remember it later. Let's use uppercase A. (The recorder distinguishes capital letters from lowercase ones.)
-
Accept the default of This Workbook for Store Macro In. (We'll discuss the Personal Macro Workbook option later in this chapter.)
-
Type a description for the macro in the Description box. (Enter company address will do nicely.)
-
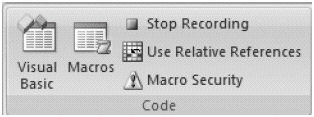
To begin recording, click OK. In the Code group on the Developer tab, the Record Macro button is replaced by a Stop Recording button, as shown in Figure 26-2. (The Stop Recording button also appears on the status bar.)
-
Select A6, and type Coho Winery. In A7, type 3012 West Beaujolais St., and in A8, type Walla Walla, WA 98765.
-
In the Code group on the Developer tab, click Stop Recording.

Figure 26-1: In the Record Macro dialog box, you must provide a name and indicate where the macro should be stored. The Shortcut Key and Description fields are optional.

Figure 26-2: The change from Record Macro to Stop Recording is your only indication that your actions are now being preserved for posterity.
To test the new macro, clear the worksheet, and then press Ctrl+Shift+A. Excel runs the macro and performs the sequence of actions in the same way you recorded them.
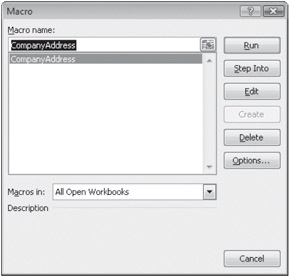
If you forget the keyboard shortcut for a macro or if you didn't bother to assign one, you can run your macro by clicking Macros in the Code group on the Developer tab. In the Macro dialog box that appears, shown in Figure 26-3, you can select a macro and run it. You can also click the Edit button in the Macro dialog box to visit (and alter) the code or click the Options button to assign the shortcut you neglected to assign earlier.

Figure 26-3: The Macro dialog box lets you run macros without keyboard shortcuts.
Recording with Relative References
The macro you just recorded has one serious fault (other than that it doesn't create your company address): It always does its business in cells A6:A8. It would be considerably more valuable if you could use it anywhere.
By default, the macro recorder records absolute references. That is, if you're in A6 when you record a cell entry, the action will play back in A6. To make it record relative references instead, click Use Relative References in the Code group on the Developer tab.
The Use Relative References button is a toggle. If you're using relative references and you click this button again, the recorder returns to absolute referencing. You can toggle between the two modes as often as you like while you are recording-which means your recorded macros can contain whatever combination of absolute and relative references suits your purposes.
| Caution | When clicked, the Use Relative References command does not change to say Use Absolute References, as you might expect. Instead, it appears highlighted on the Ribbon when you're recording (or set to record) relatively, remaining unhighlighted when you're recording absolutely. To avoid disappointment, be sure to verify the state of this toggle when you begin recording. |
What to Do When the Macro Recorder Does Not Give You What You Expect
The most likely reason a recorded macro might not generate the expected result is that it was recorded in the wrong relative/absolute state. If output from your macro does not appear in the desired worksheet location, consider the possibility that you recorded it with absolute instead of relative references, and try recording it again.
A second common cause for disappointment is that the macro recorder records completed actions only. An example will illustrate: Suppose you want to record a macro that will place a full date and time stamp in the current cell. You know you can press Ctrl+; to generate the current date and Ctrl+: to generate the current time. But you want the date and the time in the same cell, and Excel has no keyboard shortcut for that. A macro can help.
One way to achieve the desired stamp (without a macro) is to type =NOW() and then press F9 before pressing Enter. The NOW function returns the full date and time, and pressing F9 before pressing Enter converts the formula to its calculated result.
You might suppose you could turn on the macro recorder, set references to relative, and then record exactly those steps: =NOW(), F9. Unfortunately, the result of your work would be a macro that always entered the date and time of its creation, not the current date and time. That's because the macro recorder "sees" a sequence such as this as a single action, even though it might seem like two separate steps to you.
The solution to this problem is to find another way to carry out the action that really does involve discrete steps. You can accomplish that by typing the formula, pressing Enter, selecting the cell in which you typed the formula, copying it to the Clipboard, and then using the Paste Special command and selecting Values in the Paste Special dialog box. That's the long way around when you want to convert a formula to its result immediately, but it works for the macro recorder.
Further troubleshooting of recorded macros requires a rudimentary understanding of VBA. If you like the convenience and enhanced productivity that macros afford, you will probably find it worthwhile to look at the code that the macro recorder generates and learn a bit about how that code works. If you're new to VBA, the following sections will help you get started.
EAN: 2147483647
Pages: 260