Using Microsoft Query to Import Data
If you don't have a connection already set up for the data you need, you can create one with the help of Microsoft Query, a versatile querying tool included with the 2007 Microsoft Office system. Query generates statements in SQL and passes those statements to the data source while shielding you from the need to master SQL. If your query is relatively simple, you might not need to interact directly with Query; instead, you can formulate your request by means of a four-step wizard that acts as a front end to Query.
The first step in creating a query is to form a connection to the data source. Click the Data tab, click From Other Sources (in the Get External Data group), and then click From Microsoft Query. The Choose Data Source dialog box, shown in Figure 23-13, appears.
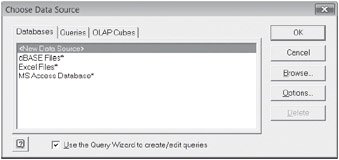
Figure 23-13: The first step in using Microsoft Query is to choose a data source.
You can query a separate Excel file (extracting particular records from a table in that file), a dBase file, or an Access file by selecting one of the options on the Databases tab. To edit an existing query (a. dqy file that has already been created), click the Queries tab. To work with OLAP data, click the OLAP Cubes tab. Otherwise, click <New Data Source>, and click OK. If you click <New Data Source> and click OK, the Create New Data Source dialog box prompts you to supply a name for the new query, identify the driver for the type of database you are going to query, supply logon information for your connection to the external source, and select the table in the external database you want to use. Click OK to save your changes.
In the following sections, we'll assume for the sake of simplicity that you're going to work with an Access file. After double-clicking MS Access Database in the Choose Data Source dialog box (or selecting that entry and clicking OK), you will see a Select Database dialog box:
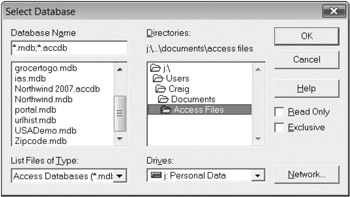
We'll choose the file Northwind.mdb (a sample database that Microsoft included with earlier versions of Access) for this example. After we double-click that file in the Select Database dialog box, the opening page of the Query Wizard, shown in Figure 23-14, appears.
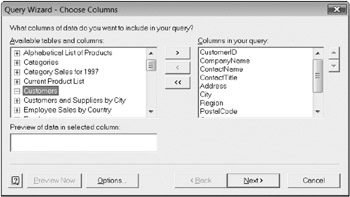
Figure 23-14: The Query Wizard, a friendly front end to Microsoft Query begins by asking you to choose the columns of data that you want to include in your query.
Choosing Tables and Fields (Columns)
On the first page of the wizard, you see a list of tables on the left and selected fields (Query refers to them as columns) on the right. Outline controls (plus signs and minus signs) appear to the left of table names. Your job is to pick the particular fields, from one or more tables, that you want to include in your query.
To add a field to your query, click the plus sign beside the name of the table to which it belongs. This expands the table to reveal its fields. Then select the field, and click the right arrow button to add those fields to your query. (To add all fields from a given table, you can select the table name and click the right arrow button.)
If you add fields from a second or subsequent table to your query, Query performs a join operation on the selected tables, if it can. Query joins related tables when it recognizes a primary key field in one table and a field with the same data type (and typically, but not necessarily, the same field name) in the other table. For an example of a query that involves two joined tables, see "Working Directly with Microsoft Query" on page 764.
Filtering Records
After specifying tables and fields and clicking Next, you arrive at the Query Wizard -Filter Data page, shown in Figure 23-15. Here you can specify one or more filter criteria. This is an optional page; if you skip it, Query returns all records from the selected tables.
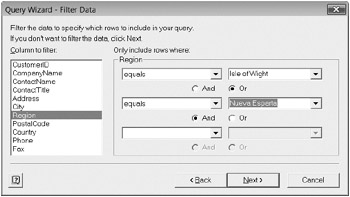
Figure 23-15: Filters, specified on the second page of the wizard, select the records that meet your criteria.
A filter criterion has three components: a field name, a relationship, and a value. You can specify as many as three criteria for each field, connected by And or Or. The list at the left side of the wizard page includes all the names of your selected fields. The lists in the center include available relationships, and the lists at the right include all the available values for the selected field. Figure 23-15 shows how the second page of the wizard would look if you wanted to see only those records in which the Region field equaled either Isle of Wight or Nueva Esparta.
Inside Out-For More Relationships, Use Microsoft Query Directly
The Query Wizard offers a long list of relational operators for building filtering criteria. If you use Microsoft Query directly, four additional relationships are available: Is One Of, Is Not One Of, Is Between, and Is Not Between. These additional operators work with two or more values-something the wizard doesn't accommodate. For example, Is Between and Is Not Between both require two values. Is One Of and Is Not One Of can use a list of values. For more information, see "Working Directly with Microsoft Query" on page 764.
| TROUBLESHOOTING | The Query Wizard won't let me get rid of a filter. The Query Wizard is a little clumsy when it comes to letting you remove filters. It doesn't have a Delete button. Clicking Back to return to the previous screen and then clicking Next to return to the Filtering screen doesn't get it done (the previous filter is still there). Clicking Cancel either bails you out of the entire edit process or takes you to Microsoft Query, neither of which is what you probably want. To get rid of a criterion, open its relationship list, and select the blank entry at the top of the list. |
If you filter on two more different fields, you'll find that when you select the second field, the wizard removes the first criterion from view. You can tell that you've applied a criterion to a field, however, by looking at the left window on the page. Filtered fields appear there in bold.
| Note | Because the wizard accepts up to three criteria per field, you can use it to generate some pretty marvelous filters. But it's a whole lot easier to see what you're doing if you use the full Query interface for multifield filtering. For details, see "Working Directly with Microsoft Query" on page 764. |
Sorting Records
After you finish filtering and click Next, the wizard presents its Query Wizard - Sort Order page, shown in Figure 23-16. Sorting is optional, of course. If you decline, Query returns records in the order in which they're stored in the external database field.
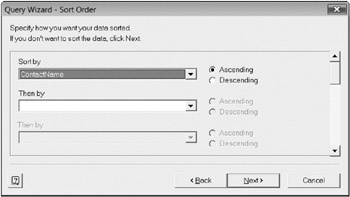
Figure 23-16: Use the Sort Order page to arrange the records that are returned to Excel.
To sort, begin by clicking the Sort By list. There you'll find the name of each field in the table you're querying. Select a field, and then select the Ascending or Descending option to the right of the list. You can sort on as many fields as you want. To remove a sort item, select the blank entry at the top of the list. In Figure 23-16, we've asked for records sorted in ascending order by ContactName. Click Next.
Saving the Query or Moving to Microsoft Query
The Save Query button, on final page of the wizard (see Figure 23-17), lets you name and save your query as a DQY file. The resulting DQY file encapsulates all the selections you've made in the construction of your query-your choice of tables and fields, your filters, and your sorting specifications. Note that this is different from the ODC file you might have made earlier. An ODC file records information required to achieve a connection with an external data source; a DQY file records query specifications.
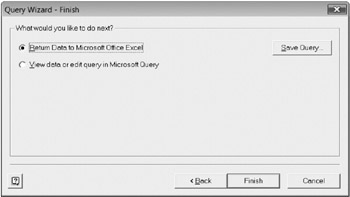
Figure 23-17: Save the query if you want, and indicate whether you want to return directly to Excel or go on to the full Microsoft Query for further processing.
The View Data Or Edit Query In Microsoft Query option on the last page of the wizard lets you move to the full Microsoft Query for further processing. For information about why you might want to do this and how to use Query, see the following section. If you don't want to move on to Query, select Return Data To Microsoft Office Excel, and click Finish. Click OK in the Import Data dialog box to import the data based on your query.
Working Directly with Microsoft Query
The Query Wizard is an ideal tool for creating relatively simple queries, but it doesn't provide access to all the power of Microsoft Query. You'll need to work directly with Query if your query uses criteria involving calculations (other than simple comparisons) or if you want to create a query that prompts the user for one or more parameters when run. Query, but not the Query Wizard, also lets you do the following:
-
Filter on the basis of fields that you don't intend to import into Excel-that is, fields that are not included in the result set, the records that meet your current criteria.
-
Filter using Is One Of, Is Not One Of, Is Between, or Is Not Between.
-
Limit the result set to unique entries.
-
Perform aggregate calculations, such as totals or averages.
-
Create your own joins between tables.
-
Edit a query's SQL code.
Getting to Query
If you have already stored the query you want to edit in a DQY file, you can open it in Microsoft Query using either of the following methods:
-
Click the Data tab, and then click Existing Connections. Your query will appear in the list, alongside your ODC files, marked by a distinctive icon-two intersecting blue rectangles.
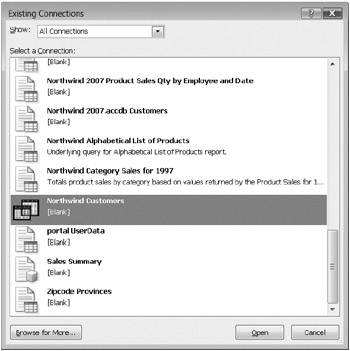
-
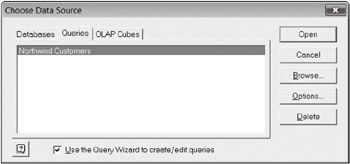
Click the Data tab, and then click From Other Sources. On the menu that appears, click From Microsoft Query. In the Choose Data Source dialog box, click the Queries tab. Your query should appear there:
If you have just finished creating your query in the Query Wizard and want to open it in Microsoft Query for further editing, select View Data Or Edit Query In Microsoft Query on the final page of the wizard (see Figure 23-17), and click Finish.
Figure 23-18 shows Query with a query against three tables from Northwind.mdb. The tables are Products, Categories, and Suppliers. The Products table is joined to the Categories table in the CategorylD field and to the Suppliers table in the SupplierlD field. The query shows selected fields from these tables, revealing products by category and supplier (CompanyName), along with some price and inventory information.
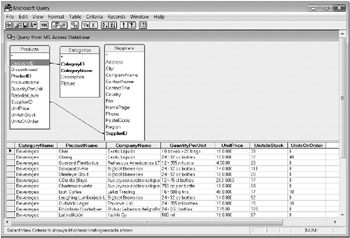
Figure 23-18: We're using Query to edit a query against three tables in Northwind.mdb.
Note that the Query window is divided horizontally into two panes-an upper pane for tables and a lower one for data. The tables pane shows a window for each table that's currently involved in the query. The data pane shows the result set-the collection of records that meet the criteria. (At the moment, we haven't defined any filters, so all records in the three tables are included.)
Shortly, you'll see that Query can also accommodate a third pane, in which you specify filtering criteria. All these panes, as well as the individual table windows, are independently sizable and movable. We've bumped the data pane down a bit from its default position to make more room for the Suppliers and Products tables, and we've stretched the windows in which those tables are displayed so that we won't have to scroll to see all their fields. You'll find that Query seldom gives you an ideal window layout when it starts, so you'll want to manipulate it to get the view you need.
Adding and Removing Tables
To add a table to the data pane, click Table, and then click Add Tables. The Add Tables dialog box lists all the tables available in the data source you're using. To add a table, select it, and click Add. You can add as many as you like before closing the Add Tables dialog box. To remove a table, select it in the table pane, and then click Table, Remove Table.
Working with Joins
If Query doesn't already have your tables joined appropriately, you can create your own joins by dragging. If you click a field in one table and then drag to a field in another, Query creates a join based on those fields and draws a line to indicate that it has done so. You can create, inspect, and modify joins by double-clicking anyjoin line or by clicking Table, Joins. Figure 23-19 shows the Joins dialog box for the query shown in Figure 23-18.
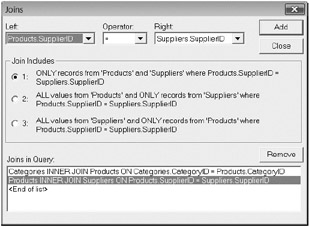
Figure 23-19: The Joins dialog box tells you exactly how your tables are joined and lets you modify the joins or create new ones.
If you're not sure what's joined to what or what the effect of a join is, it's a good idea to visit the Joins dialog box. The Join Includes area in the dialog box provides a pretty clear description of what's happening. By working with the Left, Operator, and Right fields, you can also modify the ways in which your tables are joined.
Adding, Removing, and Moving Fields
To add a field to your data pane, double-click it in a table window. To add all fields to the data pane from a table, double-click the asterisk at the top of the table window.
To remove a field, select its heading (this action selects the entire field), and press Delete. To move a field from its current location, first select its heading, and then drag it to the position you want.
Inside Out-Hide Selected Fields Without Removing Them from the Query
If you find yourself scrolling horizontally a lot but don't want to rearrange your fields, you can hide fields that you temporarily don't need to see. Select a field, and then click Format, Hide Columns. To redisplay a hidden field, click Format, Show Columns; select the field in the Show Columns dialog box; and then click Show.
Renaming Fields
By default, Query uses the names of your fields as field headings. If these field names are short and cryptic, you might want to supply different headings.
Select the column you want to change, and then click Records, Edit Column. In the Edit Column dialog box, type a new heading in the Column Heading box, and then click OK.
Sorting the Result Set
Query initially displays records in the order in which they are stored in the external data source. You can change their order by clicking Records, Sort. Figure 23-20 shows the Sort dialog box with the CategoryName field selected. (The dialog box, like others in Query, qualifies field names with the tables to which they belong; it says Categories. CategoryName because the CategoryName field is part of the Categories table.)
The Sorts In Query section in the dialog box indicates what sort specification, if any, is currently in effect. In Figure 23-20, the list is empty, indicating that the result set is currently unsorted. The Column list at the top of the dialog box lists all the table fields available for sorting. When you add a field to the Sorts In Query list, Query performs the sort immediately but leaves the dialog box open in case you want to sort on additional fields. You can sort on as many as you please.
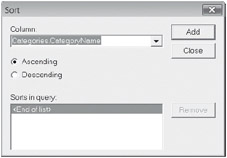
Figure 23-20: The Sort dialog box displays the current sort order and lets you add fields from a list.
For multiple-field sorts, sort first on the most important sort field. Then sort on your secondary field, and so on. Figure 23-21 shows the result set sorted first by Suppliers. CompanyName and then by Products.ProductName. (The Asc abbreviation in the Sorts In Query list indicates ascending sorts.) The records now are alphabetized by supplier, with records of a common supplier alphabetized by product name.
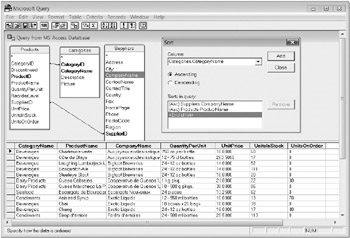
Figure 23-21: We've sorted first by the supplier's company name and then by product name.
When you click Add in the Sort dialog box, Query adds your new sort field above the currently selected field in the Sorts In Query list. If you accidentally add a field in the wrong order, select it, and click Remove. Then add the field in the correct position.
Sorting with the Toolbar The Sort icons on the Query toolbar work differently from the Sort command on the Ribbon in Excel. You can add a sort to the current list by holding down the Ctrl key when you click a Sort icon. If you do not hold down Ctrl, clicking a Sort icon replaces the current sort with the new one.
Filtering the Result Set
Query provides a variety of methods by which you can filter the result set so that it includes only the records in which you're interested. As with the Query Wizard, you create a filter by specifying one or more criteria-conditions that particular fields must meet.
Creating Exact-Math Criteria The simplest kind of criterion is one in which you stipulate that a field must exactly equal some value. Query makes it extremely easy to create such criteria:
-
Select a field value that meets your exact-match criterion.
-
Click the Criteria Equals button on the toolbar:
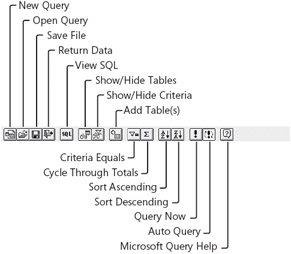
For example, suppose you want to filter the result set shown in Figure 23-21 to include only those records in which the CompanyName field is Bigfoot Breweries. To do this, select any record with the CompanyName field that already equals Bigfoot Breweries, and click the Criteria Equals button. Query responds by displaying the criteria pane (if it's not already displayed) and applying the new filter to the table, as shown in Figure 23-22.
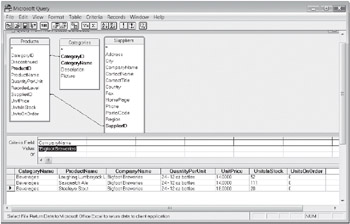
Figure 23-22: When we clicked the Criteria Equals button, Query displayed the criteria pane and applied the filter to the result set.
| Note | After you use the Criteria Equals button to specify an exact-match criterion, you can quickly switch to a different match. Type a new value in the criteria pane to replace the current one. |
If you have used the Advanced Filter command (see "Using the Advanced Filter Command" on page 689), you'll notice that the criteria pane in Query looks a lot like a criteria range in an Excel worksheet. Field headings appear in the top row, and criteria are stated in subsequent rows. Although you can type new criteria or edit existing ones directly in the criteria pane, it's not necessary, because the Query menu commands take care of entering information in the criteria pane for you. In fact, you don't need to have the criteria pane on your screen at all.
| Note | To remove the criteria pane, click the Show/Hide Criteria button on the toolbar in Query, or click View, Criteria. To remove the tables pane, click Show/Hide Tables, or click View, Tables. |
Using Multiple Exact-Match Criteria To generate a query that uses exact-match criteria in two or more fields, repeat the process just described for the second and each subsequent criterion. For example, to filter the result set in Figure 23-21 to show only those records with CompanyName equal to Exotic Liquids and CategoryName equal to Beverages, select Exotic Liquids in the CompanyName field, click Criteria Equals, then select Beverages in the CategoryName field, and click Criteria Equals again. As Figure 23-23 shows, the criteria pane then shows the two criteria on the same line. Just as with an Excel criteria range, Query treats criteria on the same line as if they are connected by the AND operator.
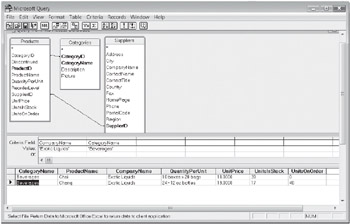
Figure 23-23: When you use the Criteria Equals button in two separate fields, the filter in Query admits only those records that meet both criteria.
By default, Query updates the result set every time you add a new field to the data pane, rearrange the order of the existing fields in the data pane, change a sort specification, or change a filter criterion. (If you're working in the criteria pane, the query is executed as soon as you click away from the current criteria-pane call.) In response to these actions, Query creates a new SQL statement and executes that statement against your data source. (You can see the SQL code-and edit it, if you are inclined-by clicking the View SQL button on the toolbar.) If your data source is particularly large or network traffic is high, Automatic Query can cause annoying delays. You can turn off the Automatic Query feature so that Query executes the current SQL statement only when you ask it to do so.
You can determine whether Automatic Query is on by verifying whether the Auto Query button on the toolbar is selected (has a "pushed in" appearance). To turn the feature off, click the Auto Query button, or click Records, Automatic Query.
To execute the current query in manual mode, click the Query Now button, or click Records, Query Now.
Using Menu Commands to Specify Exact-Match Criteria If you'd rather use menu commands than toolbar buttons, you can specify an exact-match criterion as follows:
-
Select a field value that meets your specification.
-
Click Criteria, Add Criteria. In the Add Criteria dialog box, click Add.
Removing Criteria The simplest way to remove a filter criterion is to select the criterion's heading in the criteria pane and press Delete. To remove all criteria and restore the unfiltered result set, click Criteria, Remove All Criteria.
Specifying Comparison Criteria To specify a comparison criterion, follow these steps:
-
Click Criteria, Add Criteria. You'll see a dialog box similar to the one shown in Figure 23-24.
In the Add Criteria dialog box, you can construct your criteria by selecting options from various lists. For example, you can select a field from the Field list and then select an operator, such as Is Greater Than, in the Operator list. You can also enter a value in the Value text box by typing it or clicking the Values button and selecting from the list.
Note For comparison criteria that don't involve computed fields, be sure the Total field in the Add Criteria dialog box is blank, as it is in Figure 23-24. For more information about the Total field, see "Filtering on Calculated Fields" on page 777.
-
When you have filled out the Field, Operator, and Value fields, click Add.
Query responds by creating the appropriate entry in the criteria pane and, if Automatic Query is on, executing the new query. The Add Criteria dialog box remains open so you can specify more criteria.
-
To add another criterion, select the And option or the Or option at the top of the dialog box, and then type the information as before.
-
When you've finished typing criteria, click Close.
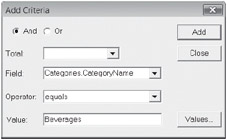
Figure 23-24: The Add Criteria dialog box lets you select fields, comparison operators, and values.
Filtering on Fields That Are Not in the Result Set Your filter criteria can be based on fields that are not currently displayed in the result set. The Field list in the Add Criteria dialog box includes all fields in all active tables, not only the fields you plan to return to Excel.
Limiting the Result Set to Unique Entries To limit the result set to unique entries, click View, Query Properties. In the Query Properties dialog box, select Unique Values Only. You can make this selection before or after you create your filter.
Comparing Fields Your comparison criteria can compare the value in one field to that in another. For example, to display records where UnitsInStock is less than Reorder-Level, you fill out the Add Criteria dialog box as shown in Figure 23-25. Note that you have to type a field name in the Value box.
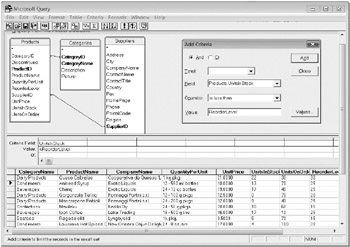
Figure 23-25: This criterion returns records where units on stock are below the reorder level.
Performing Aggregate Calculations
You can analyze your results thoroughly after you get the data back onto the Excel worksheet. If you prefer, however, you can have Query do some of the calculating for you. With Query, you can make aggregate calculations (sums, averages, counts, and so on) the basis of filtering criteria.
Query refers to all calculations as totals, although summing values is only one of the options available. The aggregate functions that are common to all database drivers are AVG (average), COUNT, MIN (minimum), and MAX (maximum). Your driver might support additional functions.
Clicking Through the Totals One way to perform aggregate calculations is by clicking the Cycle Through Totals button on the toolbar in Query. For example, to find the total of the UnitsOnOrder field, follow these steps:
-
Display the UnitsOnOrder field in the data pane, and remove all filtering criteria from the criteria pane.
-
Select the UnitsOnOrder field, and click the Cycle Through Totals button.
As Figure 23-26 shows, Query responds by displaying the total in the data pane.
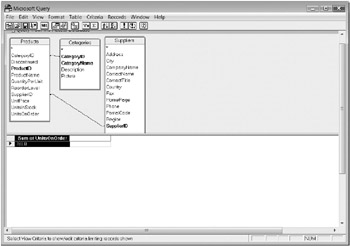
Figure 23-26: We used the Cycle Through Totals button to calculate the total units on order.
Cycling Through the Functions In the previous example, clicking Cycle Through Totals a second time changes the aggregate function from SUM to AVG, and the number shown in the data pane changes accordingly. Successive clicks on the Cycle Through Totals button result in the count, the minimum, and the maximum. One more click returns the result set to its unaggregated state.
| Note | Not all the aggregate functions are available for every field type. |
Using Menu Commands If you prefer menus to tools, you can use the Edit Column command:
-
Click Records, Edit Column. (Alternatively, double-click the field heading.)
-
In the Edit Column dialog box (see Figure 23-27), select the function you want from the Total list.
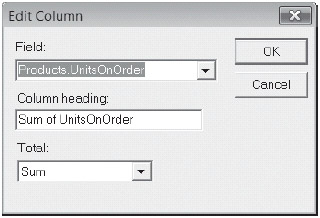
Figure 23-27: Instead of clicking Cycle Through Totals, you can click Records, Edit Column.
Aggregating Groups of Records In addition to grand totals, you can also calculate totals for groups of records. For example, to find out how many units are on order for each supplier company, do the following:
-
In the data pane, display the CompanyName field followed by the UnitsOnOrder field.
-
Select the UnitsOnOrder field, and click Cycle Through Totals.
As Figure 23-28 shows, Query displays one record for each company and shows the total units on order for each.
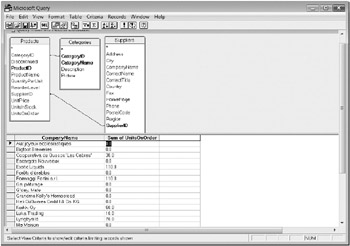
Figure 23-28: You can apply aggregate calculations to groups of records; here we calculated the total units on order per company.
Using More Than One Aggregate Field You can add as many aggregate fields to your result set as you need. To display both sums and averages for a numeric field, for example, you can drag that field to the data pane twice. Click the Cycle Through Totals button to apply the function you want to each copy of the field.
Filtering on Calculated Fields A field that performs an aggregate calculation is called a calculated field. You can use calculated fields as the basis for filtering criteria. To base a criterion on a calculated field in the Add Criteria dialog box, use the Total list to select the function you want. (If you're entering the criterion directly in the criteria pane, type the function name, and enclose the field name in parentheses.) Figure 23-29 shows a criterion that returns the names of companies for whom the total number of products on order is greater than or equal to 20.
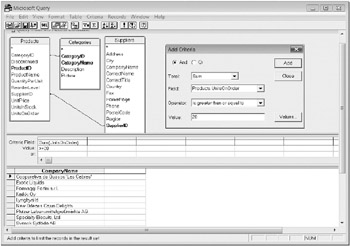
Figure 23-29: We've filtered the supplier list to show only those companies with 20 or more products on order.
Creating a Parameter-Based Query
A parameter-based query is one in which a filter criterion is based upon a value supplied by the user when the query is executed. To create such a query, first turn the Automatic Query feature off by clicking the Auto Query button on the toolbar. Then specify a criterion in the usual way-either by using the Add Criteria dialog box or by typing values directly in the criteria pane. Instead of typing a value, though, type a left bracket character, a prompt of your choosing, and a right bracket character. (The prompt must not be identical to the field name, although it can include the field name.) When you execute the query, either from within Query or from within Excel, a dialog box containing your prompt appears. Figure 23-30 shows a parameter-based query.
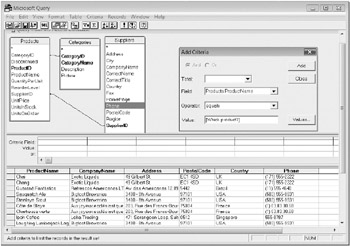
Figure 23-30: When executed, this query will prompt the user for a product name.
Saving a Query
To store your query specification in a reusable DQY file, click File, Save. This step is optional. If you do not save the query, you will still be able to refresh it from the data range that it creates on your Excel worksheet. You will have to re-create it if you want to use it in another workbook, however.
Returning the Result Set to Excel
To return your data to Excel, click File, Return Data To Microsoft Excel. The Import Data dialog box (refer to Figure 23-2) appears, asking you where and how you want the data returned.
EAN: 2147483647
Pages: 260