Disk Management
Hard disks are in your computer for one reason: to reliably store large amounts of data. This section begins with disk concepts. You need to understand the physical nature of disk management before you learn what can and can't be done on them.
After examining physical disk structure, you'll move on to the files and utilities used to manage hard disks. The ultimate goal of disk management is to create file systems in which to store data. The goal of this disk management section is to first introduce you to disk concepts and then finish by presenting the disk configuration process step-by-step, up to file system creation. File systems are covered in depth in Chapter 7.
Understanding Disk Terminology
Hard disks are physically composed of a set of magnetically coated disk platters spinning on a common spindle. Data is written as 0s and 1s on the disk platters by disk heads, also known as read/write heads. Figure 6.1 shows what the inside of a common hard disk looks like.
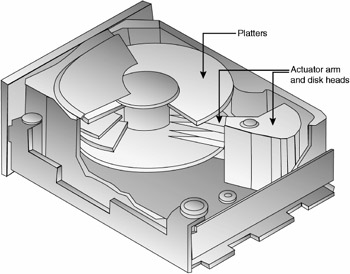
Figure 6.1: An internal view of a hard disk
You will also hear the terms sector, track, and cylinder used when discussing hard disks. A sector is an individual storage unit, 512 bytes in length. A track is a group of sectors laid end to end. If the disk heads were to stay in a stationary position with the platters spinning, the area that the heads cover is a single track. A cylinder is all the tracks, on all platters, a specific distance from the center spindle.
The first sector of the hard disk is called the disk label. It contains disk geometry (the physical number of sectors, tracks, and so on) as well as partition information. The disk label is also referred to as the Volume Table of Contents (VTOC). On a partitioned hard disk, the label is responsible for keeping track of where the logical divisions (called partitions or slices) start and stop. If the label becomes lost or corrupted, the data on your hard disk might become inaccessible.
Disks are managed by a disk controller. The disk controller is built into either the motherboard or the disk device itself. Generally, the place you plug the hard disk into is referred to as the disk controller. Although this is technically not always correct, as IDE hard disk controllers are built in to the device, it is commonly accepted jargon.
Hard disks must be partitioned and formatted before they can store data.
Partitioning and Formatting
To store data on your hard disks, you must first partition the drive. Partitioning, which is done with the format command, creates disk slices. A disk slice is a contiguous range of sectors on a hard disk. Another way to think of a slice is that it's a logical organization of data. If you were to store multiple types of items around your house, say camping gear, compact discs, and books, you would likely put all camping gear in one place, all discs in another place, and your books in a third area, apart from the others. This is what slices enable you to do.
| Note | The terms slice and partition are often used interchangeably. For the IA version of Solaris 9, the term partition is more widely accepted. |
Conventional Solaris wisdom holds that you can create a maximum of eight slices per physical disk. However, Solaris 9 has a new feature called soft partitioning, which allows for more than eight slices per disk. Soft partitioning is done through the Solaris Volume Manager (SVM), which comes with Solaris 9.
| Note | Using the Solaris Volume Manager is an objective for Exam II. It is covered in detail in Chapter 12, "Managing Storage Volumes." |
Here are some rules to follow when setting up slices:
-
Each disk slice can contain only one file system.
-
File systems cannot span multiple slices.
-
Slices cannot span multiple disks.
-
Multiple swap slices on separate physical disks are allowed.
-
After a slice is created, it cannot be resized. To "resize" a slice, you must delete it and re-create a new one.
When you install Solaris, the installation program will automatically configure your disk slices, based on your disk size and anticipated usage. Based on the model of allowing eight slices per disk, each slice is assigned a conventional use. Table 6.1 shows the typical Solaris slices and their intended usage.
| Slice | File System | Intended Purpose |
|---|---|---|
| 0 | root (/) | For operating system files. |
| 1 | swap | Used for virtual memory. Also known as swap space, programs use virtual memory in place of physical memory when the physical memory on your computer runs low. |
| 2 | none | Refers to the entire disk. This slice should not be modified. |
| 3 | /export | This slice is installed on servers only and holds alternate versions of the operating environment for clients with architecture different from that of the server. |
| 4 | none | Optional slice for customization. |
| 5 | none | Optional slice for customization. |
| 6 | /usr | Contains operating system commands, documentation, and system programs. |
| 7 | /home or /export/home | For user-created files and user home directories. On clients, this slice is /home, and on servers, it is /export/home. |
Generally speaking, the only differences between servers and clients in terms of default slices are slice 3 and slice 7. Client computers will not have a configured slice 3, meaning that is available for creation and usage as you see fit. Slice 7 will be /export/home on servers, and /home on clients. One other difference you might see is that some computers will not have slice 6 designated as /usr. On computers like this, the /usr directory is contained in slice 0.
Most hard disks today are large enough to hold all slices needed by Solaris. However, if you have multiple physical disks, you can separate your slices as necessary. For example, one disk could hold slices 0 and 6, while another disk holds the rest of the slices. If you are using multiple disks, the disk holding the operating system files (slice 0) is called the system disk, and other disks are called non-system disks or secondary disks.
| Note | Using multiple physical disks can increase disk input/output (I/O), and can increase the efficiency and speed of your system. |
Before partitioning your drive, you should see its current layout. To do this, use the prtvtoc command. When you use prtvtoc, you must supply the device name of the disk you wish to examine. The device name can be either a raw device name, with the syntax /dev/rdsk/ device_name, or a block device name with the syntax /dev/dsk/device_name.
# prtvtoc /dev/rdsk/c0t0d0s2 * /dev/rdsk/c0t0d0s2 partition map * * Dimensions: * 512 bytes/sector * 63 sectors/track * 16 tracks/cylinder * 1008 sectors/cylinder * 38792 cylinders * 38790 accessible cylinders * * Flags: * 1: unmountable * 10: read-only * * Unallocated space: * First Sector Last * Sector Count Sector * 39098304 2016 39100319 * * First Sector Last * Partition Tag Flags Sector Count Sector Mount Directory 0 2 00 1049328 4162032 5211359 / 1 3 01 0 1049328 1049327 2 5 00 0 39100320 39100319 7 8 00 5211360 33886944 39098303 /export/home #
As you can see, this hard disk has three slices defined: 0, 1, and 7. Slice 2 refers to the whole disk. On this particular computer, the /usr directory is on slice 0. The prtvtoc output shows you many details, including how many sectors, tracks, and cylinders are on your disk, and how the space on the disk is allocated. There are three flags for partitions: 00 means the disk is mountable read/write, 01 means the partition is not mountable, and 10 means the partition is mountable but is read-only.
There are 11 partition tags, which indicate the type of partition. Table 6.2 displays the tags.
| Tag | Meaning |
|---|---|
| 0 | Unassigned |
| 1 | BOOT |
| 2 | ROOT |
| 3 | SWAP |
| 4 | USR |
| 5 | BACKUP |
| 6 | STAND |
| 7 | VAR |
| 8 | HOME |
| 9 | ALTSCTR |
| a | CACHE |
Even if you have no partitions defined on your hard disk, prtvtoc will still show slice 2. This is because slice 2 represents the whole disk.
Using the format Utility
The format utility is the most powerful and versatile utility administrators have for managing hard disks. If you need to prepare a disk for file storage, format will divide the disk into slices and format the slices. If the disk is operational and you need to view configuration information, format will display it. And if the disk is having problems, format can analyze the disk for surface errors and attempt to repair defective sectors.
When you purchase a new hard disk, it might come preformatted from the factory. Even so, you will still want to format the disk under Solaris, just to avoid any possible future storage or compatibility problems. Depending on the size of your disk, formatting could take a few minutes to a few hours.
| Warning | When you format a disk, all data previously on the disk will be destroyed! |
You must be the superuser or have an equivalent role in order to use format. When you type format at a command prompt, you will be asked which disk you wish to work on. If you have only one disk, the choice is easy. Here's an example of the format command's main menu:
# format Searching for disks...done AVAILABLE DISK SELECTIONS: 0. c0t0d0 <ST320011A cyl 38790 alt 2 hd 16 sec 63> /pci@1f,0/ide@d/dad@0,0 Specify disk (enter its number): 0 selecting c0t0d0 [disk formatted, no defect list found] Warning: Current Disk has mounted partitions. FORMAT MENU: disk - select a disk type - select (define) a disk type partition - select (define) a partition table current - describe the current disk format - format and analyze the disk repair - repair a defective sector show - translate a disk address label - write label to the disk analyze - surface analysis defect - defect list management backup - search for backup labels verify - read and display labels save - save new disk/partition definitions volname - set 8-character volume name !<cmd> - execute <cmd>, then return quit format>
Notice that after you select a disk, format tells you the name of the disk, the condition of the drive (disk formatted in this case), and whether there are any defects. Defects on hard disks are not good. However, as your disk ages, it might slowly develop some (or more) defects. If you start seeing a lot of defects, it might indicate that the drive is starting to fail. A certain portion of your usable disk space is reserved for storing defect and formatting information.
Most of the options in the format menu are commands-that is, if you type label, format will prompt you for a new disk label. To format your disk, type format from the format> prompt.
| Note | The format utility will not allow you to format the system disk from within the Solaris operating environment. This makes sense, considering that files needed to run the operating system are on the hard disk, and formatting destroys all data on the disk. If you want to format the system disk, you must do so from the Solaris installation program (boot to the CD-ROM or from the network) or use a third-party format utility. |
Some of the format options display new menus. Those options are partition, analyze, and defect. You will know when you've invoked one of the format submenus, as each has its own prompt: partition>, analyze>, and defect>. Here is what the partition menu looks like:
format> partition PARTITION MENU: 0 - change '0' partition 1 - change '1' partition 2 - change '2' partition 3 - change '3' partition 4 - change '4' partition 5 - change '5' partition 6 - change '6' partition 7 - change '7' partition select - select a predefined table modify - modify a predefined partition table name - name the current table print - display the current table label - write partition map and label to the disk quit partition>
If you wanted to change the 1 partition, you would choose 1 from the partition menu. It's always a good idea, though, to see your current configuration before modifying partitions. Also, remember that if you delete a partition, all data on that partition is lost. Make sure to back up your data before modifying partitions!
| Note | Before taking the test, become familiar with the format and partition menus, and know what each option does. |
Earlier in this chapter, you looked at the prtvtoc command's output of disk information. From the partition menu, you can use the print command to view the same information:
partition> print Current partition table (original): Total disk cylinders available: 38790 + 2 (reserved cylinders) Part Tag Flag Cylinders Size Blocks 0 root wm 1041 - 5169 1.98GB (4129/0/0) 4162032 1 swap wu 0 - 1040 512.37MB (1041/0/0) 1049328 2 backup wm 0 - 38789 18.64GB (38790/0/0) 39100320 3 unassigned wm 0 0 (0/0/0) 0 4 unassigned wm 0 0 (0/0/0) 0 5 unassigned wm 0 0 (0/0/0) 0 6 unassigned wm 0 0 (0/0/0) 0 7 home wm 5170 - 38787 16.16GB (33618/0/0) 33886944 partition>
The flags listed are the same as the flags in prtvtoc, just displayed differently. In this menu, wm means mountable read/write, wu means unmountable, and rm means mountable read-only.
Using the fdisk Utility
If you are using the Solaris 9 Intel Platform Edition, you will have an additional submenu in the format menu, named fdisk. The fdisk utility is commonly used in the DOS and Windows world to create and delete partitions on hard disks, and it serves the same purpose in the Solaris environment.
The configuration options available with fdisk on IA platforms are somewhat different from the standard partitioning structure of Solaris. First of all, a single hard disk can be divided into no more than four fdisk partitions, and at least one of these must be a Solaris partition. Also, the Solaris partition must be made the active partition-that is, the bootable partition. You can create one fdisk partition to span the entire hard disk, or smaller partitions if you choose. The first fdisk partition must begin at cylinder 1, as cylinder 0 is reserved for the master boot record. After you have created an fdisk partition, the other format command options (such as partition and label) work just as they do on the SPARC version of Solaris.
The fdisk menu looks similar to the following:
format> fdisk ... SELECT ONE OF THE FOLLOWING: 1. Create a partition 2. Change Active (Boot from) partition 3. Delete a partition 4. Exit (Update disk configuration and exit) 5. Cancel (Exit without updating disk configuration) Enter selection:
These menu options are fairly self-explanatory. Just remember that deleting a partition destroys all existing data on that partition. Also, if you make changes that you don't want to keep, be sure to use the Cancel option instead of the Exit option.
One other interesting thing to note about creating partitions with fdisk is the number of slices on that partition. On the SPARC version of Solaris, if you use the default hard disk settings, Solaris will create eight slices on the hard disk, and there can be no more than eight at any time (unless you use Solaris Volume Manager, but that's not the point here). On the IA version, Solaris will place ten slices on the hard disk, numbered 0-9.
Slices 0-7 are used for the same purposes as they are in the SPARC Solaris environment. However, slice 8 is used to hold boot information for IA computers and is known as the boot slice. It's located at the beginning of the hard disk (even though based on its number, you might not think this is the case). Slice 9 holds reserved alternate disk blocks and is called the alternate sector slice.
Modifying Partitions
From the partition menu, you can create, delete, and modify partitions. Based on the preceding example, assume that you want to create partition 3 and you want to make it 2GB in size. Can you do that?
The question is, where are you going to get the room? The total disk size is 18.64GB (slice 2), and the currently defined partitions 0, 1, and 7 take up all that space. You certainly don't want to modify partition 0, because it has critical operating system files. Partition 1 contains the swap space, so for now, that's best left untouched as well. That leaves partition 7, which is using 16.16GB of disk space.
To create your partition 3, you will first need to modify partition 7 to make it smaller. Be careful, though, because once you modify a partition's size, all data on that partition is lost. After you have made partition 7 smaller and freed up the required disk space, you can create partition 3.
| Note | The modify command from the partition menu is the most user-friendly way to modify existing partitions. It enables you to specify the size of slices in megabytes and doesn't make you keep track of cylinder boundaries. |
When you modify partition sizes by using the format command, all disk space must be accounted for by the operating system. So when you reduce the size of partition 7 by 2GB, the 2GB of free space is allocated to a temporary partition known as the free hog.
The term free hog elicits some interesting visual images. It's named this because when a new slice needs space, the temporary slice frees up the space. And when a partition is shrunk, the temporary slice hogs the space. The free hog exists only when you are installing Solaris and when you're using the format utility to modify your partition structure.
Using Graphical Disk Management
In Solaris 9, the Solaris Management Console (SMC) can be used to administer hard disks as well as the command line. For people who prefer icons and graphical management, the SMC is a handy interface. The Disks node of SMC is shown in Figure 6.2.
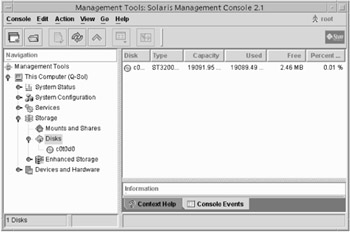
Figure 6.2: Solaris Management Console Disks node
The Disks node shows all recognized hard disks in your system. Perhaps the only confusing thing about the Disks node is what is meant by Used, Free, and Percent Free space. To the unsuspecting eye, it would appear that this disk is full, when it most certainly is not. In Figure 6.2, the used space refers to the amount of disk space occupied by slices. Conversely, the free space is unoccupied space. In this case, 2.46MB of the disk does not contain any partitions. This 0.01 percent of the hard drive is reserved for partition table information and is normal.
To view more-detailed information about a particular disk, select it from the menu on the left or by double-clicking it in the right pane. Specific disk information is shown in Figure 6.3.
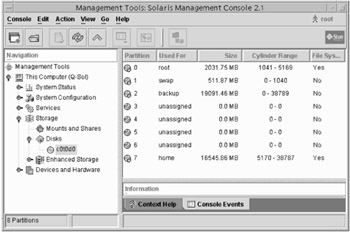
Figure 6.3: Disk partitions
Notice that the information presented in Figure 6.3 is essentially the same information you can find by using the prtvtoc command and the format ➣ partition ➣ print command. From the Action menu in SMC, you can create Solaris partitions and create file systems. The command line still offers the most flexibility when managing hard disks.
| Note | You will find occasional discrepancies between how SMC and the print command in the format utility display partition sizes. For example, the swap space usually appears larger when displayed from format, whereas /home usually looks larger when displayed with SMC. These discrepancies result from the different ways that the utilities gather disk information and are no cause for alarm. |
Analyzing and Repairing a Disk
One of the troubleshooting features of the format command is the ability to perform a surface analysis of a hard disk. A surface analysis can detect errors in file systems and defects on the hard disk. Here is what the analyze menu looks like:
format> analyze ANALYZE MENU: read - read only test (doesn't harm SunOS) refresh - read then write (doesn't harm data) test - pattern testing (doesn't harm data) write - write then read (corrupts data) compare - write, read, compare (corrupts data) purge - write, read, write (corrupts data) verify - write entire disk, then verify (corrupts data) print - display data buffer setup - set analysis parameters config - show analysis parameters !<cmd> - execute <cmd> , then return quit analyze>
Some of the analyses corrupt data and should be used only sparingly. These tests are for when you suspect the disk is damaged and you want to be very thorough in examining the disk. Of course, be sure to back up existing files before running any test that corrupts data. All seven tests attempt to repair defective blocks by default. The simplest (and quickest) test is read. When you perform a read analysis, Solaris warns you:
analyze> read Ready to analyze (won't harm SunOS). This takes a long time, but is interruptable with CTRL-C. Continue?
The read analysis performs two passes on the disk. For an 18GB disk, read took a total of 19 minutes. The read analysis is the only analysis that you can perform on a mounted partition.
If you have a defective sector on your hard disk, the analysis program you ran will tell you. It will also tell you whether it was able to fix the problem. Other times, though, you might be using your system and receive an error message similar to the following:
Error for command 'read' Error level: Retryable Requested Block 199, Error Block: 214 Sense Key: Media Error
This message indicates that block 214 might be damaged. You can try to repair the block with either the repair command from the format menu or by performing a surface analysis.
| Tip | If you know the number of the potentially defective block, you can configure analyze through the setup command to scan only a certain portion of blocks. This can save you a great deal of time as opposed to running an entire surface scan. |
Adding a Disk
This section on hard disk management is a step-by-step guide to installing a new hard disk into your Solaris computer. In practice, the exact steps you need to take might differ slightly from this list.
Here's what to do to add a secondary disk to your computer:
-
If your machine is running, create a /reconfigure file. This will cause Solaris to check for new hardware the next time it is booted. If your system is already powered off, don't worry about this step, because a reconfiguration check can be initiated another way.
# touch /reconfigure
-
Turn off your computer and all attached peripherals. Leave the computer plugged in, because this provides a natural ground. (Frying hard disks isn't as easy as frying RAM, but you still don't want to be careless with electronic equipment.)
# init 5 (or whichever shutdown command you prefer)
-
Connect the new hard disk to your computer. If you are unsure how to do this, consult your hard disk manufacturer's instructions. If you have SCSI disks, make sure the new disk you are connecting has a different SCSI ID than other SCSI devices in your system. If this is an IDE disk, make sure to configure the appropriate master/slave relationship.
-
Turn on all peripherals and your computer. If you have created the /reconfigure file, your system should detect the new disk. If you have not created the /reconfigure file, execute the following command to perform a reconfiguration boot:
ok boot -r
-
Log in as root, or log in as yourself and assume the superuser identity or equivalent role.
-
At the command line, invoke the format command. Select the disk you wish to modify. If this is the second disk in the system, it will be displayed as disk 1. The third disk will be disk 2, and so on.
# format
-
In the format command, go to the partition menu. Display the current partition table and then modify it as necessary.
format> partition partition> print partition> modify
When presented with the Select partitioning base: prompt, choose 1. All Free Hog to start from scratch. Set up the new slices as needed.
-
Name the partition table and label the disk. You will be prompted for each entry.
-
Quit the partition menu and verify the format of the disk.
partition> quit format> verify
-
Create file systems for each slice and mount your new file systems. Creating and mounting file systems is covered in Chapter 7.
-
Copy data to the new file systems or restore data from backup to the new file systems.
| Note | Restoring data from backups is covered in Chapter 9, "System Backups and Restores." |
If you are replacing the system disk in a computer, the installation process is slightly different. For one, with no system disk, Solaris cannot boot from a local disk. You must boot either to a CD-ROM or from the network. In many cases, if the system disk needs to be replaced, the easiest solution is to boot from CD-ROM (or the network) and perform a new installation of Solaris. Alternately, you can install the disk, create slices, and restore data from backup.
-
Here are steps to install a new system disk:
-
Turn off your computer and all attached peripherals. Leave the computer plugged in, because this provides a natural ground.
-
Remove the defective hard disk. Connect the new hard disk to your computer. If you are unsure how to do this, consult your hard disk manufacturer's instructions. If you have SCSI disks, make sure the new disk you are connecting has a different SCSI ID than other SCSI devices in your system. If this is an IDE disk, make sure to configure the appropriate master/ slave relationship.
-
Turn on all peripherals and your computer. You can boot from either the CD-ROM or the network, if you have a network boot server configured:
ok boot cdrom - or- ok boot net
-
When the login prompt appears, log in as root, or log in as yourself and assume the superuser identity or equivalent role.
-
If you are not going to perform a new installation, use the installboot command to install a boot block on the new disk. This will make the disk bootable.
After completing these steps, you can either perform a new installation or create and format slices and restore from backup.
Unsupported Hard Disks
Occasionally, you will encounter a third-party disk drive that is not supported by Solaris. If the format utility does not recognize your hard disk, this might be the problem. In these cases, you will need to either supply a device driver from the disk manufacturer or add an entry in the /etc/format.dat file. If the hard disk itself is not recognized, it's more likely that you'll need a driver. If the hard disk you are installing has a geometry that's not known to Solaris, an entry in the /etc/format.dat file will likely do the trick.
| Note | SCSI-2-compatible disk drives are automatically configured by the format utility and do not require an entry in the format.dat file. |
You have just purchased a new large SCSI hard disk to increase the storage capacity on your Solaris 9 server. The current system has only three other SCSI devices: two hard disks and a CD-ROM. From previous training, you know that your Ultra 320 SCSI chain can handle up to 15 devices without a problem. After business hours, you warn all remaining users to log out of the server and you shut down the server to add the new disk.
However, when you attempt to reboot the server, it does not boot into Solaris. You get to the OpenBoot PROM and receive a message about not being able to find the boot device. After disconnecting the new disk, the server boots properly. Suspecting a bad SCSI disk, you take your new disk and plug it into your workstation. The workstation boots properly. What could be the problem?
When troubleshooting failed hardware, the first thing to check is connections. When working with SCSI, make sure that the SCSI chain has proper termination and that the cables are securely fastened. Loose cables are never good for computers. Also make sure that the drive has power. Sometimes people remember the data cables but forget to plug in the power.
One last thing to check with SCSI is the SCSI target ID. If the SCSI target ID of the new hard disk were set to the same ID as the original boot disk, it could cause your computer to not boot. In this case, that's the most likely problem. All it takes to fix it is reconfiguring jumpers on the back of the drive.
When adding new devices to your computer, make sure to double-check your connections and to ensure that the new device's settings won't conflict with existing hardware.
|
|
EAN: 2147483647
Pages: 194