Managing Role-Based Access Control
In the traditional UNIX security model, the root user was the all-powerful administrator account. There were no other users with administrative privileges. To allow a user to perform administrative tasks, even common ones such as changing user passwords, mounting file systems, or shutting down the system, you had to give them the root password. This of course posed a major security threat. You were giving the user way too much power to perform their task. Also, although you might trust the user, security always becomes easier to compromise when several people know the administrative password.
Some third-party utilities, such as sudo, were developed to alleviate this problem. These security programs created roles, enabling users to assume some administrative responsibilities without knowing the root password.
Finally, a UNIX standard was developed to combat the all-or-nothing security approach of using the superuser account for administration. The standard is role-based access control (RBAC). RBAC enables the administrator to assign certain administrative tasks to specific users or to special user accounts called roles. This assignment process limits security vulnerability and grants the users only the minimum access they need to perform administrative tasks.
Understanding RBAC Concepts
Role-based access control is a complex service based upon four critical concepts: privileged applications, roles, authorizations, and rights profiles.
A privileged application is an application that can override standard security and check for specific UIDs, GIDs, or authorizations. A user might or might not have administrative access. However, if the user attempts to open a privileged application, the application can allow the user to run it as if the user had root privileges (the application would assume the UID of 0, for example). For all other applications, however, the user has their normal access.
Privileged applications can check for a real or an effective UID or GID. Using effective IDs is the recommended method and is equivalent to using the SetUID or SetGID features. Some applications, however, require a real ID instead of an effective ID. For this reason, you can set either. Other applications, such as the Solaris Management Console, at, atq, crontab, allocate, list_devices, and cdrw are capable of checking authorizations to determine access.
Privileged application information is stored in the exec_attr database.
A role is a special user account that is allowed to run privileged applications. Users log into Solaris with their normal user account and use the su command to log in as a role. Users cannot log into Solaris as a role directly; you must use su to access the role. Users must be authorized to su to a role. If the user is not authorized, they will receive an error message telling them that only authorized users can use su.
When a user assumes a role, they are allowed to perform any tasks that the role is authorized to perform. For example, you could create a role that allows users to manage printers as well as reset user passwords. Multiple users can access the same role, as long as they know the role's name and the password. There are no predefined roles in Solaris. Role information is stored in the passwd, shadow, user_attr, and audit_user databases.
An authorization is a right that is granted to a role or a user. When a user attempts to access an application that is RBAC-aware, the application can check whether the user has the appropriate authorization. If not, the user is denied access. Solaris contains a list of predefined authorizations in the auth_attr database.
Finally, there are rights profiles. A rights profile is a collection of authorizations and privileged applications. Rights profiles can contain other rights profiles as well, and information on rights profiles is stored in the prof_attr and exec_attr databases.
Here's how everything fits together: A user is assigned to a role. Roles get their abilities from rights profiles and/or authorizations. Authorizations are generally assigned to rights profiles to make management easier, but they can be assigned directly to roles. Privileged applications are assigned to rights profiles.
| Note | You can assign rights profiles and authorizations directly to users, but this practice is not recommended. It's best to assign the user to a role that has the rights profiles and authorizations. This forces the user to su to the role, perform their administrative tasks, and reassume their regular user account. |
To say that everything in RBAC revolves around roles is a safe assumption. Although there are no predefined roles, Sun recommends that you set up levels of administrative hierarchy. For example, you could create a primary administrator role that is basically an equivalent to the root user, a secondary administrator that handles all administration except for security, and an operator level that handles small administrative tasks such as printer management, and backups and restores.
To maximize your security based on Sun's recommendation, you would make root a role instead of a user. This forces the user to log in (and be audited) and use su (again, to be audited) to perform root functions.
Whether or not you choose to follow Sun's recommendations, RBAC is flexible enough to accommodate any organization's administrative needs.
Using the RBAC Databases
All RBAC information is stored in four databases:
-
/etc/user_attr
-
/etc/security/auth_attr
-
/etc/security/prof_attr
-
/etc/security/exec_attr
These databases work together to provide RBAC functionality. They can be located on each local host or managed by a name service such as NIS, NIS+, or LDAP. If the default entries in the four databases are not sufficient to meet your security needs, you can always add additional entries.
| Note | The /etc/security directory is the primary directory for RBAC-related files. However, the user_attr database is located in /etc. |
There is also one additional configuration file used, and that is the /etc/security/policy .conf file. The policy.conf file contains rights profiles and authorizations granted to all users. Here are the default entries in policy.conf:
AUTHS_GRANTED=solaris.device.cdrw PROFS_GRANTED=Basic Solaris User
You can see that the first line grants authorizations, and the second line grants rights profiles. Because you haven't learned specifics about authorizations or profiles yet, don't worry if you don't know what solaris.device.cdrw or Basic Solaris User do for you. You'll learn about those in a bit. Just remember that authorizations and profiles granted in policy.conf affect all Solaris users.
user_attr
The user_attr database contains a list of users and roles, along with assigned authorizations, profiles, and roles. Each entry in user_attr has five fields, separated by colons. Three of the fields are reserved for future use, so the only ones you need to worry about are the first and last fields. Here are the fields:
user:qualifier:res1:res2:attributes
The user field refers to the user or role, as defined in the /etc/passwd database (when you create a role, it's added to /etc/password just as a user account is). The middle three fields are not currently used. The attributes field is a list of semicolon-delimited key-value pairs that describe the security traits of the user or role. Each key pair uses the syntax of key=value to provide flexibility for adding profiles and authorizations and enables Solaris to ignore a key-value pair if it doesn't recognize what it means.
There are four valid keys for the user_attr database: type, auths, profiles, and roles. Here is a description of each one:
-
The type key defines whether the entry refers to a user or a role. For a user, the value is normal; for a role, it is role.
-
Authorizations are specified with the auths key. Any authorizations specified must be listed in the auths_attr database, and multiple authorizations can be specified, separated by commas. Authorizations can include an asterisk (*) as a wildcard. For example, solaris.admin.* signifies all of the Solaris admin authorizations.
-
Profiles are assigned with the profiles key. Multiple profiles can be assigned, just as multiple authorizations can be assigned. Profiles are defined in the prof_attr database. If multiple profiles are provided, the first profile that allows access to the command will be used.
-
Roles are assigned to users through the roles key. Roles cannot be assigned to other roles. Several roles can be assigned to one user, and one role can be assigned to several users. Roles are defined in the user_attr database.
The default user_attr file contains three entries:
root::::auths=solaris.*,solaris.grant;profiles=All lp::::profiles=Printer Management adm::::profiles=Log Management
You can identify these three entries as entries for three of the default Solaris users. The lp and adm users are granted only a profile. However, the root user is granted two authorizations and a profile. The first authorization, solaris.*, gives the root user access to all authorizations. The second authorization, solaris.grant, allows root to assign authorizations to other users. Both are very handy for the all-powerful user account.
If you were to add some custom entries to user_attr, they might look like this:
jradmin::::type=role;auths=solaris.admin.*,solaris.profmgr.*;profiles=All sjohnson::::type=normal;roles=jradmin
The first entry defines a role named jradmin. The second line associates your junior administrator, sjohnson, with the jradmin role. Therefore, the sjohnson user has some administrative abilities.
auth_attr
The auth_attr database stores RBAC authorizations. Authorizations can be assigned to users or roles in the user_attr database, or to rights profiles in the prof_attr database. Each entry in the auth_attr database has six fields:
authname:res1:res2:short_desc:long_desc:attributes
Authorizations are named with the authname field. Each authorization must have a unique name. Names take the form of prefix.suffix, and each Solaris authorization begins with the solaris prefix (for example, solaris.system.date). The suffix describes the area to be authorized. When the authorization ends in a period, the authname serves as a header for similarly grouped authorizations. When you use graphical interfaces to manage RBAC, the GUI uses the headings to organize authorizations. Authorizations that end with the word grant enable authorized individuals to assign other authorizations with the same prefix and functional area to other users or roles. For example, anyone with the solaris.grant authorization can assign any solaris.* authorization to other users or roles. Obviously, this is a very powerful authorization to have.
The second and third fields are reserved for future use. The short_desc field is a short description of the authorization and is displayed by the graphical RBAC management interface. The long_desc is a long description, which can include the purpose of the authorization and the users who might be interested in using it.
The attributes field is a list of semicolon-separated key-value pairs that describe the authorization. The help key identifies an HTML Help file (located in the /usr/lib/help/auths/ locale/C directory).
Here is a sample from the auth_attr database
solaris.admin.volmgr.:::Logical Volume Manager:: solaris.admin.volmgr.write:::Manage Logical Volumes::help=AuthVolmgrWrite.html solaris.admin.volmgr.read:::View Logical Volumes::help=AuthVolmgrRead.html solaris.admin.printer.modify:::Update Printer Information::help=AuthPrinterModify.html solaris.profmgr.:::Rights::help=ProfmgrHeader.html solaris.device.cdrw:::CD-R/RW Recording Authorizations::help=DevCDRW.html solaris.profmgr.write:::Manage Rights::help=AuthProfmgrWrite.html solaris.system.shutdown:::Shutdown the System::help=SysShutdown.html solaris.:::All Solaris Authorizations::help=AllSolAuthsHeader.html solaris.jobs.grant:::Delegate Cron & At Administration::help=JobsGrant.html ...
 The reason that only a sampling is given is simple: by default there are more than 80 separate authorizations. Remember that when granting authorizations, an asterisk can be used as a wildcard. For example, granting a user solaris.* gives him superuser powers, and solaris .admin.* gives him quite a number of authorizations as well.
prof_attr
Rights profiles are a collection of authorizations. Instead of assigning roles a long list of authorizations, you can group authorizations into profiles and then assign the profile to the role. Names, descriptions, Help file locations, and authorizations assigned to rights profiles are stored in the prof_attr database. The prof_attr database has five fields:
profile_name:res1:res2:description:attributes
The profile_name field names the profile, and profile names are case sensitive. Fields res1 and res2 are reserved for future use. The description is intended to be a detailed description of the profile. Authorizations and Help files are specified by the auths and help keywords in the attributes field. Profiles can also contain other profiles, indicated by the profiles keyword.
Here is a sampling of the prof_attr database (the entries are broken to improve readability, although each entry in prof_attr should be one line):
# /etc/security/prof_attr File System Management:::Manage, mount, share file systems:help= \ RtFileSysMngmnt.html;auths=solaris.admin.fsmgr.*, \ solaris.admin.diskmgr.*,solaris.admin.volmgr.* File System Security:::Manage file system security attributes:help= \ RtFileSysSecurity.html;auths=solaris.admin.fsmgr.*, \ solaris.admin.diskmgr.*,solaris.admin.volmgr.* Basic Solaris User:::Automatically assigned rights: \ auths=solaris.profmgr.read,solaris.jobs.users, \ solaris.mail.mailq,solaris.admin.usermgr.read, \ solaris.admin.logsvc.read,solaris.admin.fsmgr.read, \ solaris.admin.serialmgr.read,solaris.admin.diskmgr.read, \ solaris.admin.procmgr.user,solaris.compsys.read, \ solaris.admin.printer.read,solaris.admin.prodreg.read, \ solaris.admin.dcmgr.read,solaris.snmp.read,solaris.project.read, \ solaris.admin.patchmgr.read,,solaris.network.hosts.read, \ solaris.admin.volmgr.read;profiles=All;help=RtDefault.html Media Restore:::Restore files and file systems from backups: \ help=RtMediaRestore.html User Management:::Manage users, groups, home directory: \ auths=solaris.profmgr.read,solaris.admin.usermgr.write, \ solaris.admin.usermgr.read;help=RtUserMngmnt.html Printer Management:::Manage printers, daemons, spooling: \ help=RtPrntAdmin.html;auths=solaris.admin.printer.read, \ solaris.admin.printer.modify,solaris.admin.printer.delete Primary Administrator:::Can perform all administrative tasks: \ auths=solaris.*,solaris.grant;help=RtPriAdmin.html All:::Execute any command as the user or role:help=RtAll.html System Administrator:::Can perform most non-security administrative \ tasks:profiles=Audit Review,Printer Management,Cron Management, \ Device Management,File System Management,Mail Management,Maintenance \ and Repair,Media Backup,Media Restore,Name Service Management, \ Network Management,Object Access Management,Process Management, \ Software Installation,User Management,All;help=RtSysAdmin.html ...
Looking at the nine profiles listed here (there are almost 40 provided by Solaris), you can see that each one has a list of authorizations as well as an HTML Help file. Based on the sheer volume of profiles listed, you might assume that the Basic Solaris User profile is quite powerful. In fact, it's not. Rather, the Basic Solaris User has the ability to do a lot of reading of files, but very little administrative power. Also interesting to note is that some profiles overlap functionality with other profiles. For example, look at the first two profiles listed, File System Management and File System Security. They are two separate profiles, but they are granted the exact same authorizations.
exec_attr
An execution attribute is a command associated with a specific UID or GID, and then assigned to a specific rights profile. The command can then be run by users or roles who have been assigned the appropriate rights profile. The exec_attr database holds the execution attributes. There are seven fields in exec_attr:
name:policy:type:res1:res2:id:attributes
The name field, which is case sensitive, refers to the name of a rights profile in the prof_attr database. For example, anything in exec_attr beginning with Media Restore refers to the same Media Restore that was in the prof_attr file. The policy field contains the security policy associated with the entry. Currently, the only valid policy is suser (the superuser policy model). The type field defines the type of entry; cmd (command) is currently the only valid option.
Two fields, res1 and res2, are reserved for future use. The id identifies the entry. This is an executable command and can be the full absolute path to the command, or you can use wildcards such as an asterisk (*). Finally, the attributes field defines the security attributes that the command(s) can be run under. Attributes are listed as key-value pairs, and valid keywords are euid, uid, egid, and gid. These enable the application to run with an effective or real UID or GID. Basically, if you set the UID to 0 for an application, anyone with association to the rights profile that contains the execution attribute can run the command as if they were the superuser.
Here is a sampling from the exec_attr database:
Software Installation:suser:cmd:::/usr/bin/pkgparam:uid=0 Media Backup:suser:cmd:::/usr/bin/mt:euid=0 Printer Management:suser:cmd:::/usr/sbin/accept:euid=lp File System Management:suser:cmd:::/usr/sbin/format:uid=0 User Security:suser:cmd:::/usr/bin/passwd:uid=0 File System Management:suser:cmd:::/usr/sbin/unshareall:uid=0;gid=root Software Installation:suser:cmd:::/usr/bin/pkginfo:uid=0 File System Management:suser:cmd:::/usr/lib/fs/autofs/automount:euid=0 Object Access Management:suser:cmd:::/usr/bin/getfacl:euid=0 File System Management:suser:cmd:::/usr/sbin/fsck:euid=0 Printer Management:suser:cmd:::/usr/bin/lpstat:euid=0 File System Management:suser:cmd:::/usr/sbin/mountall:uid=0 All:suser:cmd:::*: Printer Management:suser:cmd:::/usr/bin/disable:euid=lp Cron Management:suser:cmd:::/usr/bin/crontab:euid=0 Object Access Management:suser:cmd:::/usr/bin/chown:euid=0 Name Service Security:suser:cmd:::/usr/sbin/rpc.nisd:uid=0;gid=0 Network Management:suser:cmd:::/usr/bin/setuname:euid=0 ...
There are several hundred entries in the default exec_attr database. As you can see, some of the profiles listed in prof_attr are represented in this sampling (in fact, all profiles are represented in the full exec_attr file).
One interesting entry to note is All:suser:cmd:::*:. This grants everyone with the All profile (basically, everybody) the ability to run every command. This is necessary so that users can run both privileged and normal commands, such as ls and cd. If you worry that this might be a security hole, it's not. Notice that no attributes are listed. Because there are no attributes, users will run the commands with their own GID and UID, meaning that normal security measures are followed. However, if you were to append the All: line with an attribute of uid=0, then all users could run all commands as if they were the superuser. For most networks, this probably isn't a very good idea.
Managing RBAC
The developers at Sun did an excellent job of setting up RBAC. There are a large number of rights profiles, execution policies, and authorizations built into Solaris. The one thing that's missing is roles. Sun didn't include a lot of roles with Solaris because each network is different and, consequently, each network will make use of roles in different ways. Although Sun has their recommended way of setting up roles, they realize that network administrators need the flexibility to configure them as they see fit.
Most of the management of RBAC involves creating and maintaining roles. You will need to create roles, assign users to the roles, and decide which abilities will be granted to the roles. You can manage roles through the command-line interface, or graphically with the Solaris Management Console.
Creating and Managing Roles from the Command Line
When you create a role, you are creating what amounts to a user in Solaris, down to the additions of the role in the /etc/passwd and /etc/shadow files. (The role account is also added to the /etc/user_attr file.) The big difference between roles and users is that you cannot log directly into Solaris by using a role. You must log in with a valid user account and then use the su command to assume the role's identity. The three primary commands you will use to create and manage roles are roleadd, rolemod, and roledel. Not surprisingly, these three commands behave a lot like the useradd, usermod, and userdel commands that you learned about in Chapter 4, "User and Group Administration."
Before creating a role, carefully plan what you want the role to be able to do. For example, will the role be able to reset user passwords? Or will the role be able to back up and restore file systems from tape backup? There is no limit to the number of roles you can create or to the combination of profiles and authorizations you can assign to one role. However, it's a good idea to carefully plan your security structure before haphazardly creating roles. To create a role, you use the roleadd command. Here's the syntax for roleadd:
# roleadd arguments role_username
Most of the command-line arguments are the same as for useradd. Table 13.3 lists some of the more important arguments for roleadd.
| Argument | Description |
|---|---|
| -A authorization | Adds one or more authorizations (separated by commas) to the role. |
| -c comment | Provides an optional description of the role. |
| -d dir | Specifies a home directory for the role account. |
| -e date | Sets an expiration date for the role. |
| -g group | Defines a primary group for the role. |
| -G group | Defines one or more secondary groups for the role. |
| -m | Creates the new role's home directory if it does not already exist. |
| -P profile | Adds one or more rights profiles to the role. Multiple rights profiles are separated by commas. Also remember that because profiles often have spaces in their names, you need to enclose them in quotes-for example, roleadd -P "Media Restore". |
| -s shell | Specifies a shell for the role account. The default is /bin/sh. |
| -u UID | Specifies a UID for the role. Roles take UIDs just as user accounts do. |
Creating a role does you no good unless you grant the role specific authorizations and/or rights profiles. Therefore, the -A and -P arguments are of critical importance. After the role is created, you can add additional authorizations and rights profiles by using the rolemod command.
If you wanted to add a role named passmgr to be able to reset user passwords, here's how you could do it:
# roleadd -P "User Security" passmgr
Now, the passmgr role exists. As you might imagine, if you have a long list of profiles or authorizations to add for a role, the roleadd command can get quite long.
Even though the passmgr role exists, there are no users that can use the role. Not only that, but just as if you created a user from the command line, the role is disabled until you provide a password for the role. First, provide a password:
# passwd passmgr
Then, associate a user with the role. For example, if you wanted your junior administrator sjohnson to be able to change user passwords, you could associate his account with the role by using the following command:
# usermod -R passmgr sjohnson
Now, the sjohnson user will be able to use the su passmgr command to access the passmgr role.
| Note | The usermod -P command can be used to assign profiles directly to user accounts. However, to maintain tighter security, it's best to create roles, assign the profiles to roles, and then associate a user account to the role. |
If you have an existing role and want to make changes to it, you can use the rolemod command. The rolemod command uses most of the same arguments as the usermod command. Using rolemod -A or rolemod -P will replace the existing authorizations or profiles, not add to the existing ones.
To delete a role, use roledel. If you want to delete the role's home directory as well, use roledel -r.
Viewing Roles, Authorizations, and Profiles
If you are logged in as a user, how can you tell which roles, authorizations, or profiles you can use? There are three commands to help you with this: roles, auths, and profiles. Consider the following sequence:
$ whoami sjohnson $ roles sjohnson passmgr $ profiles sjohnson All Basic Solaris User $
Similarly, if you used the auths sjohnson command, you would see a long list of authorizations assigned to the sjohnson account. Notice that when you looked at the profiles, only the profiles for the current user account were listed, not the profiles available for the roles that sjohnson can assume.
Using Other RBAC Management Commands
Additional commands are available to manage roles, as well as create rights profiles and execution attributes. Keep in mind that if you want to directly manage profiles, authorizations, and rights profiles, you can manually edit the prof_attr, auth_attr, and exec_attr databases.
The additional commands you can use are smexec (for managing exec_attr), smuser (for managing user entries), smmultiuser (for managing multiple user entries), smprofile (for managing the prof_attr and exec_attr files), and smrole (for managing roles). Each of the sm* commands require authentication to use. For more information on each of these commands, please see the man pages associated with each command.
Creating and Managing Roles by Using the Solaris Management Console
Using the Solaris Management Console to manage RBAC is a lot easier than using the command line. For one, you will be presented with a readable list of rights that you can assign to the role. Adding a role is done from the Administrative Roles node of the Solaris Management Console, as shown in Figure 13.1. No administrative roles are included here by default; however, Figure 13.1 shows the passmgr role created earlier in this chapter.
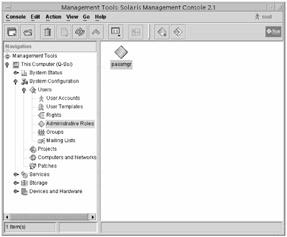
Figure 13.1: Administrative roles
To create a new role, click Action ➣ Add Administrative Role and follow these steps:
-
Provide a role name, full name, description, and role ID number, and choose a shell for the role. Click Next.
-
Type the password for the role. The password must contain at least six characters, with at least two alphabetic and one numeric or special character. Click Next.
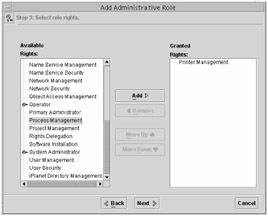
-
Select rights for the role. As you can see in the following graphic, some of the rights listed are categories (Operator and System Administrator are examples). Clicking the lever to the left of these categories displays more available rights. (These categories are the authorizations that ended in a period in the auth_attr database.) After you have chosen rights for this role, click Next.
-
Select a home directory for the role. Click Next.
-
Assign users to the role. After you have assigned users, click Next.
-
On the Add Administrative Role screen, confirm that your choices are correct, and click Finish to create the role. If you want to make any changes, click Back.
After the role is created, you can manage the role by selecting the role in the right pane of the Solaris Management Console and viewing its properties. To do so, either right-click the role and choose Properties, or highlight the role and choose Action ➣ Properties. You will see a screen similar to the one shown in Figure 13.2.
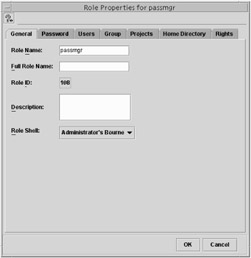
Figure 13.2: Role properties
The two most useful tabs in Properties are the Users tab and the Rights tab. On the Users tab, you can assign additional users to the role. The Rights tab enables you to assign additional rights.
To delete a role from within the Solaris Management Console, right-click the role and choose Delete, or highlight the role and choose Edit ➣ Delete.
You are the only network administrator for a small engineering firm, which has approximately 40 employees. Recently, the company has grown, and so has the network. Because of your increasing responsibilities within the organization, you are finding it difficult to perform your daily network management tasks. However, there is neither enough work nor the budget to hire another administrator.
Fortunately, you've been allowed to procure some junior administrators from the ranks of the current employees. These employees will be trained by you and given some administrative duties but will also retain their current position. You will be allowed to select three people. You will need to decide which tasks they will perform, train them, and make sure they can do their new jobs.
The first thing you should do is to decide which types of tasks you want these new administrators to perform. You will probably not want to give them full administrative powers, but you do want them to be able to do things like manage printers, manage user accounts (reset passwords, perhaps change group assignments), and load and unload devices.
After you have decided what you want the administrators to do, create roles that can perform the tasks you need. Create the roles and assume their identities to make sure they can do what you want them to do. You have some flexibility in creating roles. One way would be to create a role for each user that can perform all tasks. Another way would be to create a role for each task (such as one for printer management, one for user management, and so on), but that can get confusing because each user would have to remember three (or more) role names and passwords. Finally, you could create one role that can perform all tasks, and let each user know their role name and password. This is probably the easiest solution because you can log su activity as well as the functions the role performs. However, the final decision on how to create your roles is up to you.
By creating roles and using RBAC, you can allow others to perform administrative tasks, while maintaining overall control of the security on your network.
|
|
EAN: 2147483647
Pages: 194