Manually Using XML from Access 2003
This section aims to give you a hands-on feel for creating and using XML documents based on tables and other database objects in an Access database file or an Access project. You will see how Access can generate both XML documents and their matching XSD documents. In addition, you'll learn how to use these documents in other Access applications, with e-mail, and in browsers.
Exporting, Importing, and Presenting an Access Table
In this section, you are shown how to export, import, and present the Shippers table from an Access database as an XML document. The Shippers table is convenient for demonstrations because it has few rows and columns . The examples in this section provide step-by-step instructions for generating an XML document based on the Shippers table and importing that document into another Access application to create a faithful copy of the table's contents and structure. You also learn how to display the data in a tabular format in the XML document within a browser. The section closes with an example that attaches an XML document and its matching XSD schema to an e-mail message. This example suggests how you can readily mail Access data across the Internet and have another Access application on another continent recreate both the table values and structure. Though the examples in this section use the Shippers table, the guidelines apply to any Access table.
Generating XML Files
The Access UI offers an exceptionally easy means of creating XML documents and XSLT transforms that are suitable for presentation on the Web. You can base the XML documents on tables and queries, as well as the data behind forms and reports in Access database files and Access projects. To export a table as an XML document, such as the Shippers table in Chapter15.mdb, select the table in the Database window. Then choose File, Export. From the Export dialog box for the selected object, designate a destination folder via a selection from the Save in drop-down box. Next , select XML from the Save as type drop-down box. This selection causes Access to populate the File name text box with the name of the object highlighted in the Database window. If you select the Shippers table, clicking Export eventually creates a file named Shippers.xml. However, you can specify a different file name for the XML document by modifying the default entry in the File name drop-down box. Clicking Export on the dialog box presents the Export XML dialog box with selected check boxes for Data (XML) and Schema of the data (XSD); see Figure 15-7. Access does not select by default the third check box, which is Presentation of your data (XSL). Clicking OK on the Export XML dialog box creates files based on your selections.
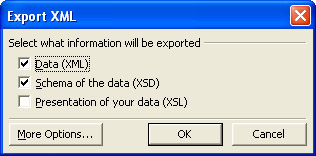
Figure 15.7: The Export XML dialog box for creating XML files based on Access database objects, such as tables, queries, forms, and reports.
The set of selections is richer than it might appear from a casual examination of Figure 15-7. In addition to creating an .xml file with the contents of the selected database objects, the default selections also create an .xsd file with the XSD schema for the selected object in the Database window when you invoke the File, Export command. The "XSD Schemas" section in this chapter presents and describes the files for an XML document and XSD schema based on the Shippers table.
Clicking the Presentation Of Your Data (XSL) check box will add two additional files to those created when you click OK on the Export XML dialog box. One of these files will have an XSLT program; the file's default name for the Shippers table will be Shippers.xsl. The other file will be an HTML file with an .htm extension (Shippers.htm). To view this file in a browser, you must use Internet Explorer 6+. This is because opening the HTML page requires MSXML 4.0+ on the computer, which installs along with Internet Explorer 6+. If a client does not have Internet Explorer 6 on a workstation, you have two alternatives. First, you can save the generated files to a Web site, such as pma11. Choose the LAN location for an intranet Web site, or save the files to a local folder and then upload them to your Web site on a remote Web server. After selecting the Presentation of your data (XSL) check box on the Export XML dialog box, click More Options. Then select the Presentation tab. Select the Server (ASP) check box. Then click OK. The Server (ASP) selection causes the XSLT transform to run on the Web server and return HTML to the browser through an .asp file named after the selected object in the Database window (for example, Shippers.asp). The second option is to install Internet Explorer 6+ on the workstation that needs to open the .htm file created by the standard process. This option installs MSXML 4.0+ on the local workstation. You can obtain the most recent Internet Explorer download at http://www.microsoft.com/ windows /ie/downloads/default.asp .
There are a few other options for controlling the output from the File, Export command for XML files. These options typically will not have a critical impact on the use of your XML files, and the default settings are appropriate for most circumstances.
Importing XML Documents
One reason for exporting XML documents based on Access database objects is so that you can import them into other Access database files and Access projects. XML documents store the data and much of the structure associated with Access tables. In addition, creating XML documents based on queries as well as the data behind forms and reports gives you a snapshot of the data in those objects at a moment in time ”namely, the moment when the XML document was generated.
It is important to understand that an XML document is a text file with tags and the tags can have attributes. Because XML documents are text files, you can import them into any application that can open a text file. In Figure 15-3 you saw that an Internet Explorer browser can import an XML document for viewing. The Internet Explorer browser brings special benefits, including automatic indenting for nested elements and collapse/expand controls for hiding and exposing document details. However, you can also read XML documents with other packages that can read text files. Just as you can use the Notepad utility program to create XML documents (mentioned in the "XML Document Syntax" section of this chapter), you can also use Notepad to open XML documents for viewing. The "XSD Schemas" section demonstrates how a schema appears in Notepad ”after opening the XML document, you can view it, edit it, and save changes.
Access can store the XSD schema file along with the XML document file from an Access database file or an Access project. This feature enables another Access database file to open an XML document and re-create the data source associated with the document. This includes the values and the structure, including the data types, the primary key, and any indexes. While reading an XML document and showing its values as text is useful, capturing its value along with its structure is substantially more beneficial. Recall that XSD schema created by Access represent data values with Jet and SQL Server data types. Therefore, you can pass data between Access and SQL Server in either direction by exporting an XML document with its XSD schema from one application, for example an Access project, and importing the document and schema into another application, such as an Access database file.
Because XML is text, it passes through Internet firewalls, whereas an Access database file and an ADO object, such as a recordset, are blocked by many firewalls. The ability of XML files to pass through firewalls allows you to post an XML document file along with its XSD schema file to a Web site so that remote users can download it and reconstruct the source data in Access. You can also send an XML document and its XSD schema file through e-mail as attachments to one or more recipients. Because you often will be passing relatively small text files, data transfer via XML can be faster than transferring a whole database just for one or two small tables.
To demonstrate the XML Import capability, start a new Access database file or Access project that can connect to the XML document and XSD schema file. In the companion content for this chapter, you'll find a Chapter15Receive.mdb and Chapter15Receive.adp. If you use an .adp file, recall that you must connect it to a SQL Server or MSDE 2000 database. You can use the Chapter15ReceiveSQL.mdf file in the companion content for this chapter to achieve this task ”see Chapter 11 for details on how to do this. Once you gain local access to the XML document file and the XSD schema file, you can start to create a table based on the XML document by choosing File, Get External Data, Import. Use the Look in drop-down box to point the Import dialog box at the folder containing the XML document and XSD schema files. Select XML from the Files of type drop-down box. Then simply double-click the XML document file to open the Import XML dialog box. If you click Options, Access expands the dialog box to show three possible ways of processing the XML document and XSD files (see Figure 15-8). The default option is to create a new table with the name of the XML document and populate the table with data from the XML document. You can also choose to import the structure without the data or to append the data to an existing table. If you want to create a new table based on the contents of the XML document, just click OK. Otherwise, select a check box for one of the other two options before clicking OK.
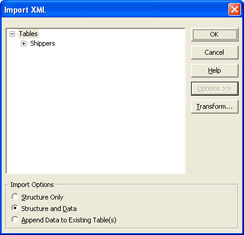
Figure 15.8: The Import XML dialog box for importing the XML document created in the "Generating XML Files" section.
These steps work the same for importing an XML document and its XSD schema into an Access project, with one exception. At the conclusion of importing the XML document into a SQL Server table, Access presents the error message explaining the Identity property was not set. Actually, this behavior is by design. SQL Server does not necessarily let a user write values into an Identity field. This ability depends on the permissions associated with a login or user account, but Access cannot ensure the permissions are valid for all users (see Chapter 13 for more details about SQL Server security). Therefore, Access turns off the Identity property and presents an error message. In addition, Access creates an ImportErrors table to make the error description readily available for viewing. One workaround for this problem is to turn the Identity property back on. You can do this by opening the table in Design view and selecting the column that had the Identity property turned off during the importing process. Next, change the Identity property setting on the Column tab to Yes. Either accept the default Identity Seed and Identity Increment settings or override them with whatever values your application requires. In order to make these design changes to the table, your login and/or user account must have permission.
Viewing the XML as a Table in a Browser
When you select the Presentation of your data (XSL) check box in the Export XML dialog box, Access creates two additional files ”namely, an .xsl file and an .htm file. In the case of exporting the Shippers table with the default settings, the two extra files have names of Shippers.xsl and Shippers.htm. If you have Internet Explorer 6.0 or later installed on your computer, you can open the Shippers.htm file by choosing the File, Open command, and then navigating to the .htm file. A table appears in your browser (see Figure 15-9). For many viewers , this is a substantial improvement in readability over the layout for a standard XML document (see Figure 15-3).
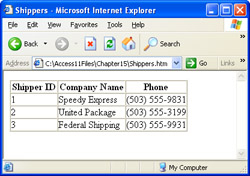
Figure 15.9: The Shippers.htm file generated by the Access File, Export command in an Internet Explorer 6.0 browser.
There is one problem with the default settings for representing an XML document as a table on a Web page. The .htm file opens properly only in Internet Explorer 6.0 or later browsers (even Internet Explorer 5.0 browsers on Windows 2000 Server computers cannot open the file properly). That's because the .htm file requires software installed on a computer along with Internet Explorer 6.0 or later. The "Generating XML Files" section of this chapter describes how to create another presentation version of the XML document that runs on a Web server and downloads HTML. If you were working with the Shippers table, you would navigate to Shippers.asp instead of Shippers.htm. The .asp file must reside in a Web site running on a Microsoft Internet Information Services Web server (the only place .asp files run). You can deploy the .htm file to any folder on a computer.
Exporting Related Tables
To demonstrate how to export tables in relationships, I used a Microsoft Access file type to import the Orders and Customers tables from the Northwind database to the Chapter15.mdb file. Recall that the Shippers table was already in Chapter15.mdb. Use the Relationships window to adjust the relationships among the three tables to match those in the Northwind database. After your adjustments, the Customers table and the Shippers table will be in a many-to-many relationship with the Orders table serving as a junction table between the other two tables. As a consequence of this design, the Shippers table will be in a one-to-many relationship with the Orders table. In other words, one shipper can deliver multiple orders.
By exporting the Shippers table with the Orders table that depends on it, you can see how the Access XML processing capabilities handle a one-to-many relationship. Start by selecting the Shippers table. Then choose File, Export. In the Export Table dialog box, designate an appropriate folder for the .xml and .xsd files, such as C:\Access11Files\Chapter15. Select XML as the file type. Override the Shippers default name with ShippersOrders . Click Export to open the Export XML dialog box. Next, click More Options. Access automatically selects the Shippers check box on the Data tab, but it does not select the Orders check box. Click this check box to select it so that the Shippers and Orders tables populate the XML document that Access generates. Notice there is an expand control next to the Orders table. Leave the control alone for now. A subsequent example will demonstrate its role. Click OK to close the Export XML dialog box and generate the ShippersOrders.xml and ShippersOrders.xsd files.
If you open the ShippersOrders.xml file, the first element you see after the dataroot element is the Shippers element. Nested below this element are the ShipperID , CompanyName , and Phone elements for the Speedy Express shipper, whose ShipperID element value is 1. Nested below these elements are a series of elements for the orders shipped via Speedy Express. The first set of elements based on the Orders table have an OrderID element value of 10249, and the next set of elements based on the Orders table have an OrderID element value of 10251. Notice there is a gap in OrderID numbers . This is because the elements for the order with an OrderID of 10250 nests below the Shippers element with a ShipperID element value of 2 for the United Package shipper.
The nesting of Orders elements within Shippers elements reflects the one-to-many relationship between the Shippers table and the Orders table. This is a common XML document feature that some developers find preferable to relational views of one-to-many relationships. In a relational view, all the data from the Shippers table and the Orders table appear in a single datasheet. There is no natural break in the design of the datasheet when the orders for one shipper stop and the orders for the next shipper begin.
Exporting the Data Behind a Form
In addition to exporting XML documents based on Access tables, you can also use the File, Export command to create XML documents based on the data behind forms and reports. The best way to understand how to create an XML document based on the data behind an Access form may be to follow the steps for creating an XML document based on a typical form. You use the same steps as for creating an XML document based on a report, but before invoking the File, Export command, you start by selecting a report instead of a form.
Figure 15-10 shows a main/sub form generated with the help of the AutoForm tool on the Database toolbar. This form is available in Chapter15.mdb as frmCustomersOrders . As you can see, the form presents data from the Customers and Orders table. I shifted the sub form view to the right and adjusted its column widths to highlight that the sub form also exposes CompanyName column values in its Shipvia column. Therefore, the frmCustomersOrders form also has data behind it from the Customers , Orders , and Shippers tables. Since there are no filters in this AutoForm tool “generated form, the form contains all the data from the tables behind it.
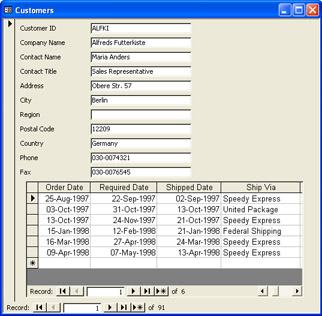
Figure 15.10: The frmCustomersOrders form used to demonstrate the process for creating an XML document based on the data behind a form.
Begin to create an XML document based on the data behind frmCustomersOrders by selecting the form in the Database window and choosing File, Export. Next, designate a destination folder for the XML document, such as C:\Access11Files\Chapter15. If you do not mind naming the XML document after the form (namely, frmCustomersOrders.xml), click Export. Otherwise, revise the file name drop-down box on the Export Form dialog box before clicking Export. Click More Options on the Export XML dialog box and select the Data tab. Notice that Access selects the Customers table by default. Then click the expand control for the Orders table. Next, click the expand control for [Lookup Data] to expose the Shippers table. With all tables exposed, select the Orders and Shippers tables so that all three tables are selected on the Data tab. Finally, click OK to create the XML document and its corresponding XSD schema.
If you open the frmCustomersOrders.xml file in a browser, you can see the Orders elements nested within Customers elements. Furthermore, the nested Orders elements correspond to those for the Customers elements making the orders. If you navigate the browser to the bottom of the frmCustomersOrders .xml file, you can see the three Shippers elements based on the rows in the Shippers table. These rows do not nest within any other elements. Instead, they trail the last Orders element for the last Customers element. The Shippers elements have the same level of indentation as the Customers elements in the document. This indicates that the values from the Shippers and Orders tables are at the same hierarchical level in the document, though the Shippers elements have no elements nested within them.
| |
EAN: 2147483647
Pages: 144