Signing and Encrypting E-mail Messages
When your personal certificate is installed, it's time to get down to the business of securing your e-mail messages by using encryption and digital signatures. In this section you'll learn more about sending and receiving digital signed and encrypted e-mail message using the Windows Vista native e-mail software, Windows Mail.
| Note | The steps to digitally sign and encrypt e-mail messages outlined in this section assume that you're using Windows Mail as your e-mail client. For details on completing these tasks with Microsoft Outlook or other e-mail clients, consult that program's Help file. |
Sending and Receiving Signed E-mail Messages
As you now know, digitally signing e-mail messages both verifies the sender's identity and helps to ensure message integrity. Thankfully, after your personal e-mail certificate is installed, sending signed e-mail messages and verifying the signatures on messages you receive is exceptionally simple.
Follow these steps to read and verify the signature associated with a signed e-mail message received from another user:
-
Open Windows Mail and look for a digitally signed e-mail message. The icon for signed messages in Windows Mail looks like an envelope with a seal attached.
-
Open the signed e-mail message. The Security Help screen appears by default when you open a signed message, as shown in Figure 12-6.

Figure 12-6: The Security Help screen appears when you open a digitally signed message in Windows Mail. -
Click the Continue button. The contents of the message now appear like any unsigned e-mail message.
-
Click the seal icon in the top right-hand corner of the message. This opens the Security tab for the message, as shown in Figure 12-7. Notice that the e-mail address associated with the signature is displayed, along with messages stating that the contents of the message are unaltered, and that the signature is trusted.
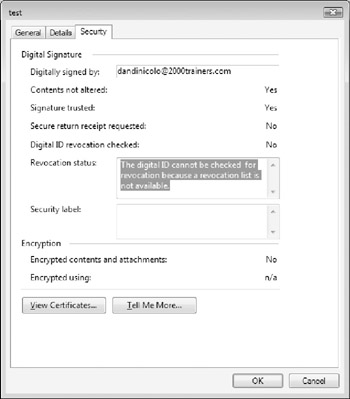
Figure 12-7: The Security tab displays details associated with a digitally signed message. -
Click View Certificates.
-
In the View Certificates window (see Figure 12-8), you can view the certificate used to sign this message (the sender's certificate), as well as add the sender's certificate to their entry in your Contacts list. Click Add To Contacts.
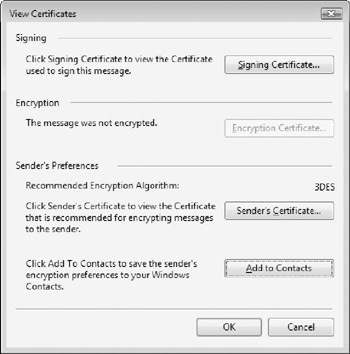
Figure 12-8: Use the View Certificates window to view the certificate used to digitally sign a message, or add the user's certificate to your Contacts list. -
When the Windows Mail dialog box appears, confirming that the certificate was added to the user's Contacts entry, click OK.
-
Click OK to close the View Certificates and message detail windows.
-
In the main Windows Mail program window, select Tools → Windows Contacts.
-
Double-click on the entry for the user whose certificate you added in Step 6.
-
Click the IDs tab, shown in Figure 12-9. With the recipient's digital certificate stored on your system, you can now send this user encrypted e-mail messages.
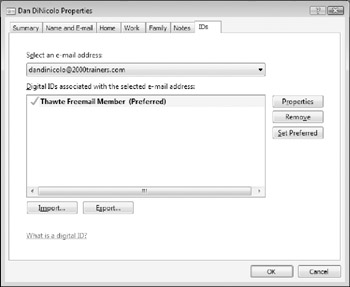
Figure 12-9: The Digital IDs tab in a user's address book entry displays certificates associated with that user.
| Caution | Most web-based e-mail services (such as those offered by MSN Hotmail, Yahoo! Mail, and Google's Gmail) are not capable of sending and receiving digitally signed and encrypted e-mail messages due to a lack of support for the S/MIME protocol. As such, you shouldn't expect web mail users to be able to read signed or encrypted messages you send them. When in doubt, send them a digitally signed test message, and have them respond if they can open and read the message correctly. Alternatively, ask them to use an S/MIME-compliant e-mail client like Windows Mail for the purpose of engaging in secure message exchanges. |
Follow these steps to digitally sign an e-mail message you are sending to another user:
-
Open Windows Mail and click Create Mail.
-
Compose the e-mail message as you normally would, complete with the recipient's e-mail address and a suitable subject line.
-
In the message window, select Tools → Digitally Sign, as shown in Figure 12-10. The seal icon is added to the upper-right corner of the message window.
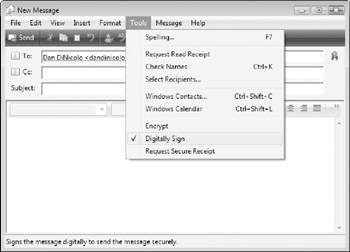
Figure 12-10: A digitally signed message. -
Click the Send button.
-
When the Signing data with your private exchange key window appears (Figure 12-11), click OK. The signed message is sent to the recipient, including a copy of your certificate and public key.
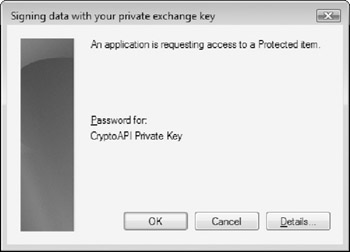
Figure 12-11: This dialog box is displayed when your private key is being accessed.
Sending and Receiving Encrypted E-mail Messages
In a manner similar to working with digital signatures, it's easy to decrypt encrypted messages that you receive, or send encrypted messages to other users. Remember that to send encrypted messages to others, you need to have a copy of their public keys (included in their personal certificate) available on the computer from which you're sending the message.
Follow these steps to read an encrypted message received from another user:
-
Open Windows Mail and look for an encrypted e-mail message. The icon for encrypted messages in Windows Mail looks like an envelope with a blue lock attached.
-
When the Using Your Private Key To Decrypt Message dialog box appears, click OK.
-
Open the encrypted e-mail message. The Security Help screen appears by default when you open an encrypted message, as shown in Figure 12-12.
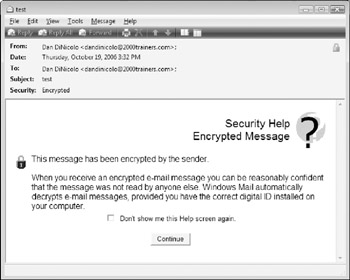
Figure 12-12: This Security Help message appears when you open an encrypted message. -
Click the Continue button. The contents of the message now appear like any unencrypted e-mail message.
-
Click the lock icon in the top right corner of the message to open the Security tab for the message, shown in Figure 12-13. Notice that the Encryption section lists the message as having been encrypted.
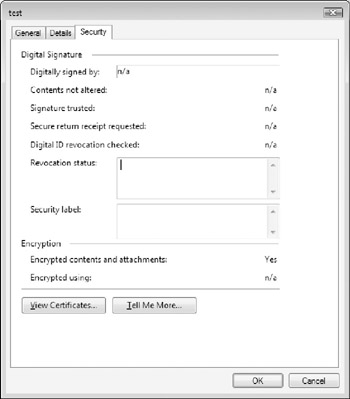
Figure 12-13: The Security tab for an encrypted message. -
Click the View Certificates button.
-
In the View Certificates window, click the Encryption Certificate button.
-
At the bottom of the General tab is a message stating that you have a private key that corresponds to this message (see Figure 12-14). Ultimately, this means that your public key was used to encrypt the message.
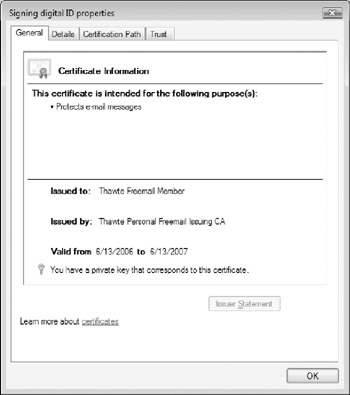
Figure 12-14: Viewing the certificate that was used to encrypt a message.
If you don't want to go through the hassles of manually encrypting and signing every e-mail message that you send, Windows Mail makes it possible to have all messages digitally signed and/or encrypted by default.
To enable these settings, open Windows Mail and select Tools → Options → Security. At the bottom of the Security tab you'll find check boxes marked Encrypt Contents And Attachments For All Outgoing Messages and Digitally Sign All Outgoing Messages, as shown in the following figure.
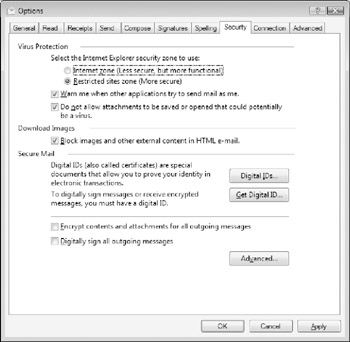
As a general rule, select the option to Digitally Sign All Outgoing Messages Only. If you select the option to Encrypt All Messages, you'll receive error messages every time you attempt to send a message to a user whose public key is not present on your system. Based on that, it's better to encrypt e-mail messages on a case-by-case basis.
In addition to these settings, the Security tab in Windows Mail includes an Advanced button that opens the Advanced Security Settings window, as shown in the following figure.
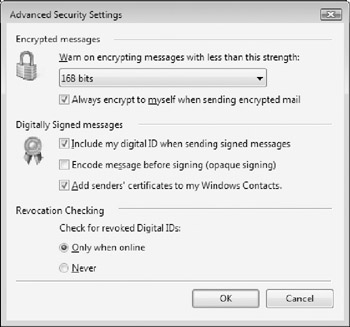
Options on the Advanced Security Screen include:
-
Warn on encrypting messages with less than this strength. This drop-down menu lets you specify the minimum strength level associated with encrypted messages you send. When a sender's public key specifies a less strength, Windows Mail will prompt you with a warning message.
-
Always encrypt to myself when sending encrypted mail. When this option is selected, messages that you send to others are also encrypted with your public key, ensuring that you can open and read your stored copies of the message, for example those in your Sent Items folder. If deselected, you will not be able to read encrypted messages that you've sent to other users, since only their public key was used to encrypt the message.
-
Include my digital ID when sending signed messages. As its name suggests, this option automatically adds your certificate (and public key) to all signed messages you send.
-
Encode message before signing (opaque signing). If this option is selected, a recipient will only be able to read your message if they're using an S/MIME-compliant e-mail system that can verify your signature. If you select this option and the user is using a non-S/MIME e-mail client, they will not be able to read the message, even though it is not encrypted.
-
Add senders' certificates to my Windows Contacts. When this option is selected, Windows Mail will automatically add the certificates associated with signed messages you receive to your address book.
-
Check for revoked Digital IDs. When this option is set to Only When Online, Windows Mail automatically checks to ensure that all certificates being used are valid, and have not been revoked.
For users working with Microsoft Outlook, similar advanced message security settings can be found under Tools → Options → Security → Settings.
Follow these steps to encrypt an e-mail message you are sending to another user:
-
Open Windows Mail and click Create Mail.
-
Compose the e-mail message as you normally would, complete with the recipient's e-mail address and a suitable subject line.
-
In the message window, select Tools → Encrypt, as shown in Figure 12-15. The blue lock icon is added to the upper right corner of the message window.
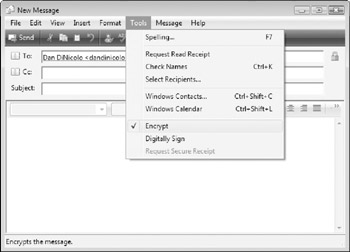
Figure 12-15: An encrypted e-mail message. -
Click the Send button. The message is encrypted with the recipient's public key, and then sent like any other e-mail message.
Digitally signing and encrypting messages are separate and distinct processes that use different keys. However, there's nothing stopping you from digitally signing and encrypting the same message - in fact, it's a great idea. By encrypting a message with the recipient's public key, you ensure that its contents are securely protected and inaccessible by everyone except the recipient. By digitally signing the same message with your private key, the recipient can verify that the message actually came from you, and was not altered in transit.
EAN: 2147483647
Pages: 135