7.4. Using Outline Mode
| When you're writing something, whether it's a book, a long paper, or a technical specification, getting a sense of organization as you go along is frequently difficult. Without a sense of structure, it is hard to expand an outline smoothly into a longer paper or to reorganize a paper as you go along. The words get in the way of your headings, making it hard to see the forest for the trees. Outline mode provides a built-in solution to this problem. This mode gives you the ability to hide or display text selectively, based on its relationship to the structure of your document. For example, you can hide all of your document's text except for its headings, thereby giving you a feel for the document's shape. When you're looking at the headings, you can focus on structure without being concerned about individual paragraphs. When you've solved your structural problems, you can make the text reappear. Outline mode is more useful for documents with several levels of headings (or for long programs) than for plain outlines containing very little text. The longer a document is, the harder it is to get a quick feel for the overall structure; it is in such a situation that outline mode's ability to hide and show portions of the text comes in handy. Outline mode requires you to follow some special conventions in your outline or document. Figure 7-1 shows an outline in traditional format and the same outline prepared for outline mode. On the left, we show a "traditional" outline; on the right, we show the same outline, after being prepared for outline mode: Figure 7-1. Traditional Outline versus Outline Mode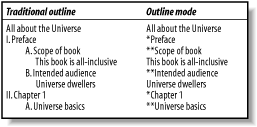 Whereas traditional outlines use a hierarchical scheme of Roman numerals, uppercase letters, numbers, and lowercase letters for heading levels 1 through 4, outline mode by default expects to see one asterisk (*) for a first-level heading, two for a second-level heading, and so on. Lines that don't start with an *, such as "This book is all-inclusive," are referred to as body lines. Notice that Emacs expects to see the asterisk in the first column. You can use traditional outline indentation, provided that the asterisks start in the first column.[3]
The sample outline has only two body lines. As we developed the book, though, we'd gradually add more and more body: "This book is all-inclusive" would be replaced by a substantial chunk of the preface, and other body lines later in the outline would turn into the text for Chapter 1. When used properly, outline mode removes the distinction between outlining and writing. As your outline grows and becomes more detailed, it can gradually become your paper. 7.4.1 Entering Outline ModeTo start outline mode, type M-x outline-mode Enter. Outline appears on the mode line. (Outline mode is also available as a minor mode; we'll discuss that later in this section.) After you are in outline mode, you can use special commands to move quickly from one part of the outline to another. C-c C-n moves to the next heading or subheading; C-c C-p moves to the previous one. C-c C-f moves to the next heading of the same level, so you can use this command to move from one first-level heading to another throughout the outline, or from one second-level heading to another within a given entry. C-c C-b moves backward to the previous heading of the same level. If you want to move from a second-level heading to its first-level heading, up a level in the outline structure, you type C-c C-u. (If you are on a first-level heading already, C-c C-u beeps because it can't move to a higher level.) Figure 7-2 illustrates how these cursor commands would work on our sample outline. Figure 7-2. Moving around in outline mode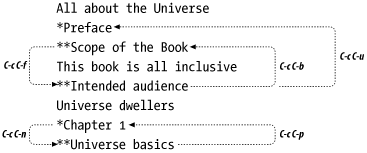 These commands make it easy to solve a lot of organizational problems. If you often think, "I know I'm writing about widgets, but I can't remember the bigger point I'm trying to make," type C-c C-u to get to the next higher level of the outline. If you want to figure out how widgets relate to the other topics within the section, use C-c C-b and C-c C-f to move backward and forward to your other headings. 7.4.2 Hiding and Showing TextThe most important feature of outline mode is the ability to selectively hide or show different portions of your text. The ability to see a skeletal view of a long document with outline mode is its best feature; it's much easier to evaluate the structure of a document when you can hide everything but the headings and see whether it is coherent or in need of some reorganization. Although it sounds like something out of a detective novel, the hide-body command, C-c C-t, hides all the body (or text) lines but leaves all the headings (lines that begin with an asterisk) visible. Wherever Emacs hides text, it places an ellipsis (...) on the corresponding heading line. The ellipsis tells you that some hidden text is present. The buffer itself is not modified; you'll notice, if you watch the left side of the mode line, that the asterisks that indicate a modified buffer don't appear. If you save a file and exit while some text is hidden, Emacs saves the hidden text along with what you see displayed; hiding text in no way implies losing text. The next time you read the file, Emacs shows all text that was hidden. Using the hide-body command is a good way to get a feel for the structure of a long document. You can then type C-c C-t and see only the headings without the text. For example, let's start with the simple outline we gave above and hide the body.
To show all the hidden text in a file, whether headings or body, type C-c C-a (for show-all). These commands, hide-body and show-all, work on the outline as a whole. A command similar to hide-body is hide-sublevels, C-c C-q. This command shows only first-level headers, giving you a feel for the major sections in the document you're working on.
7.4.3 Editing While Text Is HiddenNow that you know how to hide and show text, let's discuss some of the properties of hidden text. Editing a document while some of it is hidden is often useful it's a great way to make major changes in document structure but there are some dangers that you should be aware of. Let's say you've hidden all text with outline mode and only the headings are showing, giving you a true "outline" of your document. If you move a heading that has hidden text and headings associated with it, everything that is hidden moves when you move the visible text. Later, when you "show" all of the document, the hidden text appears in its new location underneath the heading that you moved. Similarly, if you delete a heading, you delete all hidden text as well. This feature makes moving blocks of text easy. However, there are some things to watch out for. If you delete the ellipsis following an entry, Emacs deletes the hidden information as well. To its credit, Emacs tries to keep you from doing this; it does not allow you to delete the ellipsis using the Del key or using normal cursor commands like C-b to move the cursor onto it. However, if you're persistent you can delete the ellipses (and the text it represents) using, for example, C-k. If you do so, Emacs deletes the hidden text. Typing C-y yanks the hidden text that you killed when you deleted the ellipsis; the undo command, C-_, restores the ellipsis. Our advice is to display text before deleting it so you can see what you're doing. On the other hand, when you are moving sections of an outline around, it is helpful to do sowhile text is hidden so you can keep the structure in mind. Be careful when moving hidden text to a buffer that's not in outline mode. Let's say that your outline ends with a heading followed by an ellipsis. When marking that section to move to another buffer, make sure the region includes the newline following the ellipsis (for example, move to the beginning of the next line). If you simply place the cursor following the ellipsis, Emacs copies only the header, not the hidden text. We're not sure why. Moving past the newline copies the body as well as the heading correctly, and pasting it into a buffer in text mode shows all the hidden text. 7.4.4 Marking Sections of the OutlineWhen you're moving text around, it's convenient to be able to mark a section of the outline and then move it or promote or demote it a level, as we'll discuss next. To mark a section of the outline (the current heading and its children), type C-c @ (for outline-mark-subtree). You can then cut or paste the section you've marked. You might want to type C-x C-x to verify that the region is marked correctly. 7.4.5 Promoting and Demoting SectionsOften as you're writing, you find that a certain heading should really be promoted or demoted a level. To promote a heading, type C-c C-^. To demote it a level, C-c C-v. (Note the clever attempt to make the key bindings indicate that you're moving headings up or down a level using ^ and v.) This automatically changes the markings for the heading in question. In other words, promoting a second-level heading removes an asterisk, making it a first-level heading. You'll find the commands to move to the next and previous headings, C-c C-n and C-c C-p, helpful when you are promoting and demoting sections. But what if you want to demote not just a heading but a subtree? Or even the entire outline? At the moment, you'd have to write a Lisp function to do that (or use someone else's). Several functions like this have been written by gurus and posted online, but none are part of Emacs at this writing. We hope this function is incorporated soon. 7.4.6 Using Outline Minor ModeOutline mode is also available as a minor mode so that you can use it subordinately to your favorite major mode. To start outline mode as a minor mode, type M-x outline-minor-mode; Outl appears on the mode line. In some ways, this mode is less convenient; rather than the simple C-c prefix you use for most outline mode commands, in outline minor mode, you must preface all commands with C-c @ instead, to avoid interfering with the usual C-c commands of the major mode. So, if you want to move down to the next heading (the C-c C-n command in outline mode), you would type C-c @ C-n instead. Please note that mixing outline major mode and outline minor mode is not only redundant but can be dangerous. Turning on the minor mode while the major mode is on can confuse Emacs. Exit outline mode, then enter outline minor mode if you wish. Table 7-4 summarizes outline mode commands. In the next section, we discuss another specialized editing method: editing with rectangles.
|


EAN: 2147483647
Pages: 161