Chapter 6: Programming Fundamentals Using VBA
In Chapter 5 you learned about the VBA environment by looking at its structure, concepts, and editor. In this chapter, we are going to study the fundamentals of all programming while, at the same time, examine the specific syntax of the VBA language. We are going to review concepts from Chapter 5 and study them in greater detail, beginning with a review of the places where the code is stored and the types of blocks it is stored in. While discussing that, we will visit the subject of variables in greater detail. It is difficult to talk about variables without discussing a special type of variable called an array.
We are also going to look at some of the built-in tools that VBA gives you to make your job easier. We will conclude our discussion by looking at the various types of programming structures and how they are used in a VBA environment.
Programming Fundamentals
As stated in Chapter 5, VBA code is written and stored within modules. Recall that there are two basic types of modules: those associated with forms or reports, and a general module for holding procedures that is applicable to the whole project.
There is one other type, called a class module, which contains code associated with an object. We have discussed modules already in the previous chapters and will be referring to them throughout the rest of the book.
Before you can write VBA code, you need to be able to create the module. Since form or report modules are created through their respective forms and reports, we will focus on creating standard modules here.
Creating Standard Modules
There are a couple of different ways of creating a standard module. The easiest way is to use the Modules category of objects right in the Database window, as shown in Figure 6-1. All you need to do is click on New and you are taken to the VBA Editor with a module created, as shown in Figure 6-2.
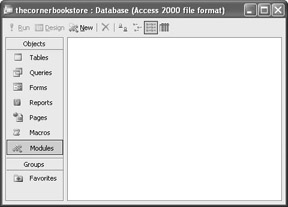
Figure 6-1: The Modules category selected in the Database window
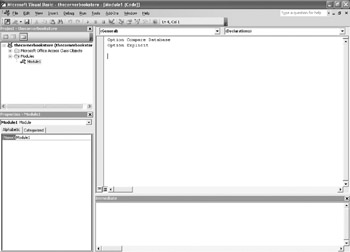
Figure 6-2: The VBA Editor with a module open
VBA assigned your new module a temporary name of Module1. You will probably want to give it a more descriptive name. This can be done from the Properties window of the VBA Editor or directly in the Database window.
As an example, in the VBA Editor, highlight the name Module1 in the Properties window, as shown in Figure 6-3, and rename it. You can call it myFirstModule. Once you have changed it in the Properties window, the name is changed in the Project window as well as in the Database window in Access (under the Modules category).

Figure 6-3: The Name property
In addition, you should click on the Save icon in the toolbar. You will be prompted to confirm the name, as shown here:

Now you can confirm that the name has been changed in the Project window (Figure 6-4) and the Database window Figure 6-5).

Figure 6-4: Project window after renaming the module
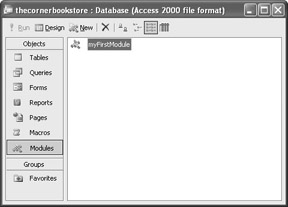
Figure 6-5: Database window after renaming the module
| Note | You can also change the name in the Database window by right-clicking it and selecting the Rename menu command. |
Creating Procedures
You will recall from Chapter 5 that most VBA code is contained in blocks called procedures. Further, these procedures are divided into two categories: sub procedures (sometimes called subs) or function procedures. A sub just performs a task but does not return a value, while a function does return a value.
Most of the time, you will see the following two lines of code at the top of the module:
Option Compare Database Option Explicit
These are called the general declarations of the module. Any code put into this section will affect all the procedures in the module.
The Option Compare line has three possible settings for sorting strings of characters within the code:
-
Option Compare Database This uses the same sort order as the database itself and is the most common setting.
-
Option Compare Binary This sorts a string of characters based upon the binary values of the characters. Thus, uppercase letters would be recognized before lowercase.
-
Option Compare Text This makes the sort case sensitive with regard to the local language.
Throughout this text, we will keep the Option Compare Database setting, which is the default.
The Option Explicit line is, in my opinion, an important one. As you shall see momentarily, that line can keep you from making a lot of coding mistakes by forcing you to formally declare all variables before using them.
If this option does not come on automatically when you create the module, force it to do so by selecting Tools | Options and selecting Require Variable Declaration on the Editor tab, as shown in Figure 6-6.
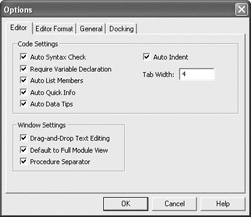
Figure 6-6: The Require Variable Declaration option
Think of a procedure as a miniprogram to do one specialized job. For instance, a procedure may be used to add two numbers together. Every time those numbers need to be added, you can just call this prewritten procedure. Without the procedure, you might need to write redundant code every time you needed to do that particular job.
Within the procedure, you declare variables, have loops and If statements, and even call other procedures. Let’s build a simple procedure that adds two numbers together. We will discuss each step along the way.
A procedure is first declared with the following syntax. Of course, the name is anything that you choose it to be.
Sub addNumbers() End Sub
Notice that the VBA Editor draws a horizontal line between the general declaration area and the new procedure. This is to help delineate the procedures. It has no bearing on how the procedure works.
When you declare a procedure, it is important that you begin it with the word Sub and complete the declaration with the parenthesis. I say it is important because it is worthwhile to use proper syntax from the beginning. If you don’t put the parenthesis in, the VBA Editor will put it in for you as soon as you press ENTER.
Normally you would place any arguments the procedure would be expecting to receive within the parenthesis. Even if no arguments are expected, you need to have the empty parentheses.
As soon as you press ENTER, the VBA Editor adds the End Sub line to close the procedure. All of your code will go between the opening and closing statements.
As we move through this book, I will relate what I feel are good programming habits, or practices. While these are certainly not rules, they are accepted by many programmers and are industry standards.
The first such practice is to name your procedures with a name that reflects its job, for instance, addNumbers. Any other programmers looking at it would easily discern what it does. In addition, even though VBA is not case sensitive, it will sometimes need to interact with programs that are. A common naming convention, as mentioned in Chapter 4, is to use lowercase letters, with the exception of midword capitalization, no spaces, and to begin with a letter rather than a number. In the case of beginning with a letter rather than a number, this is more than just a naming convention; for many programs, including VBA, it is a rule.
The second practice is to indent the code in the procedure. That way, it is easy to spot where the procedure begins and ends. I usually just press the SPACEBAR three times. The VBA Editor will preserve the indenting for subsequent lines.
The third practice is to carefully comment your code. You can easily do that by using the single quote before a line. If you do that, VBA will ignore that line as a comment.
The following example shows the indent and comment:
Sub addNumbers() 'Declare the variables End Sub
Notice the color the VBA Editor uses to indicate the comment. Understanding the color coding in the VBA Editor can help you track what is going on with the code. As an example, code colored red indicates a syntax error.
You can see what the various colors denote by selecting Tools | Options. Once you are in the Options dialogue box, the Editor Format tab will show you what the various colors mean and, in addition, allow you to change the scheme.
Declaring Variables
Within a procedure, you will find two basic components: variables and methods. Quite simply, a variable is a piece of information stored somewhere in the computer’s memory. It could be a number, a letter, or an entire sentence. The location where it is stored in memory is known by the variable name. As an example, let’s say that you have a line of code like this:
number = 23
From that point on, every time the code refers to the variable name number, 23 will be put in its place. Of course, later on, you could assign a different value to the variable name of number. This example is a simplification.
In order for the variable to function properly, you should also declare what type of information is going to be kept by the variable. (The reasons for this will become obvious as we progress.) Table 6-1 lists variable types and how they are used.
| Variable Type | Description |
|---|---|
| Boolean | A Boolean type returns True or False. You could also frame it in terms of the numbers, with 0 = False and –1 = True. |
| Byte | This is one of the least used of the variable types. It can only hold a single value between 0 and 255. |
| Currency | This does just what it says. It holds a currency value with four decimal places, from –922,337,203,685,477.5808 to 922,337,203,685,477.5807. |
| Date | This stores both dates and time. Interestingly, the years range from 100 to 9999. |
| Double | This is one of the two variable types that use decimal points. The other is Single. Doubles are for very large numbers. The range runs from –4.940656458411247 * 10–324 to 4.94065645841247 * 10–324. |
| Integer | This is one of the two nondecimal variable types. The other is Long. Integer handles the range of numbers –32,768 to 32,767. |
| Long | Long is the other of the two nondecimal variable types, with Integer being the first. Long handles the number range –2,147,483,648 to 2,147,483,657. |
| Object | You can store an object as a variable for later use. |
| Single | This is the second decimal point type, the other being Double. |
| String | This is the most common variable type. A String variable can hold up to 2 billion characters. |
To declare a variable, you use the keyword Dim. As an example:
Dim number As Integer
This declares that the variable name number will hold only data of type Integer. You will notice that we have not assigned a value yet (and in fact the editor will not allow us to do so). We only declared the name and type. At some future point in the code, we would have a line like this:
number = 32
| Note | Remember that VBA is not case sensitive. The variable names number, Number, and numBer would all be recognized as the same name. |
There are a couple of things you should be aware of when assigning values to a variable. First of all, a variable of type String must have its value enclosed in quotation marks. For instance, this would be a proper assignment:
Dim lastName as String lastName = “Smith”
The second thing you must be aware of is that variables of type Date must have their values enclosed in # signs. A proper assignment would be as follows:
Dim thisDate as Date thisDate = #10/08/03#
Chapter 5 discussed naming conventions in conjunction with the objects of your database. The same rules apply to variables. Remember, these are not requirements, but conventions adopted by most programmers. The prefixes associated with variables are listed in Table 6-2.
| Variable Type | Prefix |
|---|---|
| Boolean | bln |
| Byte | byt |
| Currency | cur |
| Date | dat |
| Double | dbl |
| Integer | int |
| Long | lng |
| Object | obj |
| Single | sng |
| String | str |
It is a good idea when naming objects of any kind to use descriptive names. This will have the benefit of making the code self-documenting. Using the date example, the proper way of declaring the variable would be as follows:
Dim datThisDate as Date
Getting back to the original procedure, addNumbers, let’s go ahead and add three variables as shown here:
Sub addNumbers() 'Declare the variables Dim intNumber1 As Integer Dim intNumber2 As Integer Dim intSum As Integer End Sub
You should be able to see where this is going. There will be two numbers entered and stored in variables intNumber1 and intNumber2. They will be added and stored in intSum.
Variant
There is one other variable type that hasn’t been discussed yet: the Variant. Depending on which programmer you talk to, it is either a powerful programming tool or an excuse for sloppy programming.
A Variant allows VBA to make its own decision as to what type of data it is holding. It is the default variable type and is used automatically if you leave the “as type” clause off the variable’s declaration. It uses the prefix of var.
As an example, let’s say we declare a variable as follows:
Dim varMyData
Because we left out the “as type” parameter, this defaults to the type Variant and will be the same as if you typed:
Dim varMyData as Variant
Let’s say you assign it as follows:
varMyData = “This is a Variant”
VBA will convert varMyData into a String type. If, later on, you assign the following:
varMyData = 12
VBA will now convert varMyData into type Integer.
As we progress, you will see situations where a variant could end up being a type other than what was wanted or, even worse, could result in an error. Many programmers also argue that too many variants take up too much memory “overhead” and slow the code down. So before you make the decision to work with variants, you want to carefully weigh the pros and cons.
As a beginner, it is best to approach variants with great caution and stay with one of the standard type declarations.
Constants
Many times you may want to declare a value that will not change. This type is called a Constant and is declared using the keyword Const in place of the normal declaration using Dim.
As an example:
Const conNumber1 As Integer Const conDate As Date = #03/02/04#
Notice that you preface the variable’s name with con instead of the normal type. Also, when declaring a constant, you must assign it an initial value, or you will get a syntax error message when you leave the line.
Input and Output
You now know how to save data with the use of variables. But how do you get the information into a variable? Or read the information that is stored in them? In many ways, that will be what we spend the rest of this book examining. However, let’s begin by looking at a couple of simple techniques for testing our code.
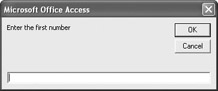
One of the simplest techniques for getting information from the user into a variable is to use a built-in function called InputBox. This will give you a simple dialog box with a prompt.
To code this in our small example, you would enter the shaded lines shown here:
Sub addNumbers() 'Declare the variables Dim intNumber1 As Integer Dim intNumber2 As Integer Dim intSum As Integer 'Create InputBoxes to enter numbers intNumber1 = InputBox("Enter the first number") intNumber2 = InputBox("Enter the second number") End Sub
Notice that for clarity’s sake, I also added a comment to indicate what I am doing.
The entry intNumber1 = InputBox is called an assignment statement, and it assigns the value the user enters to the variable. In this case two assignments have been created: one for intNumber1 and the other for intNumber2.
You can execute the code by selecting the Run button:
![]()
That brings up a dialog box like the one shown here for the first entry (a second one will appear for the second entry).
If you followed the preceding steps, the code will run and the variables will be set. However, there is no means of outputting the results. There are two ways to create an output for now. The first way is to add the code, shown with shading, here:
Sub addNumbers() 'Declare the variables Dim intNumber1 As Integer Dim intNumber2 As Integer Dim intSum As Integer 'Create InputBoxes to enter numbers intNumber1 = InputBox("Enter the first number") intNumber2 = InputBox("Enter the second number") 'Add numbers intSum=intNumber1 + intNumber 2 ' Create an output Debug.Print "The numbers entered were " & intNumber1 & " and " & _ intNumber2 End Sub If you run the code now, you will once again get the two dialog boxes. Notice that the output will appear in the Immediate window, located at the bottom of the editor environment:
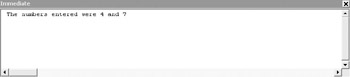
This window is used as a temporary testing place for our code and will come in handy initially.
There are several issues worth discussing here. First of all, the line:
Debug.Print "The numbers entered were " & intNumber1 & " and " & _ intNumber2
This is called a concatenation because it brings various components together. The literal text is enclosed in quotation marks, and the variables are not. The two types are separated by the ampersand.
Also, notice that the line is broken with a space and then an underscore. When you break up a statement onto multiple lines, VBA requires this. Throughout this book, we may need to do that for typographical reasons. However, you can keep the code on one line.
Another way of formatting an output is to use a technique you first saw in Chapter 4. You could use a message box by replacing the output line with the following line of code:
MsgBox "The numbers entered were " & intNumber1 & " and " & intNumber2
This will produce output similar to the following:

You now have your first VBA program running.
EAN: 2147483647
Pages: 214