Security for Your Network
| The preceding section dealt with security access to the switch itself. This section covers some security features that affect traffic as it flows through the switch, including port security, VLAN ACLs, and private VLANs. Basic Port SecurityThe user's initial access to the network is typically via a switch port. Because this is the user's initial access, the port on the switch becomes your first line of defense. There are two security tools that you can use to restrict the user's access: port security and port authentication using IEEE's 802.1x. The following sections discuss these solutions. Port SecurityThe port security feature is also known as MAC address lockdown and works on access link ports it is not supported on trunks. Likewise, not all Catalyst switches support port security. With Catalyst switches, by default, all addresses are allowed to be associated with any particular port. In port security, a user's MAC address is associated with a specific port. If a different source MAC address is seen off of the port than those allowed, the switch can disable the port and turn the port's LED to amber. There are two ways that you can associate an address with a port with port security:
Static configuration is not very manageable in a large network. Most administrators use the dynamic method, sometimes referred to as sticky learning. With the dynamic method, between 1 132 MAC addresses can be dynamically learned from a port (you control the number of addresses). Dynamically learned addresses are placed in the switch's configuration and saved. If the switch is rebooted, the dynamically learned addresses will still be in the switch's configuration. Two things can cause a security violation:
When a security violation occurs, the switch can take one of the three actions listed in Table 10.4.
To enable port security, use the configuration in Listing 10.6. Listing 10.6 Port Security ConfigurationSwitch(config)# interface type slot_#/port_# Switch(config-if)# switchport port-security Switch(config-if)# switchport port-security maximum #_of_addresses Switch(config-if)# switchport port-security mac-address sticky|MAC_address Switch(config-if)# switchport port-security violation protect|restrict|shutdown Port security is enabled with the switchport port-security command. The default maximum number of secured addresses that can be associated with a port is 132. You can change this value from 1 132 with the maximum parameter. Sticky learning is enabled by default. However, you can statically configure secured MAC addresses by using the macaddress parameter. The default violation mode is restrict. You can modify this with the violation parameter. In Listing 10.7, port security restricts fastethernet0/1 to just a single address learned via sticky learning, and shuts down the port if a violation occurs. Listing 10.7 A Sticky Learning ExampleSwitch(config)# interface fastethernet0/1 Switch(config-if)# switchport port-security Switch(config-if)# switchport port-security maximum 1 Switch(config-if)# switchport port-security mac-address sticky Switch(config-if)# switchport port-security violation shutdown To verify your port security configuration and operation, use the following command: Switch# show port security [address|interface type slot_#/port_#] Without any options, the show port security command displays information for all interfaces, like this: Switch# show port security Secure Port MaxSecureAddr CurrentAddr SecurityViolation Security Action (Count) (Count) (Count) Fa0/1 10 10 0 Restrict Fa0/2 1 1 0 Restrict <--output omitted--> In this example, you can see the maximum allowed secured addresses, the current number, the number of violations, and the security action for each port. To view port security information for a particular interface, use the interface parameter, like this: Switch# show port-security interface fastethernet0/1 Port Security: Enabled Port status: SecureUp Violation mode: Shutdown Maximum MAC Addresses :50 Total MAC Addresses: 10 Configured MAC Addresses: 1 Sticky MAC Addresses :9 Aging time: 20 mins Aging type: Inactivity SecureStatic address aging: Enabled Security Violation count: 0 In this example, you can see that nine addresses were learned via sticky learning and one was statically configured. To see the CAM table information related to port security, use the address parameter, like this: Switch# show port-security address = Secure Mac Address Table ----------------------------------------------------------- Vlan Mac Address Type Ports Remaining Age (mins) ---- ----------- ---- ----- ------------- 1 0000.0a00.1234 SecureDynamic Fa0/1 - 1 0000.0a02.5678 SecureDynamic Fa0/1 - 1 0000.0200.1111 SecureConfigured Fa0/1 - <--output omitted--> ----------------------------------------------------------- Total Addresses in System :10 Max Addresses limit in System :10 In this example, the first two addresses were learned via sticky learning and the third one was statically configured.
Port-Based Authentication with 802.1XIEEE's 802.1X standard defines how to authenticate and control port access. There are three devices involved with 802.1X:
A switch's port state (with 802.1X enabled) is initially in an unauthorized state. The switch only allows Extensible Authentication over LAN (EAPOL) traffic through the port until the user is authenticated. 802.1X uses EAPOL to perform authentication. After the user is authenticated, all of his traffic is permitted. If the user doesn't support the 802.1X protocol, the port remains in an unauthorized state. If the switch doesn't support EAPOL, but the client does, the client sends EAPOL frames, but when it doesn't get a response from the switch, the client assumes that the switch is not configured for 802.1X and continues by forwarding normal frames. To enable 802.1X, use the following configuration: Switch(config)# aaa authentication dot1x default group radius Switch(config)# interface type slot_#/port_# Switch(config-if)# dot1x port-control auto|force-authorized|force-unauthorized As I mentioned earlier, an external authentication server and RADIUS are used to handle authentication. This is specified with the aaa authentication dot1x command. You must still enable AAA and specify the RADIUS server. After that, you have to enable 802.1x on your switch's interfaces using the dot1x port-control command. There are three authentication modes, as listed in Table 10.5. To enable 802.1X, you have to specify the auto parameter.
After you've configured 802.1X, use the show dot1x command to verify its configuration and operation: Switch# show dot1x Global 802.1X Parameters reauth-enabled yes reauth-period 3600 quiet-period 60 tx-period 30 supp-timeout 30 server-timeout 30 reauth-max 2 max-req 2 802.1X Port Summary Port Name Status Mode Authorized Fa0/1 disabled n/a n/a Fa0/2 enabled Auto (negotiate) yes <--output omitted--> 802.1X Port Details 802.1X is disabled on FastEthernet0/1 802.1X is enabled on FastEthernet0/2 Status Unauthorized Port-control Auto Supplicant 0060.b0f8.1234 Multiple Hosts Disallowed Current Identifier 2 Authenticator State Machine State AUTHENTICATING Reauth Count 1 <--output omitted-->
VLAN Access ListsCisco MLS switches support three types of access control lists (ACLs):
You should be familiar with standard and extended ACLs from your CCNA studies. With standard and extended ACLs, you build a list of statements and then apply the list of statements to an interface. The configuration of VACLs is conceptually different from standard and extended ACLs. First, you create a VACL map that specifies what traffic to match on and what to do when there is a match. The VACL is then activated for a VLAN or list of VLANs or one or more of the switch's interfaces.
VACL ConfigurationTo create a VACL map, use the configuration in Listing 10.8. Listing 10.8 VACL Map ConfigurationSwitch(config)# vlan access-map name_of_map [sequence_#] Switch(config-access-map)# match ip address 1-199|1300-2699|ACL_name Switch(config-access-map)# match ipx address 800-999|ACL_name Switch(config-access-map)# match mac address ACL_name Switch(config-access-map)# action {drop [log]}|{forward [capture]}| {redirect (type slot_#/port_# | port-channel channel_#)} The vlan access-map command is similar to a statement in a standard or extended ACL. There are a few differences. First, these statements can be ordered by giving them sequence numbers. This enables you to insert or delete a specific entry. The order of the VACL maps is important because they are processed in order of their sequence numbers: 1, 2, 3, and so on and so forth. Sequence numbers can range from 0 65,535. The match commands specify which traffic is important to the VACL and have the action performed on it. You can match on IP, IPX, or MAC address information. Notice from the syntax of the match command that you must configure a normal ACL (numbered or named) to match on traffic. A permit parameter in an ACL statement indicates that a successful match has occurred. A deny parameter in an ACL statement means that the traffic should be ignored. If the switch goes through each match statement with a corresponding ACL and doesn't find a match, the packet or frame is automatically dropped. If there is a match in a VACL map, the indicated action in the action command is performed. The drop parameter causes the matching traffic to be dropped. Only on the 6500 can you log dropped traffic with the log parameter. The forward parameter specifies that matching traffic should be forwarded. You can specify the capture parameter only on the 6500, which can be used with SPAN. The redirect parameter has two options: redirect matching traffic to a specific interface or an EtherChannel. VACL ActivationAfter you've created your VACL map, activate it with the following command: Switch(config)# vlan filter VACL_map_name {vlan-list vlan_list|interface type slot_#/port_#} Notice that with this command, you can activate a VACL on a VLAN or list of VLANs, or for a specified interface. Please note that you can use the interface option only for WAN interfaces installed on the Catalyst 6500s. Listing 10.9 shows a simple example. Listing 10.9 Using the vlan filter CommandSwitch(config)# access-list 1 permit 192.168.1.0 0.0.0.255 Switch(config)# vlan access-map VMAP 10 Switch(config-access-map)# match ip address 1 Switch(config-access-map)# action forward Switch(config-access-map)# exit Switch(config)# vlan filter VMAP vlan-list 5 In this example, traffic from 192.168.1.0 will be allowed to travel to/through VLAN 5. When your configuration is done, you can use the show vlan access-map and show vlan filter commands to examine your VACLs. Private VLANsVLANs are used to group ports together in a broadcast domain. Private VLANs (PVLANs) provide Layer 2 isolation between devices within the same private VLAN. At first, this sounds confusing. Probably the best way of looking at a bunch of devices is in a broadcast domain, where rules dictate how traffic travels between devices. Private VLANs are used to enforce these rules. For example, you might have a group of devices that you want to put in the same broadcast domain, but you want to limit what each of these devices can access within the same domain. One solution would be to use ACLs, which are not very scalable in a dynamic and growing network. PVLANs, on the other hand, provide flexibility. In our example, you might have a server farm and users accessing the server farm. The rules are that the devices in the server farm should be able to communicate with themselves and the users. The users should be able to communicate with only the servers, but not each other. PVLANs can provide this type of cookie-cutter process to Layer 2 separation within the same broadcast domain.
AdvantagesPVLANs provide the following advantages:
ComponentsThere are two sets of components in private VLANs: PVLAN type and port type. There are two types of PVLANS with private VLANs: primary, which is used to connect multiple secondary PVLANs together, and secondary, which is used to separate devices with PVLANs. In addition to the two PVLAN types, there are three types of ports:
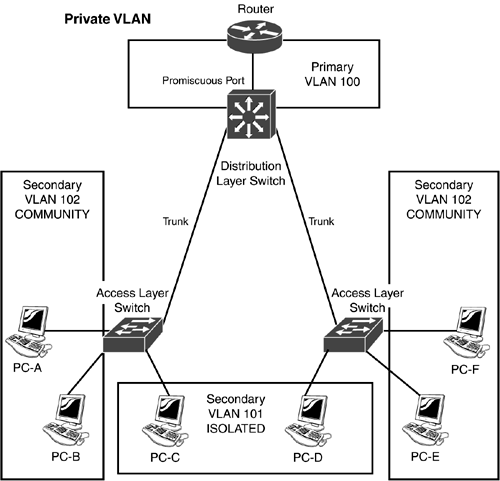
Primary PVLANs contain promiscuous ports. These ports enable connectivity between devices in the PVLAN, if it is allowed. Community and isolated ports belong to secondary PVLANs. There is a trust hierarchy, with primary PVLANs at the top and secondary PVLANs at the bottom. Figure 10.2 shows a PVLAN example. In this example, there is one primary PVLAN (100), which includes the router (promiscuous port) at the distribution layer. Below that, at the access layer, are two secondary PVLANs associated with the primary PVLAN: 101 and 102. PVLAN 101 is an isolated PVLAN. The PCs in this VLAN cannot share information with each other or PVLAN 102 they can share information only with the devices in PVLAN 100 (in this case, the router). PVLAN 102 is a community PVLAN. Notice that this PVLAN is spread across two switches. In a community PVLAN, the devices can share information with each other and the promiscuous port(s) in the primary PVLAN (the router). One important thing to point out concerning this example is that all of these devices are in the same broadcast domain and same subnet address scheme. You could use normal VLANs to solve this problem, but doing so would require one VLAN for the community of devices and a separate VLAN for each isolated device. With hundreds of devices, using normal VLANs doesn't scale. Figure 10.2. Private VLAN example.
PVLAN Configuration RequirementsBefore I begin discussing the configuration of PVLANs, I need to cover some configuration requirements:
Creating PVLANsAfter you've placed your switch in VTP transparent mode, you're ready to create your PVLAN: Switch(config)# vlan VLAN_# Switch(config-vlan)# private-vlan primary|isolated|community First, create a VLAN with the vlan command, and then specify the PVLAN type with the private-vlan command. The isolated and community parameters specify that the PVLAN is a secondary PVLAN. Given our example in Figure 10.1, the configuration would look like that shown in Listing 10.10 on the three switches. Listing 10.10 PVLAN ExampleSwitch(config)# vlan 100 Switch(config-vlan)# private-vlan primary Switch(config-vlan)# exit Switch(config)# vlan 101 Switch(config-vlan)# private-vlan isolated Switch(config-vlan)# exit Switch(config)# vlan 102 Switch(config-vlan)# private-vlan community Switch(config-vlan)# exit After you've created all of your primary and secondary PVLANs, you must associate the secondary PVLANs with their respective primary PVLANs. This is accomplished by going into the primary PVLAN and using the private-vlan association command, shown in Listing 10.11. Listing 10.11 PVLAN Association ConfigurationSwitch(config)# vlan VLAN_#_of_primary_PVLAN Switch(config-vlan)# private-vlan primary Switch(config-vlan)# private-vlan association secondary_PVLAN_#(s) Switch(config-vlan)# private-vlan association add secondary_PVLAN_list(s) Switch(config-vlan)# private-vlan association remove secondary_PVLAN_list(s) The first association command specifies the list of secondary PVLANs that are associated with this primary PVLAN. By using the add parameter, you can add other secondary PVLANs to your existing list. The remove parameter removes secondary PVLANs from the association. To list multiple PVLANs, separate them by a comma, like so: 105, 108, 110. You can also use a range by specifying the beginning PVLAN number, immediately followed by a dash, and then the ending PVLAN number; for example: 100-102. You can also mix the two types, like 100-102, 105, 108, 110. Going with our previous example shown in Figure 10.2, here's the association configuration: Switch(config)# vlan 100 Switch(config-vlan)# private-vlan primary Switch(config-vlan)# private-vlan association 101-102 To view your PVLANs, use the show vlan private-vlan command: Switch# show vlan private-vlan Primary Secondary Type Interfaces ------- --------- ----------------- ---------------------------- 100 101 isolated 100 102 community Associating Ports with PVLANsNow that you've created your PVLANs, you can begin associating ports to them. This configuration is done under the switch's interface configuration. There are actually three ways of doing this, based on the type of interface. If the interface is a Layer 2 promiscuous interface, like one connected to a file server, use the following configuration: Switch(config)# interface type slot_#/port_# Switch(config-if)# switchport mode private-vlan promiscuous Switch(config-if)# switchport private-vlan mapping primary_vlan_ID secondary_vlan_ID_list The switchport mode private-vlan promiscuous command specifies that the interface is in promiscuous mode (and therefore in a primary PVLAN). The switchport private-vlan mapping command specifies the primary PVLAN that this port is associated with, along with the secondary PVLAN(s) that are associated with the primary PVLAN. With this command, you can insert the add and remove parameters, which function like those discussed in the last section. If the interface is in a Layer 2 isolated or community secondary PVLAN, use the following: Switch(config)# interface type slot_#/port_# Switch(config-if)# switchport mode private-vlan host Switch(config-if)# switchport private-vlan host-association primary_vlan_ID secondary_vlan_ID The switchport mode command specifies that this is a secondary PVLAN port. The switchport private-vlan host-association port specifies the primary PVLAN that this port is associated with and the secondary PVLAN assigned to it. If the interface is a Layer 3 interface (performing routing), use the following: Switch(config)# interface vlan VLAN_# Switch(config-if)# private-vlan mapping secondary_VLAN_list To view your configured interface settings, use the following command: Switch# show interfaces type slot_#/port_# switchport |
EAN: 2147483647
Pages: 171