To spice up your slideshow, you'll want to add audio to it. You can add any audio file on your computer or you can rip one from a CD. The great thing about importing into your slideshow in VideoWave instead of using Slideshow Assistant is that you can do some basic editing and place it anywhere inside your production.
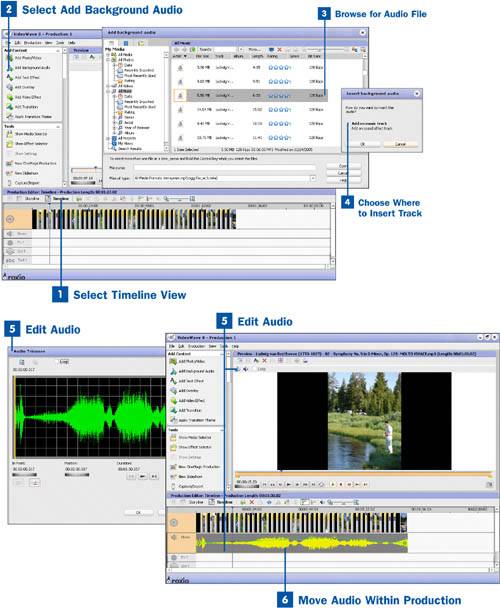
 Select Timeline View
The first thing you are going to want to do when adding audio is make sure your production is in the Timeline view. This allows you to see your audio track and edit it more easily. Select the Timeline icon from the Production Editor taskbar to change the view.
 Select Add Background Audio
Select Add Background Audio from the tasks pane to bring up Media Manager.
 Browse for Audio File
From Media Manager, you can browse your albums or folders to find audio files to add to your slideshow. You can select more than one by holding down the Control key and clicking on files. When you are done selecting your audio, click OK.
 Choose Where to Insert Track
After you have selected your audio, you are asked which track you would like to place it on, the music track or the sound effect track. There is essentially no difference between the two except for their names. Click on the option you would prefer and click OK.
Note
When your audio is dropped into your project, it only lasts as long as your slideshow, no matter how long the audio track is. You can only stretch your audio out if you add more to the video track.
Tip
You can make your slideshow conform to the length of your audio track by selecting Fit Video & Audio from the Production pull-down menu. This shortens or lengthens each photo (including blank slides) in your production so it is the same length as the audio you have chosen. This only works if your audio and video are relatively close to the same length in the first place.
 Edit Audio
You can edit your audio in several ways within VideoWave. To start, select the audio track and click on the Edit icon in the Preview taskbar. This brings up the Audio Trimmer. Here you can set the start and end points for your audio and loop the audio track. If you have unwanted silence or your audio is too long for your slideshow, this is the place to trim it down to size by clipping off the beginning or the end. When you are finished making your edits, click OK to return to VideoWave.
You can split your audio into two or more selections by selecting the Split icon from the Production Editor taskbar. Move the selection line over the audio to the spot where you would like it split. It is very important to be sure that you have the audio track selected; otherwise you will split something else. Click on the Split icon. You can now delete either one of the splits. For instance; if you want to edit out the middle of a music clip, you need to split it into three sections and then delete the center section.
You can mute the volume or set a fade in or fade out by clicking on the Adjust Volume icon in the Production Editor taskbar. You can also change the volume settings manually by clicking on the Edit Volume Envelope for Audio Objects icon. This expands the audio track and gives you manual control of the volume indicator. Add a node to the line by clicking on it. Drag the node up or down to adjust the volume.
 Move Audio Within Production
You can adjust the location of the audio track within the production by selecting it and dragging it to the location you would like it to be. This only works if the audio track is shorter than the video track.