Section 52. Create a Panorama
52. Create a Panorama
The Panorama Assistant is designed to help you put together several photos taken at different angles from the same position. For example, you might want to create panoramic images of natural landscapes to remember the entire view. To do this, first take a series of photos from one spot turning slightly left or right between each photo, and then use the following steps to open the Poster Assistant, add your photos to it, join the photos into a single panoramic image, and output your results. Create a Panorama
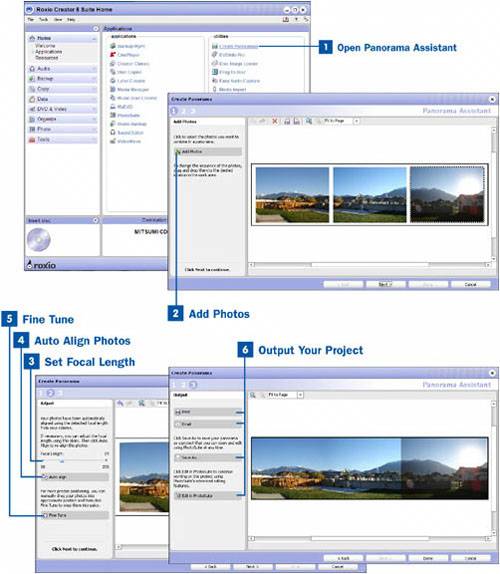
Tip When emailing photos to friends, you should convert them to JPEG to conserve space. This speeds up how fast the email is sent and reduces the risk of the email being too big to send. To print your project, click on Print to bring up the Photo Print Assistant. The Photo Print Assistant gives you the standard options of selecting the printer, setting the paper size and orientation, and specifying how many copies to print. In addition to those options, the Photo Print Assistant provides a powerful layout manager that allows you to specify whether to print one photo per page or multiple photos per page. The Multiple photos per page option allows you to select one of many templates that automatically configure where the photos fit on the printed page. For example, you can print a sheet that has two 5"x7" photos or you can print a sheet that has one 5"x7" and two 3"x5" photos. You want to select the Crop photo to fill the placeholder and Auto-rotate to fit the placeholders buttons to make the pages of your project fit properly. For more information, see To save the project, click on Save to bring up the Media Manager. Use the Media Manager to find the folder or album where you want to place the project. You can create folders and albums by clicking on the Create a New Folder and Create a New Album buttons respectively. After you have selected the folder or album, select the file type for your project. You can choose from several image file types. Then type in the name of the file and click the Save button. To edit the project further in PhotoSuite, click on the Edit in PhotoSuite button. This brings up your project in PhotoSuite. For more information about editing the project in PhotoSuite, see the tasks in Chapter 6. |
EAN: 2147483647
Pages: 171