46. Create a Photo Album  BEFORE YOU BEGIN BEFORE YOU BEGIN
|  SEE ALSO SEE ALSO
|
|---|
Chapter 5, "Importing Photos" | Chapter 6, "Editing Photos" |
Just like traditional photo albums, the Photo Album Assistant is designed to create a place where photos can be put together in a way that is meaningful and looks nice. You can create a photo album to remember a vacation, birthday, or other family event. The following steps describe how to open the Photo Album Assistant, add photos to it, customize the album, and output your results. Create a Photo Album 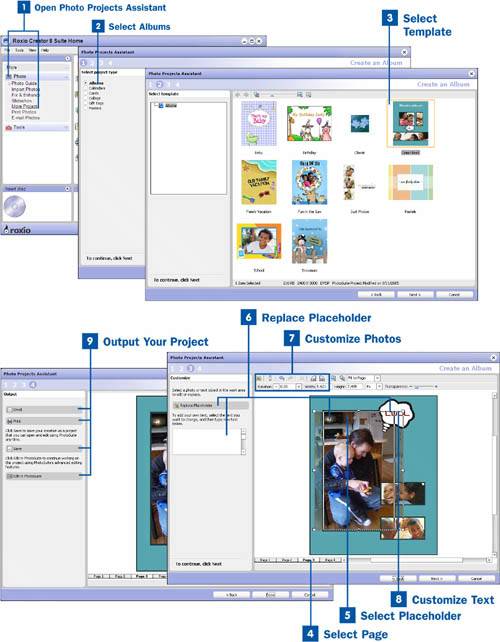
 Open Photo Projects Assistant Open Photo Projects Assistant
You can open Photo Projects Assistant in three ways, depending on which is easiest for you. If you have the Roxio Home page up, simply click on Photo and then select More Projects from the Photo submenu. If you have PhotoSuite open, you can select Photo Projects from the Open/Create options of the Common tool menu. You can also open Photo Projects Assistant by selecting Programs, Roxio Easy Media Creator 8, Photo from the Start menu in Windows.  Select Albums Select Albums
After you have the Photo Projects Assistant up, select Albums from the Select project type menu and click the Next button to begin creating a new photo album.  Select Template Select Template
After you have started a new photo album project, you need to select a template. The template is a document that predefines the look of the photo album. It includes preset text, photo locations, and some kind of clip art or other graphics in the background. After you have selected the template, click the Next button. Key Term Template Predefined settings that are applied to a project that save time by automatically setting up basic features.
 Select Page Select Page
The template that you selected in step 3 likely has several pages to add photos to when creating your photo album. Click on the Page tabs on the bottom of the view to see the various pages in the photo album until you find a page to which you want to add photos and text. You want to make the changes listed in the steps below to each page in the project.  Select Placeholder Select Placeholder
There are two types of placeholders on each template page: text and photos. You need to select and replace these placeholders one at a time. Select a placeholder you want to change. Key Term Placeholder Placeholders are photos or text that have been preformatted with specific settings to fit in the template. They are an example to allow you to see where you can add photos and text to the template. You replace these with your own photos and text.
 Replace Placeholder Replace Placeholder
After you have selected a placeholder, you need to replace the content with content that is meaningful to you. You can replace the content of a photo by selecting it and then clicking on Replace Placeholder to bring up the Media Manager. Then use the Media Manager to find a photo you want to use in the project. Your photo then becomes the placeholder. You can also replace the text. First select it and then replace the text in the text box on the left. You can also replace the content by double-clicking on it, which also opens the Media Manager. Tip Replace all of the placeholders on a page before customizing the look and feel. Things look different when you add a new photo or new text, and you might spend more time redoing things if you customize each item as it is added to the page.
 Customize Photos Customize Photos
After you have replaced the photo placeholders on the page, you can edit them in several ways to make the project more your own. To customize a photo, first select it. After the photo is selected, you are able to see the areas of the photo that are inside and outside of the mask. The portions of the photo that will be cropped out by the mask are grayed out in the display. Resize the photo by dragging the handles on the corners of the photo. After the photo is the size you want it, you can drag it to a position where the proper space is visible inside the template. If you need to, you can also rotate the picture by clicking on the rotate left and right buttons. If you need to adjust the colors of the photo or fix red eye, click on the Pocket Editor button. The Pocket Editor provides buttons to autofix, crop, fix red eye, change brightness and contrast, and adjust saturation. You can also open the Pocket Editor by double-clicking on the photo after it's in place. Key Term Pocket Editor An application within Easy Media Creator that allows you to quickly edit an image that has already been added to a project.
 Customize Text Customize Text
After you have replaced the text placeholders on the page, you can edit the text in several ways to make it look the way you want. To customize text, first select it. After the text is selected, drag it to the location on the page where you want it to be. You can also rotate the text by clicking on the rotate control attached to the top center handle of the text box and dragging the mouse with the left mouse button pressed down. After the text is in the position you want it to be in, you can use the menu at the top of the display to set the following attributes: color, font, bold/italic/underline, size, horizontal scaling, and alignment. Key Term Horizontal scaling Adjusts the width of text in a project based on a scale of 1% to 100%. Alignment How an object is lined up in relation to other objects, or how text is lined up in relation to its text box.
 Output Your Project Output Your Project
After you have completely customized the project, click the Next button to bring up the Output menu. From the Output menu, you can email, print, save, or open the project in PhotoSuite.
Note When clicking the Next button to move to the final step of the project, you get a warning dialog if you have not replaced all of the placeholders in the project. If you did not deliberately leave a placeholder in the project, click the Yes button and go back and replace any placeholders that were missed.
To email your project, click on Email to bring up the Email Assistant. The Email Assistant allows you to specify your email client. It also allows you to specify whether to convert the project into compressed JPEG files, turn it into a WMV slideshow movie, or just send it as is with no conversion. For more information, see  Use Email Assistant to Email a Project (on the Web). Use Email Assistant to Email a Project (on the Web). Tip When emailing photos to friends, you should convert them to JPEG to conserve space. This speeds up how fast the email is sent and reduces the risk of the email being too big to send.
To print your project, click on Print to bring up the Photo Print Assistant. The Photo Print Assistant gives you the standard options of selecting the printer, setting the paper size and orientation, and specifying how many copies to print. In addition to those options, the Photo Print Assistant provides a powerful layout manager that allows you to specify whether to print one photo per page or multiple photos per page. The Multiple photos per page option allows you to select one of many templates that automatically configure where the photos fit on the printed page. For example, you can print a sheet that has two 5"x7" photos or you can print a sheet that has one 5"x7" and two 3"x5" photos. You want to select the Crop photo to fill the placeholder and Auto-rotate to fit the placeholders buttons to make the pages of your project fit properly. For more information, see  Use Print Assistant to Print a Project (on the Web). Use Print Assistant to Print a Project (on the Web). To save the project, click on Save to bring up the Media Manager. Use the Media Manager to find the folder or album where you want to place the project. You can create folders and albums by clicking on the Create a New Folder and Create a New Album buttons respectively. After you have selected the folder or album, select the file type for your project. The default file type is .DMSP, which is a PhotoSuite format. Then type in the name of the file and click the Save button. If you would like to save your project as an image, choose a different file format to save it in. You can then bring it up in other photo editors and print or make changes to it. However, it will no longer be dynamic, and you will not be able to change the placeholders. To edit the project further in PhotoSuite, click on the Edit in PhotoSuite button. This brings up your project in PhotoSuite. For more information about editing the project in PhotoSuite, see the tasks in Chapter 6, "Editing Photos". |