Capture Audio Using LP and Tape Assistant
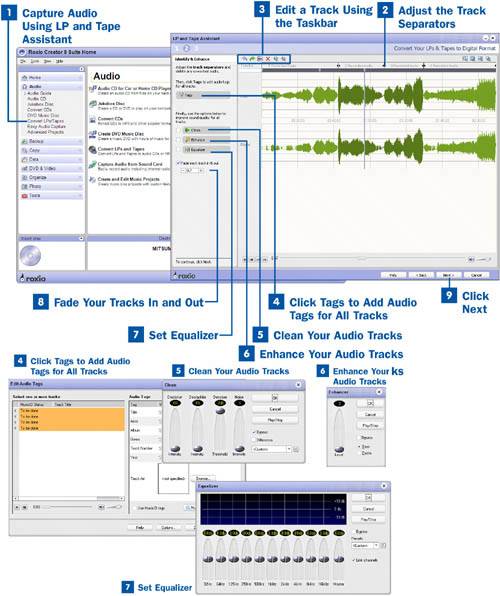
In the Roxio Creator Suite 8 Home page, launch LP and Tape Assistant from the project pane under the Audio heading by selecting Convert LPs/Tapes. Follow the steps to capture your audio and click Next. If you are unfamiliar with this process, refer to  Capture Audio Using LP and Tape Assistant.
 Adjust the Track Separators
Here's your chance to really play with the tracks you've imported. Above your tracks is a header that labels each track you've recorded; in this case, 1 Recorded Audio, 2 Recorded Audio, and so forth. A line separates each track you've recorded. By holding your left mouse button and dragging those lines around, you can change the definition of the track boundaries. You can merge two or more tracks (or parts of tracks) or create a new clip entirely.
You can select any one of these tracks by highlighting the header. Or, by clicking anywhere inside the tracks, you can create a new selection line. You can leave it as a line in order to create a separator, or you can drag it to your preferred end point to highlight a larger selection. At any time you can preview your recorded audio by clicking the Play button at the bottom left of the screen to make sure you've selected the portion of the audio clip you want.
You can create a marker by right-clicking inside the track and choosing Add/Remove Marker from the context menu that appears. You can also do this by holding down the Control key and then clicking inside the audio. You create a new separator while leaving a marker in the place of your last separator. The marker appears as a little blue tab inside the dark upper border of the track view.
 Edit a Track Using the Taskbar
You can edit a selected portion of the track by using the buttons on the top left of the LP and Tape Assistant window (called the taskbar). Listed in order, these buttons are
Undo Undo the last change you've made to the tracks
Redo Redo the last undone change
Rename Allows you to rename the selected track
Delete Allows you to delete a selected portion of the track
Add Track Separator Allows you to divide or crop tracks by adding a track separator
Delete Track Separator Allows you to combine tracks by deleting their separators
Key Term
Taskbar A group of icons that usually appears at the top of any application you are using, although it is also very common to see them down one side. These icons make it convenient to complete tasks just by pointing and clicking. A taskbar is sometimes called a toolbar or toolbox.
Tips
Right-clicking inside of the track gives you several options for more precisely selecting or moving around inside the tracks. You can also insert a silence of the duration of your choice by choosing the appropriate option from the context menu that appears.
Any time you have a portion of an audio clip selected, you can zoom to that selection by using the zoom tools in the upper right of your view or by right-clicking on the selection and choosing Zoom to Selection. When you are done editing your particular selection, you can zoom back to your full view by right-clicking and choosing Zoom out Full.
 Click Tags to Add Audio Tags for All Tracks
After you have made your changes, click on the Tags button to add audio tags to your tracks. You can select any or all of your tracks and change their name, artist, album, genre, track number, and year. You can also assign track art. The MusicID button allows you to search the online database for your track information. This works if your tracks have been recorded in their entirety and you haven't made any major changes to them.
 Clean Your Audio Tracks
When you have named your tracks, select the portion of the audio clip that you want to clean and click the Clean button on the Clip Editor toolbar. In the Clean dialog that opens, you can declick, decrackle, denoise, or add noise manually by selecting Custom (the default) at the bottom right of the pane and adjusting the sliders for each function until the cleaning effect is properly applied. You can also have the effect applied via LP and Tape Assistant presets by choosing a low, medium, or high setting from the bottom-right drop-down menu. Play the track that you are cleaning to hear the effect as you adjust it.
Tip
Because the cleaning effects are layered on top of each other as you apply them, you should add the effects one at a time, adjusting each as necessary.
 Enhance Your Audio Tracks
After you have cleaned your audio, you can enhance it by selecting the Enhance button. You can choose to enhance the Bass, or make your audio brighter by enhancing the Excite. There are no presets for either enhance function, so you'll need to adjust the effects manually with the slider provided.
 Set Equalizer
When you are satisfied with the enhancement settings of your audio, click the Equalizer button to use Easy Media Creator's 10-band equalizer to change the levels of your audio track. You can use the presets or customize your settings by adjusting the levels manually. Customizing your settings is mostly a trial-and-error process, so change one setting at a time and preview your track to monitor the differences. There is a left and right channel indicator for each band. You can adjust each channel separately by deselecting the Link Channels option.
 Fade Your Tracks In and Out
After you have set the equalizer, you have the option to fade your tracks. Selecting the Fade each track in & out option fades the beginning and ending of each track within the editor for the specified amount of time. Use the + and buttons to increase and decrease the duration of the fade, or type your preferred time in the box provided.
 Click Next
After you have completed your edits, click Next. This takes you to the final step within LP and Tape Assistant, where you have the option to burn your audio to CD or export it to a file on your hard disk. You are also given the option to continue editing your audio using the more advanced Sound Editor or to export the track to Music Disc Creator so it can be added to a project. For more information on exporting your audio, see  Export Audio.