Select the Audio Button
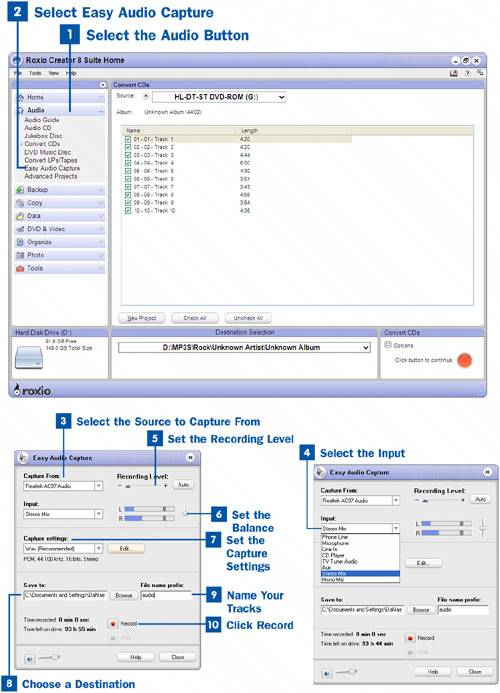
Select the Audio button in the project pane to open the Audio menu.
 Select Easy Audio Capture
After the Audio menu is open, select Easy Audio Capture to start this application.
 Select the Source to Capture From
After Easy Audio Capture has launched, you need to navigate the Capture From drop-down menu to choose the hardware device that will capture your sound. Commonly your sound card is the only device listed here. If you have a USB input device, this is also listed. Choose which source you will be using.
Key Term
USB A port on the computer that allows you to connect peripheral devices such as cameras, hard drives, MP3 players, and so forth.
 Select the Input
After you have chosen what you will capture from, select your input device. This step requires that you have correctly set up the required hardware for the input device you would like to use. You can learn more about this in  About Audio Capture Hardware.
Several input devices are listed, so let's take a look at each one:
Phone Line Choose this option and you can record a phone conversation through a phone line connected to your modem.
Microphone Record live audio through a microphone by choosing this option.
Line In This option is for any device plugged into your sound card or a USB input device. For example, you would choose this option if you had a stereo hooked up to your computer in order to input LPs or tapes.
CD Player Use this option if you have a CD player or other digital input device plugged in to your line-in port on your sound card.
TV Tuner Audio If you have a TV tuner connected to your computer, you can capture the audio from your TV programs by choosing this option.
Aux If you have a device plugged into your auxiliary line-in port in your sound card, choose this option.
Stereo Mix and Mono Mix These are options for capturing streaming audio. A stereo mix gives you two channels of audio, while a mono mix gives you just one.
SPDIF This option appears in your menu if your sound card has RCA, coaxial, or optical ports. If you have these ports and the cables to use them, they are the best quality choice.
Note
Your audio doesn't have to be streaming from the Internet for you to record it. You can also capture any audio your computer happens to be playing. You can extract audio from a video file this way.
 Set the Recording Level
After you have set your input, drag the recording level slider to the desired position. You want your recording level to be as high as possible without creating distortion. Set your levels until the left and right meter indicators below the slider are in approximately the center of the meter. As your recording progresses, make sure that they rarely, if ever, reach the top of the meter. This keeps your recording free of distortion. You can also click the Auto button next to the recording level slide. You need to do this while your audio is being played so Easy Audio Capture can monitor the levels. Easy Audio Capture automatically tracks the levels of the meter in order to use the highest possible recording level.
 Set the Balance
After you have set your recording level, drag the balance slider to balance the audio level between the left and right channels.
 Set the Capture Settings
After you have selected the tracks you want, set your capture settings by choosing from the Capture settings drop-down menu. Your capture settings are determined by what kind of project you are planning and the amount of disk space you have available. A WAV file is the highest quality file available. It is also the best option if you are planning to edit the audio file in any way. You can convert the file to a different file format after you have edited it. An MP3 or WMA file is the popular choice for use with your computer or digital media player. It can still be very good quality, and it takes up a significantly smaller amount of space. Either one is a good choice; it just depends on your preference. If you are limited on space and don't mind giving up quality, choose the lower quality settings.
For the advanced user, you can also customize your audio. This option enables you to apply your own combination of settings, including an alternative file format, encoder type, bit rate, and file location. To define custom settings, click the Edit button to the right of the Capture settings menu.
 Choose a Destination
When you have decided on your capture settings, choose the location to which you would like to save the file. Make this a folder that is conveniently accessible and easy to remember. When it comes time to add these tracks to a project, you'll want to be able to find them again.
 Name Your Tracks
After you've determined where to save your file(s), you need to name your tracks. You can enter a name in the File name prefix text box. Media Import uses the text you enter to begin the file name for each recorded file. For example, if you are recording several audio files and enter Audio, the recorded files are named Audio_1, Audio_2, and so on.
 Click Record
When you are sure that all your settings are correct, click the Record button. After you have clicked the Record button, start the audio that you are capturing. This ensures that no clipping occurs. When you are done recording, click the Stop button.