Open Plug and Burn
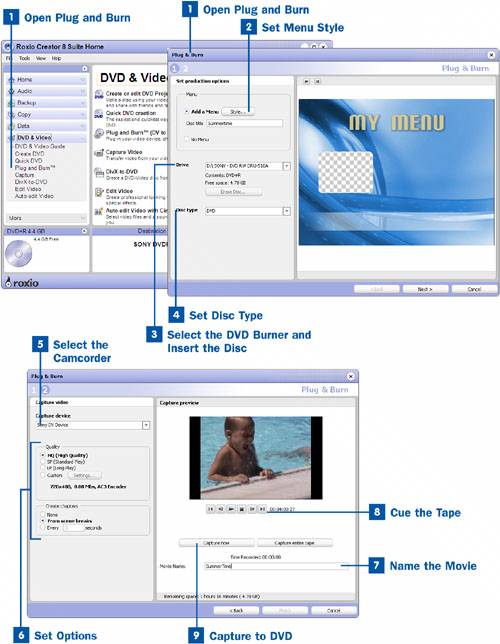
In the Easy Media Creator project pane, select the DVD & Video menu. When the DVD & Video menu is displayed, select Plug and Burn to launch the Plug and Burn utility.
 Set Menu Style
After you have opened Plug and Burn, you can select the Add a Menu option and click the Style button to add a menu to the DVD, or you can select No Menu to have no menu on the DVD.
 Select the DVD Burner and Insert the Disc
After you have set the menu option, select the DVD burner from the Drive list and insert a blank disc.
Tip
If you are using rewritable media, you can erase the disc first by clicking on the Erase button.
 Set Disc Type
After you have inserted the disc into the drive, select the disc type from the Disc type drop-down list. Then click the Next button to move to step two in the Plug & Burn window.
 Select the Camcorder
In the Capture video area, first select the camcorder from the Capture device drop-down list.
 Set Options
After you have selected the camcorder, set the quality and chapter options for the DVD. You can choose from the HQ (High Quality), SP (Standard Play), or LP (Long Play) options. HQ is the best option to use; however, it also takes up the most disc space. You can also customize the quality by selecting Custom and then clicking on the Settings button.
You can also have chapters automatically added to the DVD by selecting either the From scene breaks or Every (number) seconds option.
 Name the Movie
After you have set the DVD options, type in a name for your movie in the Movie Name text box. This name is displayed on the DVD menu if you include one in the project.
 Cue the Tape
After you have given the movie a name, you can use the playback controls to cue the tape to where you want to start capturing the video.
 Capture to DVD
After the tape is cued to the correct starting point, click the Capture now button. The camcorder starts playing and the DVD drive starts burning simultaneously. After you have finished capturing, click the Stop Capture button to end capturing. After the DVD has finalized, it is ready to play in a DVD player.
Tip
Some DVD players choke and sputter on burned discs that are recorded at too high a video bitrate. If you experience this problem with your player, go to, File, Project, Setting to change your project settings to record at a lower bitrate. You can switch from the Best to Good preset, or manually change the bitrate to 7 or 7.5 megabits per second, which most DVD players can handle.