With just a few quick steps you can export your video production directly to a DVD, complete with menus, so you can enjoy watching it for years to come or share your special memories with others.
You might want to export your creation to a video file, as well as burning it to a DVD, so you always have the option to view it on your computer or import it into a new project as a video file.
Note
MyDVD Express is a simplified version of the more robust MyDVD, a full DVD-authoring application that can give you several more options for creating a DVD menu than the Express version. Take a look at Chapter 12, "Authoring DVDs."
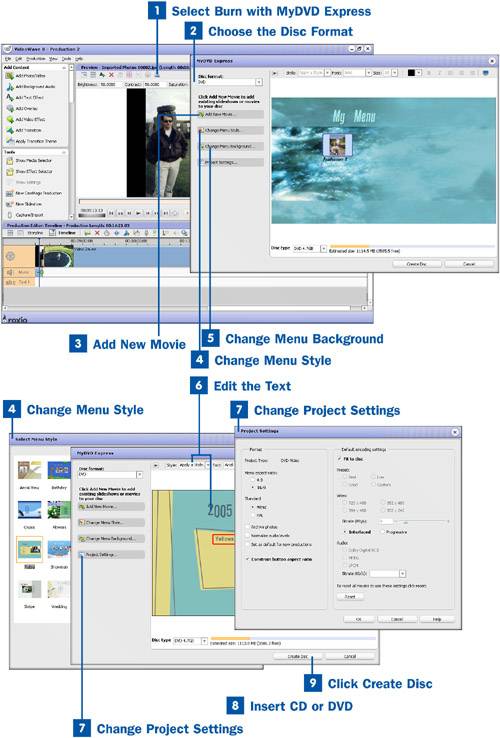
 Select Burn with MyDVD Express
When you are ready to burn your production to a DVD, click on the Burn with MyDVD Express icon in the Preview taskbar. This opens MyDVD Express.
 Choose the Disc Format
After MyDVD Express has launched, choose your disc format from the Disc format drop-down menu. DVDs are so inexpensive now that it is rare that you would want to use an alternative disc format. If you do want to create another disc format, such as Video CD, which burns video in a standardized format to an ordinary CD, you can choose from several.
Be sure and set the disc type at the bottom of the MyDVD window so your available space indicator is correct.
 Add New Movie
You can add additional video productions and files to your DVD. Select the Add New Movie button and browse to find the files you want to add. When you have selected your files, click OK.
 Change Menu Style
After you have added any additional videos to your DVD project, change the menu style by selecting the Change Menu Style button to bring up the Change Menu Style window. From this window you are able to select from several styles for your menu. Preview the styles by clicking on them to bring them up into the larger windows. When you have selected the style you like best, click OK. After you are back in MyDVD Express, you can preview the menu style by clicking the Play icon in the taskbar.
Tip
You can preview the way your menu will operate on a DVD by clicking on the Preview icon in the taskbar. The Preview icon looks like a miniature TV.
 Change Menu Background
After you have set the style for your menu, you might want to use your own photo for the menu background to give it a personal touch. Click on the Change Menu Background button and browse for the photo you would like to have as a background. When you have selected a photo, click OK.
 Edit the Text
After you have put in your own background photo, you can do some basic editing of the text. Although the text objects are constrained to the menu style you picked, you can retype the text as well as change the font, color, and size by using the taskbar above the background photo.
 Change Project Settings
When you are satisfied with the look of your menu, select the Project Settings button. In the Project Settings window you can change the aspect ratio, set the video standard, and choose whether you would like the production to be interlaced or progressive, among other things. When your settings look good, click OK.
 Insert CD or DVD
When you are ready to burn the disc, insert the disc you are using into your burner.
 Click Create Disc
When you have inserted your disc, click the Create Disc button to burn your DVD project. The Burn DVD window comes up. Change any of the options and click Burn.