Using ZENworks for Servers 3 Server Inventory
| Another important component of ZENworks for Servers 3 server management is server inventory. ZENworks for Servers 3 uses inventory scan programs to scan and store hardware and software inventory of your managed servers. The following sections describe the inventory components and discuss how to scan server inventory and customize software scanning. Understanding Server Inventory ComponentsTo get the most out of ZENworks for Servers 3 server inventory, you need to understand the components that make up the inventory process and roles that inventory servers play in capturing and storing inventory data. In a small network, one inventory server would be ample to collect, store, and provide access to the inventory data about servers. But in enterprise networks, the number of servers and the amount of inventory data that can be collected and managed becomes extremely complex. For that reason, ZENworks for Servers 3 implements a tree design to allow several inventory servers to be involved in accumulating and distributing the inventory data. The following is a list of the types of inventory servers and their roles in the inventory process:
Now that you understand the types of inventory servers that are involved in the server inventory process, you need to understand the components that are involved. ZENworks for Servers 3 uses several different pieces to scan servers for inventory data, process that information, and then store it in the appropriate location. The following is a list of components that make up the inventory process:
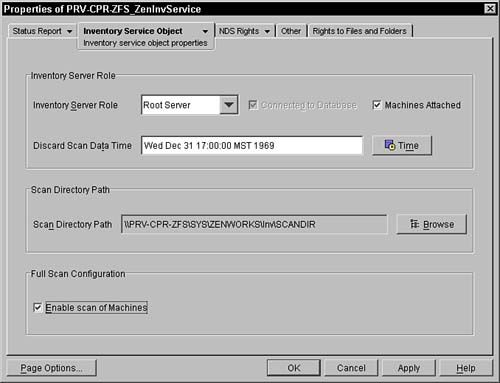
Understanding the Scanning ProcessNow that you understand the types of inventory servers and the software components that are involved in ZENworks for Servers 3 server inventory, it is helpful for you to understand the actual process using ZENworks for Servers 3 to scan, collect, and store inventory data. The first thing that happens in the inventory process is that the inventory scanner agent is activated on a Windows or NetWare Server. The agent reads inventory policy settings (discussed later in this chapter) and uses those settings to scan the server. As the scanning agent runs, it collects data about the server's hardware and software and stores that data in .STR files on the server's local file system. The scan collector then transfers those files to the scan directory (\SCANDIR\) of the inventory server defined in the inventory policy. After the inventory scanner places data in the scan directory, the selector begins to process the .STR files. The selector filters out everything but new inventory data, and then stores the new data in the enterprise merge directory (\ENTMERGEDIR\) to be transferred to a higher level and/or to the database directory (\DBDIR\) to be stored in the inventory database, if one is running on the server. After files are stored in the enterprise merge directory, the sender zips up all the scan data files and sends them to a receiver running on another inventory server, which is defined in the roll-up policy (discussed later in this chapter). The receiver opens the .ZIP files it receives from a sender and copies them to the enterprise merge directory (\ENTMERGEDIR\) to be transferred to a higher level and/or to the database directory (\DBDIR\) to be stored in the inventory database, if one is running on the server. On an intermediate server with an inventory database, for example, the files would be copied to both directories; however, on the root server the files would be copied to only the database directory. After files are placed, the storer opens the .ZIP file, extracts the scan files to a temp directory (\DBDIR\TEMP\), and updates the inventory data with the data in the .STR files. After the database is updated, the administrator can view the new inventory data from the management console. Setting Up Server InventoryNow that you understand the components that are involved in the ZENworks Server Inventory process, you need to understand how to set up and configure the eDirectory objects that control inventory scanning. You use the management console to define the database types and locations in the inventory tree, as well as their synchronization and roll-up schedules. The following sections discuss the configuration changes you need to make at the management console to configure and customize server inventory. Configuring the Inventory Service ObjectThe first object you need to configure for server inventory is the inventory service. You must create an inventory service object for each server on which you install ZENworks for Servers 3. The inventory service object defines which role that server plays during the server inventory process. (The inventory service object can be created automatically during the installation of ZENworks for Servers.) To configure the inventory service object for an inventory server, right-click the inventory service object in ConsoleOne and select Properties. Then select Inventory Service Object Properties from the drop-down list of the Inventory Server Object tab, as shown in Figure 12.14. Figure 12.14. Inventory service object properties of an inventory service object of a ZENworks for Servers 3 inventory server.
From the Inventory Service Object Properties panel, you can configure the following items of the inventory server:
ZENworks for Servers 3 enables you to configure the synchronization schedule to synchronize servers being inventoried with the inventory server with which they are associated. To configure the synchronization schedule for an inventory server, right-click the inventory service object in ConsoleOne and select Properties. Then select Inventory Server Sync Schedule from the drop-down list of the Inventory Server Object tab, as shown in Figure 12.15. Figure 12.15. Inventory Server Sync Schedule panel of an inventory service object of a ZENworks for Servers 3 inventory server.
From the Inventory Server Sync Schedule panel, you can configure the following synchronization options for the inventory server:
Configuring the Distributed Server Inventory PolicyAfter configuring the inventory service object, you need to configure server inventory policy for distributed server packages that you want to use to collect and distribute inventory data. The server inventory policy enables you to configure which inventory service the servers associated with this package are to use. It also allows you to enable and configure hardware and software scanning. To configure the server inventory policy for a distributed server package, right-click the package and select Properties from the drop-down menu. Then select the Policies tab for the operating system you want to configure. ZENworks for Servers 3 enables you to select NetWare, Windows, Linux, Solaris, or General to configure for all those operating systems. Next, enable the server inventory policy by checking the box next to it. Finally, select the server inventory policy and click the Properties button to bring up the Server Inventory Policy Properties window. The following sections discuss how to configure the server inventory policy from this window. Configuring the Inventory Service for the ServerThe first step in configuring the server inventory policy is to configure which inventory service the servers associated with this policy are to use. Select the General tab in the Server Inventory Policy panel, as shown in Figure 12.16, and configure the following settings:
Figure 12.16. General panel of the NetWare Inventory Server Policy for a distributed server package.
Configuring Hardware ScanIf you are configuring an inventory server policy for Windows, then you need to configure hardware scanning by selecting the Hardware Scan tab and setting the following options:
Configuring Software ScanNext you need to configure software scanning. Enable software scanning by checking the box next to the Enable Software Scan option, and then clicking the Custom Scan Editor button to bring up the Custom Scan Editor window (see Figure 12.17). Figure 12.17. Custom Scan Editor window for software scanning in the server inventory policy for a distributed server package.
If you are configuring a server inventory policy for Windows, then you also have the option to enable ZENworks to scan for product identification numbers of applications that are installed on inventoried Windows NT/2000 Servers. The product identification number can be extremely useful in sorting and organizing inventory software reports. From the Custom Scan Editor window, you can create a list of software that ZENworks for Servers 3 will scan for on servers during the inventory process. The Custom Scan Editor provides you with a powerful tool to optimize software scanning for your network. Use the Custom Scan Editor to specify the vender, product name, product version, filename, and file size of the software for which you want to scan on servers. This enables you to selectively inventory only software that is important to track, reducing the size of inventory reports as well as network and server utilization. Configuring the Configuration EditorAfter you enable and configure software scanning, you can modify the INI file that ZENworks for Servers 3 uses when reporting software inventory by selecting the Configuration Editor tab, as shown in Figure 12.18. From the Configuration Editor tab, you can edit the SWRules file by clicking the Set Default button to open the default file, and then modifying the entries. This enables you to modify what information ZENworks includes when you create inventory reports. Figure 12.18. Configuration Editor panel of the server inventory policy for a distributed server package.
If you are modifying the server inventory policy for Windows, then the Configuration Editor tab will have a drop-down arrow enabling you to modify the entry's INI files for Zipped Names. This modification enables you to specify the manufacturers of software that is being used to zip files, as well as the identifiers that they are using for the zipped files. If you are modifying the server inventory policy for Windows, you can also modify the entries in the INI file for Asset Information. You can specify the DMI classnames and attributes for things such as a server model, model number, serial number, and computer type. Configuring the Service Location PackageThe next step in configuring server inventory is to define the inventory database for the service location package object and associate the database object with the inventory service object. This step tells ZENworks which inventory server to use for objects associated with the service location package. Follow these steps to configure the service location package from within ConsoleOne:
Configuring the Roll-Up PolicyAfter configuring the service location package, you need to configure the roll-up policy if this inventory server is a leaf or intermediate server. The roll-up policy controls the flow of scanned data through the inventory tree by determining the next inventory location and schedule-to-roll scan data collected by the current inventory server. Follow these steps to configure the roll-up policy for an inventory server in ConsoleOne:
|

EAN: N/A
Pages: 137