Setting Up Users to Receive Applications
Once you have set up application foldering, you need to set up users to receive applications via ZENworks for Desktops. This section covers using ConsoleOne to set up User objects to receive applications by using the following methods:
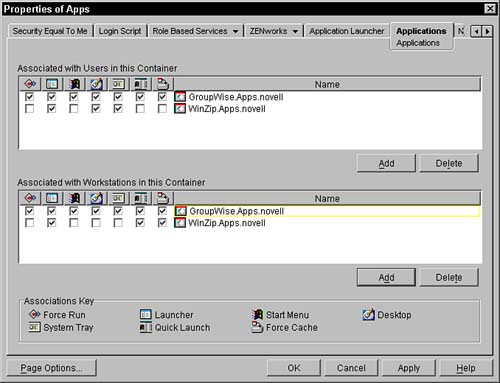
Associate a User, Group, Workstation, or Container Object to Application ObjectsThe first step in setting up users to receive applications is to use the Applications property panel to associate a User, Group, Workstation, Organizational Unit, Organization, or Country object to one or more Application objects. You can also use the Associations panel for Application objects to individually add users or containers; however, unless you associate applications using one of these two methods, applications are not available to users. You should design your application associations to make it as easy as possible to administer. For example, separating applications into company, division, group, and then users levels would enable you to make the fewest associations as possible and would also reduce the cost of future administration. In addition to associating applications with other objects, use the Applications property panel to specify where and how users access applications on their workstations. For example, you can display application icons in Application Launcher, Application Explorer, Windows Explorer, Start menu, the Desktop, and the system tray (or in all of these areas). You can also force applications to launch when Windows starts. Note The default method of access is App Launcher, meaning that users see the application only in the Application Launcher and Application Explorer browser view (depending on what you have made available). To specify who sees an application and where it is displayed on workstations, use the following method:
The following sections describe the options from the Applications panel that specify how the application is available to users. Force Applications to RunThe Force Applications to Run option runs applications immediately when Application Launcher or Application Explorer starts and when the application is available. You can use this option in conjunction with several other Application object settings to achieve unique behaviors. For example, if you set an application as Run Once (on the Application object's Identification property page) and Force Run (on the User, Group, or container object's Applications property page), the application runs immediately one time (if available). Put Applications in the Application Launcher or Explorer Browser ViewThis option displays application icons in Application Launcher and Application Explorer (browser view), depending on which one you make available to your users. Put Applications on the Start MenuWhen Application Explorer is enabled, the Start Menu option displays icons on the Windows98 or Windows NT/2000/XP Start menu under Novell Application Launcher. Put Applications on the DesktopWhen Application Explorer is enabled, this option displays icons on the Windows 98 or Windows NT/2000/XP desktop area. Put Applications on the System TrayThis option displays icons on the system tray, an area on the Windows 98 or Windows NT/2000/XP taskbar where small icons, representing applications, are placed for easy access. Application Explorer can display or remove applications on the system tray at any time. Set Application for Quick LaunchThe Quick Launch option puts the icon for the application in the quick launch menu for even faster and easier distribution of the object. Tip If you plan to add the application to the quick launch menu, you should use an icon that users can easily recognize. Force Cache the ApplicationThe Force Cache option forces the application to be cached to the workstation, where it can be used the next time it is run. This is extremely useful for applications that need to run more than once. For example, you could use this option for a virus scanner that runs every time the user logs into the network. The workstation would need to pull down the virus scanner object only once; from then on, it would be applied out of cache. Make Application Launcher/Explorer Available to UsersOnce you have associated the Application object with the specific users you want receiving it, you need to make Application Launcher/Explorer available to them. Application Launcher and Explorer are types of software that run on users' Windows 98 or Windows NT/2000/XP workstations. They display the applications that you distribute to users using the Application Launcher/Explorer snap-in. You can specify to what degree users control the options in Application Launcher/Explorer by using a User, Organizational Unit, Organization, or Country object's Launcher Configuration property page. Application Explorer displays application icons in a special Application Explorer window, Windows Explorer, Start menu, System Tray, or Desktop. Use the Applications property page of the User, Group, Organizational Unit, Organization, or Country object to set up the different Application Explorer access points, as discussed earlier in this chapter. The following sections discuss methods to make applications available to your users through Application Launcher/Explorer. Note You can run Application Launcher or Explorer on a workstation; however, you should not run them both at the same time on the same workstation. Manually Starting Application Launcher/ExplorerThe easiest way to make Application Launcher and Explorer available to users is to have users run them manually. Click Start, Programs, Novell ZENworks for Desktops, Application Management Window to start Application Launcher manually on a workstation with the ZENworks for Desktops client installed on it. Click Start, Programs, Novell ZENworks for Desktops, Integrated Application Explorer to start Application Explorer manually on a workstation with the ZENworks for Desktops client installed on it. You can also set the Launcher/Explorer to start automatically as part of the installation of the ZENworks Management Agent. Starting Application Launcher/Explorer from a Login ProfileThe most user-friendly method for making Application Launcher/Explorer available to users is to add the command to launch them to a login profile that the users will run when logging into the network. This gives the administrator more control over how and where they are run. To make Application Explorer available to users, ensure that NALEXPLD.EXE is in a network directory (such as sys:\public) where users have rights and access. The Application Explorer is installed to the sys:\public directory when ZENworks for Desktops is installed on a server, but you might need to copy it to the public directory on other servers that do not have ZENworks for Desktops installed on them. To make Application Launcher available to users, follow these steps:
Note The # command requires the external command to complete before executing the next line in the login script. The @ command enables the login script to continue processing while the external command is processed. It's recommended that you use the @ symbol for faster script execution. Do not equate NAL.EXE, a "wrapper" executable that does not stay in memory, with NALWIN32.EXE. If you use # with NALWIN32.EXE, the scripts will wait until the user exits Application Launcher. In ZENworks for Desktops 4, the Application Launcher actually resides in C:\Program Files\Novell\ZENworks directory. The NAL.EXE on the server is replaced with an executable that will launch the local copy of the launcher. Setting Up Application Launcher/Explorer As a ShellThe most powerful way for you to make applications available to users via Application Launcher is to use Application Launcher as a shell in place of Windows Explorer. This allows you to completely control which applications your users have access to on their local workstations. Use the following steps to set Application Launcher as the Shell on a Windows 98 workstation with the ZENworks for Desktops client installed on it:
Use the following steps to set Application Launcher as the Shell on a Windows NT/2000/XP workstation with the ZENworks for Desktops client installed on it:
|
EAN: 2147483647
Pages: 198