The following sections walk you through a standard installation of ZENworks for Desktops 4 in a pure Windows environment with Active Directory. ConfigurationFor the purposes of developing your own test environment, the configuration used in this chapter is relatively small. Your systems can include, in fact, many servers for such needs as application execution, terminal services, and so on. This chapter uses the following network layout: Windows 2000 server, which is the Active Directory DC Windows 2000 server, which is the ZENworks server and is where you'll install eDirectory and the ZENworks Middle Tier server Windows XP Professional Workstation with the full ZENworks agents configured Windows XP Professional Workstation with the Application Browser View agent
In a more traditional system, you might want to put your ZENworks Middle Tier server onto another Windows 2000 server to provide maximum performance. This is not done here to minimize hardware requirements. Should you decide to put the Middle Tier server on another server, the only requirements for this server is a Windows 2000 Server running IIS with all of the appropriate support packs. Installing ZENworks for Desktops 4Now that you understand the network configuration required to install ZENworks for Desktops 4, you can begin the install process. The following sections discuss the pre-installation requirements to check before you begin the ZENworks for Desktops 4 install and how to install ZENworks for Desktops 4 into your pure Windows environment. Pre-Installation RequirementsPrior to installing ZENworks for Desktops 4, you need to make certain that the required network components are installed and running. The following is a list of components that must already have been installed and functioning: DA-01 Windows 2000 Server with Active Directory (DA domain) and SP2 installed. DA-02 Windows 2000 Server with Support Pack 2 or greater, IIS, and a member of the DA domain. WKS-01 Windows XP Professional Workstation. WKS-02 Windows XP Professional Workstation.
Once you have verified the network components are installed and running, it's a good idea to download the following updates and documentation and save them for use during the installation process: DirXML 1.1a for Windows NT/2000 from the http://download.novell.com Web site. Choose DirXML product. DirXML Password Synchronization for Windows from the http://download.novell.com Web site. Choose DirXML Password Synchronization for Windows product. This will download version 1.0. DirXML Password Synchronization update (PWDSNC1.EXE) from the http://support.novell.com/filefinder Web site. Enter pwdsnc1.exe in the search field. Print TID# 2962702 from http://support.novell.com to learn how to apply the password synchronization update. eDirectory 8.7 or higher for Windows NT/2000 from the http://download.novell.com Web site. Choose the eDirectory product. The update DirXML Active Directory driver and utilities found in TID#2964748 from the http://support.novell.com Web site (through the knowledge base).
ZENworks for Desktops 4 InstallationPerform the following steps to install the ZENworks for Desktops 4 system into the identified environment. Step One: Getting eDirectoryDownload eDirectory and get a license from Novell for it. This is done by performing the following: Go to http://download.novell.com and download eDirectory for the Windows 2000 platform. Choose eDirectory 8.7 on Windows NT/2000 and download. Go to http://www.novell.com/products/edirectory/customer_license.html. Press the I Accept button on the license agreement. Select the appropriate eDirectory version from the list of licenses available. Fill in the contact information. Make sure you put in your correct e-mail address, as your licenses will be sent to that address. Press the Submit button. A license will be sent to your e-mail address. When received, open the e-mail and save the two files to a floppy disk.
Step Two: Getting Updated DirXML DriversTake the new AD drivers and support tools you downloaded from TID#2964748 and put them on the server in some directory you create (not in ConsoleOne) or onto a floppy. These files should include AD-DRIVER.XML, AD-DRIVER_EN.XLF, AD-DRIVER-SCHEMA.LDI, and READDOMAINGUID.EXE. Step Three: Installing eDirectoryInstall eDirectory onto DA-02 by following these steps: Log onto the DA-02 Windows 2000 server as the administrator and launch the eDirectory execution program, which is downloaded in the pre-installation procedures. Choose to install both eDirectory and ConsoleOne onto the server. Press Install. The first step that eDirectory installation performs is the installation of the Novell client. Perform the following steps to install the client: Choose Yes on the license agreement. Choose custom installation and press Next. Verify that only the client is chosen on the modules list. Press Next. Choose IP only and Remove IPX if present. Press Next. Choose NDS to instruct the client to default to using NDS connections. Press Next. Choose Finish.
The eDirectory License Installation will begin automatically. Press Next. Read the license agreement and press I Accept. Insert the license disk you made in the previous step. Select Install License Diskette, A:License and press Next. Press Close on the licensing installation success dialog box. The system will now install NICI cryptography system. Once that is installed, the system will prompt you to reboot. Remove the floppy disk and press OK on the dialog box requesting to reboot. Once the system is rebooted, eDirectory will complete its installation. When the system next comes up, you see the client login dialog box. Press Ctrl+Alt+Delete. Choose workstation only and log into the system as the administrator. Press OK. The installation of eDirectory will automatically continue. On the welcome screen for the installation, press Next. View the license and press I Accept. Select the desired languages and press Next. Accept the default installation path and press Next. Press Yes on the dialog box to create the new directory that does not exist. Choose to create a new eDirectory tree. Press Next. Choose a tree name, context for the DA-02 server, and admin user object along with the passwords. At the very minimum you want the server and admin under a container, so append a <dot>containername (where <dot> is a period) after the server name. This chapter uses the da container name. So, for example, the tree name would be DA-TREE. The server object would be DA-02-NDS.servers.da, the admin name would be admin, and the context would be da. Press Next. Accept the HTTP Stack Ports as default, because there will be no conflicting Web ports on this server. Press Next. Accept the defaults on the Certificate Server Objects wizard page and press Next. Proceed and create a certificate authority for the tree, pressing OK on the warning dialog box. Because eDirectory will need to not interfere with the Active Directory that is using the default 389/636 ports, you need to change them. Change the clear text port to 388 and the SSL port to 635, as shown in Figure 18.2. Uncheck the Require TLS for Simple Bind with Password option. This is necessary in order to allow password synchronization to function. Press Next. Figure 18.2. LDAP ports setting for eDirectory installation.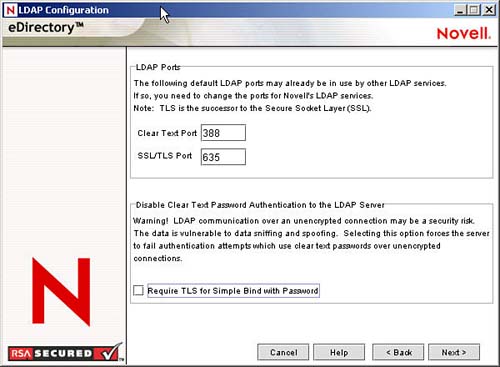
Accept the default NMAS Login Methods by pressing Next. Complete the eDirectory installation by pressing Finish.
eDirectory will now perform its installation on the DA-02 server. When completed, press Close on the success dialog box. Step Four: Creating DirXML Administrator Account in Active DirectoryIn order to isolate changes that occur with other administrator accounts, Novell recommends that you create a separate account for DirXML with Administrator privileges in Active Directory. To create this account: Log onto the DA-01 server as administrator of the domain. Launch the Active Directory Users and Computers MMC by launching Start, Programs, Administrative Tools, Active Directory Users and Computers. From Active Directory Users and Computers, select the container where you want to add the DirXML administrator user, and then click Create a New User. Enter the names for the user. For example, enter Novell as the first name, Dirxml as the last name, and Novell Dirxml as the full name. The user login name should be novelldirxml@da.com. Click Next, and then set the password for the new user. Mark Password Never Expires so that a password won't disable the driver unexpectedly. Click Next, review the summary, and then click Finish. In the Tree view, select Builtin, Administrator's properties, Members, Add. Select the full name of the user you created (Novell Dirxml). Click Add, click OK, and then click OK again. Close the Active Directory Users and Computers window. In the Administrative Tools window, select Domain Controller Security Policy. In the tree view, expand Security Settings, Local Policies, User Rights Assignment. Set Log On As a Service, Security, Add, Browse. Select the user you created (Novell Dirxml). Click Add, OK, OK, and then OK again. Close the Domain Controller Security Policy. Reboot the system.
Step Five: Installing ConsoleOneThe installation of ConsoleOne will now automatically start. Proceed through the wizard to install ConsoleOne onto the DA-02 server: Press Next on the welcome screen. Read the licensing agreement and press I Accept. Select any additional languages you want to install. Press Next. Accept the default installation path and press Next. Accept the default set of components to install and press Next. Accept the JInfoNet licensing agreement and press Next. Press Finish on the summary page. ConsoleOne will now install on the server. Press Close on the successful installation dialog box.
Step Six: Verifying That eDirectory Is FunctioningWhen ConsoleOne is completed, you need to verify that the tree is up and looks appropriate by performing the following steps: Right-click the red N in the taskbar and select login. Enter user admin, your password for eDirectory. Press Advanced and fill in the tree name, context of admin, and server, as shown in Figure 18.3. Figure 18.3. Advanced options for the Novell client login window.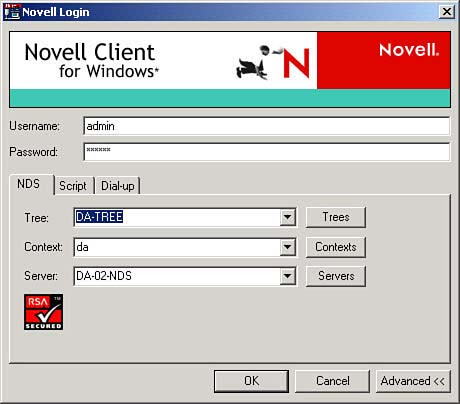
Press OK. This should log you into eDirectory. Verify that you are logged into the tree as admin by right-clicking the red N in the taskbar and selecting connections. Verify that you have a resource for the tree and the server and the username of CN=Admin. The authentication state on the server should be Directory Services and the tree should be DA-TREE. Close the dialog box. Now launch ConsoleOne and see whether the tree is visible and the admin along with server objects are present, as shown in Figure 18.4. Figure 18.4. Tree view with admin user in ConsoleOne.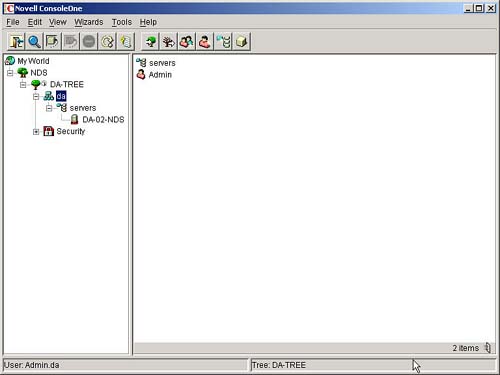
Create a shortcut on your server for c:\novell\nds\ndscons.exe. NDSConsole enables you to view the state of the eDirectory tree and the services running. Launch ndscons and verify that at least ds.dlm and nldap.dlm are running. You now have an eDirectory tree running on your Windows 2000 server.
Step Seven: Installing DirXMLNow that eDirectory is running, you need to install DirXML so that users can be synchronized between your Active Directory Domain and eDirectory. Install DirXML by performing the following steps: Log onto the DA-02 Windows 2000 server as the administrator and into eDirectory as the admin. Launch the DirXML 1.1a installation program, downloaded in the pre-installation procedures (nt\install.exe after extraction). Press Next on the DirXML welcome screen. Read the licensing agreement and press I Accept. Choose to install DirXML Engine and Drivers and DirXML Management Utilities on the component installation page, shown in Figure 18.5. Press Next. Figure 18.5. Component options of the DirXML installation.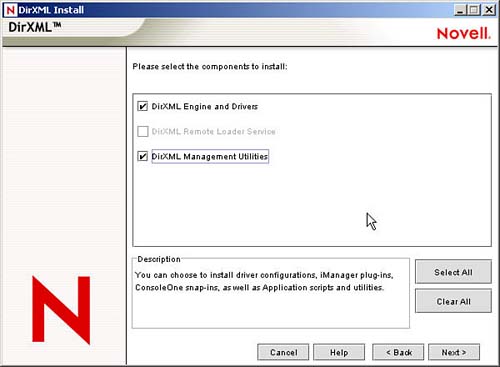
On the following component page, choose DirXML Engine and the appropriate core driver (DirXML Driver 2.0a for Active Directory). Proceed with the installation by pressing Next. Verify that the tree is appropriate and enter, or browse to, the admin user and password. Your admin username is CN=admin.O=da. Press Next. Choose ConsoleOne Snapins for DirXML, and DirXML Preconfigured Drivers for additional installation. Press Next. Deselect all of the preconfigured drivers except the appropriate Active Directory driver. Press Next. Press Finish on the summary dialog box. The installation of DirXML will continue. First it will shut down eDirectory and then the installation will proceed. Press OK on the dialog box warning about the possible conflict with eDirectory and the LDAP system. (You fixed that when you installed eDirectory.) When it is completed eDirectory will be brought back up. On the final dialog box, uncheck Launch ConsoleOne DirXML Configuration Wizards and press Close. You'll be launching the configuration wizards at a different time.
You have now installed DirXML. The drivers need to be configured before synchronization will occur, so that's the next step. Step Eight: Configuring DirXML DriversNow that eDirectory and DirXML have been installed on your DA-02 server, you need to configure your DirXML drivers and begin synchronization between your Active Directory Domain and eDirectory. Configure your DirXML drivers by doing the following: Log in to the DA-02 server as the administrator and eDirectory as the admin. Open a DOS box and execute the readDomainGUID.exe program. Make sure you run the tool from the c:\novell\nds directory. Cut and paste the GUID returned by the tool into a text file for later use. Launch ConsoleOne. You need to extend the eDirectory schema to accommodate the new Active Directory driver. This is accomplished by doing the following: Launch the schema import tool by selecting Wizards, NDS Import/Export from ConsoleOne. Select Import LDIF file; press Next. Browse to and select the AD-Driver-Schema.ldif file on your ZENworks floppy. Press Next. Enter 127.0.0.1 into the Server DNS Name/IP Address field and 388 into the Port field. Select Authenticated Login and enter your admin user object and password in the fields. Remember to enter the LDAP version of the admin username including the container (cn=admin,o=da). Press Next. Press Finish on the summary screen. You should get a scrolled output of the import. Verify that the total entries processed are three and that there were no errors. Press Close.
Create an Organizational Unit (OU) container in the directory under your da organizational container. Call this new OU DirXML. You'll create all of the objects related to DirXML under this container. If desired, create a user Organizational Unit container under da. Select the parent container (da) of the new DirXML organizational unit, and then choose Wizards, Create a New Application Driver. On the creation wizard, select In a New Driver Set. Press Next. Enter a driver set name, such as ADDriverSet. Browse to and select the DirXML container for the context and the DA-02 server for the server field, as shown in Figure 18.6. Press Next. Figure 18.6. Application driver creation wizard for DirXML configuration.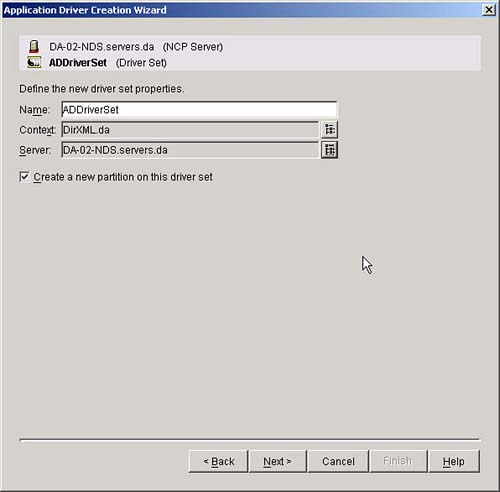
The wizard will now create the objects for the driver set. Select Import Preconfigured Driver and browse to and select AD-DRIVER.XML on your ZENworks floppy. Press Next. WARNING The installation of DirXML places an ADDRIVER.XML file in the system. This will also come up on the list. Make sure you choose the new AD-DRIVER.XML file. Now you must configure the driver parameters. They are all on the presented wizard page and are visible by using the scroll bar. See Table 18.1 for a list of fields and their description. Press OK. Press Yes to set the security equivalences of the driver. Press the Add button. Browse to the admin.da user and add it to the list. Press OK. Press Yes on the Novell Recommends You Identify All Objects that Represent Administrative Roles dialog box. Press the Add button and browse to and select all users who are administrators of eDirectory. This will prevent them from being created in the Active Directory domain and synchronized. Press OK. Press Finish on the summary page to complete the wizard.
Table 18.1. Application Driver Parameters for Configuring DirXMLFIELD | DESCRIPTION |
|---|
Field 1 | Driver name. Leave the name of the driver as the default. | Field 2 | Active Directory Account. Enter the domain administrator account you created (novelldirxml@da.com) and the passwords. | Field 3 | Authentication Password. Enter the password for the domain administrator account. | Field 4 | Retype the Password. Re-enter the domain administrator account password. | Field 5 | DNS name of Domain Controller. Enter LDAP://<DNS name of DA-01> into the address of Active Directory Domain controller field. Do not enter an IP address. This would be LDAP://da-01.da.com. | Field 6 | Domain GUID. Enter the GUID for the domain. You can cut and paste the GUID that you saved in a text file into this field. | Field 7 | Data Flow. Leave this to the default Bi-Directional. | Field 8 | Active Directory Base Container. Enter the base container in Active Directory. This is the container where you want users to be synchronized with eDirectory (for example, CN=Users,DC=da,DC=com). | Field 9 | eDirectory Base Container. Enter the container where you want your users to be created and synchronized with Active Directory (for example, users.da). You can browse for this container by pressing the browse button. If you are going to mirror the Active Directory containers, then this would be the top container in eDirectory. | Field 10 | Publisher Placement. Choose if you want flat or mirror. If you choose flat, all user objects coming from Active Directory are placed in the same container. If you choose mirror, the user objects and the containers are re-created in eDirectory. | Field 11 | Subscriber Placement. See field 10 to choose your placement. | Field 12 | Driver Polling Interval. Enter the polling interval you desire. In the lab it should probably be around 1 minute whereas in production you probably will want it around 15 minutes. | Field 13 | Use Secure Authentication. Leave this the default Yes. | Field 14 | Enable PasswordSync. Leave this the default Yes. | Field 15 | Install Driver as Remote/Local. Set this to Local. | Field 16 | Remote Host Name and Port. Ignore and leave as the default. | Field 17 | Driver Password. Ignore and leave blank. | Field 18 | Retype the password. Ignore and leave blank. | Field 19 | Remote Password. Ignore and leave blank. | Field 20 | Retype the password. Ignore and leave blank. |
Before you can get the DirXML driver running, you need to install the Password Synchronization software as described in the next step. Step Nine: Installing Password SynchronizationOnce you have installed eDirectory and DirXML, you need to install Password Synchronization. This enables the User objects that you create in Active Directory, which are automatically created in DirXML, to have the same password as their corresponding user in Active Directory. This is necessary to allow for single-login to both Active Directory and eDirectory when your users log in to their workstations. You should be aware that password synchronization requires that the platform-specific password policies not be in conflict with each other. Password policies that are in conflict will prevent successful password synchronization. For example, if eDirectory passwords are required to be at least eight characters, whereas Windows passwords have no length requirements, users could create shorter Windows passwords that wouldn't be accepted by eDirectory. In this case, the passwords will not be synchronized. Password synchronization does not override platform policies. DirXML allows you to generate an initial password for an account based on the account's attributes or other information available through Java services. For instance, you can generate a password based on a user's surname plus a four-digit number. Generating an initial password requires driver customization, but is a great way to manage passwords when provisioning an account through your existing HR toolset. ConsoleOne lets you set an initial password when creating a user account by marking the Assign NDS Password check box and then selecting the Prompt During Creation radio button. In this case, ConsoleOne sets the password before an account is associated in NT or Active Directory accounts, thus preventing the initial password from being synchronized. Passwords are synchronized only after the first password changes. To avoid this delay, you can use one of the following methods: Unmark Assign NDS Password during user creation and assign the password later. A brief delay will allow account associations to be completed. Select Prompt User on First Login so that password setting is delayed until the account is actually used.
Microsoft Management Console lets you set an initial password on a user account simply by typing the password at account creation. The password is set before password synchronization can associate an eDirectory account with the Active Directory account, so the password synchronization service cannot update the eDirectory account immediately. However, the service will retry the password update and the account will be properly updated within several minutes. Install password synchronization on your servers by performing the following steps: Log in to DA-02 as the administrator and in to eDirectory as the admin. Ensure that ConsoleOne is closed. Launch the installation of password sync that you downloaded from the Novell Web site. Press Next on the welcome screen. Read the license and press Yes to accept. Select both the Password Synchronization Service and PasswordSync Snap-in for ConsoleOne on the component menu. Press Next. Press Next on the review settings page. The installation will now copy the files to your DA-02 server. On the Setup dialog box, select the DA domain and browse to the ADDriver object (ADDriver.ADDriverSet.DirXML.da) in eDirectory. Press OK. Leave the object name as the default. For the Context, verify that it is the DirXML container that you have created. Press OK. When asked to give the password sync object rights, select the container where your user objects, synchronized from Active Directory, are expected to reside. Make sure you give these rights for every container of users that you are synchronizing. Press OK. When prompted to put filters on each Domain Controller, press Yes. You will be given a list of Domain Controllers. Select DA-01 and press Add (as shown in Figure 18.7). Figure 18.7. Password Synchronization Add Filters dialog box.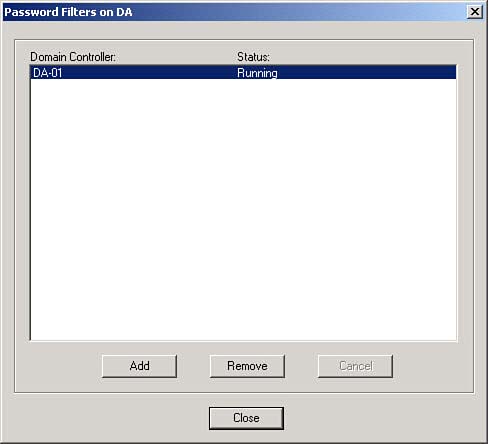
WARNING Adding the DA-01 domain controller will cause DA-01 to be rebooted. Wait until DA-01 has rebooted and the dialog box shows DA-01 status of Running. Press Close. Press Finish. Follow the instructions on TID# 2962702 that you downloaded. This will apply the update of password synchronization that you downloaded. Don't forget to reboot both DA-01 and DA-02 after applying the update.
Step Ten: Finalizing Configuration for DirXML DriversNow that you have installed and configured both the DirXML drivers and the PasswordSync driver, you need to finalize the configuration to make these drivers start automatically and function properly. This can be achieved by following these steps: Log in to DA-02 as the administrator and to eDirectory as the admin. Launch ConsoleOne. Select the ADDriverSet object under the DirXML container in ConsoleOne and right-click to select Properties. Select the DirXML, Drivers tab. Select the ADDriver in the list and press the Start button. Verify that the driver has started by watching the status field change to Running. Press the Properties button. Select the Startup Option tab and change the startup to automatic. Press Apply. Press Close. Open NDSCONS.EXE and verify that the dirxml.dlm is running.
Step Eleven: Verifying eDirectory, DirXML, and Password SynchronizationYou now need to verify that your eDirectory, DirXML, and password synchronization are working properly in your environment. One way to do this is to create a few users in Active Directory and see whether they are automatically created in eDirectory with the proper passwords. Log in to DA-01 as the administrator of the AD Domain. Launch the Active Directory administration tool and create a test user in Active Directory (for example, TestUser1@da.com). Log in to DA-02 as the administrator of the domain and as admin in eDirectory. Open ConsoleOne and verify that TestUser1 has been created in the administered container. Remember that you might have to wait for a synchronization cycle to complete before the user will appear in eDirectory. Log in to eDirectory as that user and verify that the password is the same as was given in Active Directory and that you successfully authenticated to eDirectory. Remember that it might take another synchronization cycle before the password is updated. For completeness, you can now create a user in eDirectory, using ConsoleOne as admin, and verify that the user is now in the domain. Log in to the domain as that user with the password you specified in eDirectory. Don't forget to log in to the directory as admin.
NOTE The default synchronization rules will not create an Active Directory user until the full name attribute field is populated in eDirectory. This can be done under the properties of the user object, in the General tab.
Now that eDirectory, DirXML, and password synchronization are working and users are being synchronized, you can proceed to activate your DirXML licenses and then install ZENworks. Step Twelve: Getting a License for DirXML DriversNow that you have DirXML and password synchronization working, you need to receive an activator license to properly license DirXML and the drivers. This can be done with the following: Log in to DA-02 as the administrator of the domain and as admin in eDirectory. Launch ConsoleOne. Browse to and select the DirXML container. Select Wizards, Create a DirXML Activation Request. On the welcome screen, browse to and select the DirXML driver set (ADDriverSet.DirXML.da). Press Next. Enter your Novell customer ID. Press Next. Insert your ZENworks floppy and store the activator request onto the floppy. Press Next. Press Finish to exit the activator wizard. On a machine that has Internet access, launch your browser and go to the Novell activator Web site (http://www.novell.com/activator). Log in to the Web site with your Novell profile username and password. Press the Browse button on the Web page and browse to and select the REQUEST.REQ file on the ZENworks floppy. Press Submit at the bottom of the page. On the Novell Product Activator page, select DirXML Password Synchronization and press Submit. This will generate an activator license for your DirXML 1.1a engine, the Active Directory driver, and the PASSWORD SYNCHRONIZATION driver. You will receive an e-mail with an attached Activation Credential file (<bunch of numbers>.act). Save this file onto your ZENworks floppy. Go back to DA-02 and log in as administrator of the domain and as admin in eDirectory. Launch ConsoleOne. Browse to and select the DirXML container. Select Wizards, Install a DirXML_Activation. On the welcome screen, browse to and select the DirXML driver set (ADDriverSet.DirXML.da). Press Next. Insert the ZENworks floppy into DA-02. In the Specify a File ... field, browse to and select the .ACT file that you saved on your ZENworks floppy. Press Open. Press Next. On the conclusion page, press View to see whether the activation file installed is considered valid. Press Cancel. Press Finish.
You have now completed the installation and activation of eDirectory, DirXML, and password synchronization on your server. Now it is time to install ZENworks into the system. Step Thirteen: Installing ZENworks for Desktops ServerYou are now prepared to install ZENworks for Desktops into your Pure Windows environment. This section describes how to install all components of ZENworks for Desktops, although only a small portion is needed based on your desires. ZENworks for Desktops can be broken into five main categories: Policy Management, Application Management, Imaging, Inventory, and Remote Control. You can also choose for your environment to have workstation objects in your eDirectory tree. This can impact whether certain features are available. See ZENworks for Desktop documentation for more information regarding these features (http://www.novell.com/documentation). Now, you will install the ZENworks for Desktops server onto DA-02, where eDirectory is located. Follow these steps: Log in to DA-02 as administrator of the domain and admin for eDirectory. Insert the ZENworks for Desktops program CD. Choose English. Choose New Installation. Choose Install ZfD Server. The installation wizard starts. Read the welcome page. Press Next. Read the license agreement. Choose Accept and then press Next. Press Next on the information page. Browse and select your eDirectory tree you installed on DA-02 (DA-TREE). Make sure the Extend Schema option is checked. Press Next. Select all of the components of ZENworks for Desktops that you desire. Press Next. Press Add Server and add DA-02-NDS to the server list. Select all of the appropriate components to install on this server, as shown in Figure 18.8. Figure 18.8. ZENworks for Server component installation options.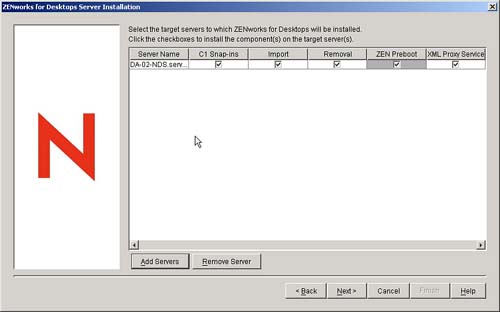
Press Next. Press Next on the Database file installation path to accept the defaults. Select Configure Standalone for Inventory. The container should be the same as where your server is located (servers.da). Press Next. Press Next on the XML Proxy Configuration page to accept the defaults. Press Next on the Remote Management File installation paths to accept the defaults. Press Finish in the summary dialog box. The schema will now be extended in eDirectory. Press OK on the Schema Extended Successfully dialog box. A dialog box, similar to the one in Figure 18.9, pops up. It warns you about certain ZfD processes and services that cannot be running. Because this is the first time you have installed ZfD, none should be running. Make sure that you have closed ConsoleOne. Press OK. Figure 18.9. The Stop Services warning dialog box lists the services that must be shut down prior to completing the installation.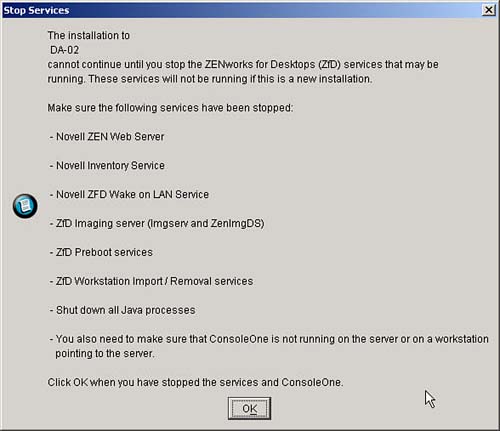
The ZENworks for Desktop software and services will now begin to install on DA-02. Press OK on the Please Reboot dialog box. Press No on the View Log Files dialog box. Reboot server DA-02 to complete the installation. When DA-02 comes back up, additional installation processes will be activated and completed.
Step Fourteen: Installing ZENworks for Desktops Middle TierNow you need to install the ZENworks for Desktop Middle Tier, if you delivered your ZENworks for Desktop features through the browser and over the Internet. You will install ZENworks for Desktops middle-tier server on DA-01, where IIS is present. You need to be aware that the installation of the Middle Tier requires the Novell client already be installed on the server that runs the installation; therefore you will install the Middle Tier onto DA-01 from DA-02 where the client is already running with eDirectory. Install the ZENworks Middle Tier by performing the following: Log in to DA-02 as admin of eDirectory and administrator of the domain. Insert the ZENworks for Desktop Program CD. Choose English. Choose New Installation. Choose Install ZfD Middle-Tier Server. The installation wizard launches. On the welcome screen, press Next. Read the licenses, and then choose to accept them. Press Next. On the information screen, press Next. On the Select Middle Tier Server screen, choose Add Server. On the Add Server dialog box, choose DA-02. Then press OK. Back on the Select Middle Tier Server screen, shown in Figure 18.10, enter the following into the sections devoted to ZfD Middle Tier Server on Windows 2000: Administrator login name (administrator@da.com) in the Domain Username field. The administrator password in the Password and Confirm Password fields.
Figure 18.10. Entering the primary eDirectory tree information during the Middle Tier Server Installation process.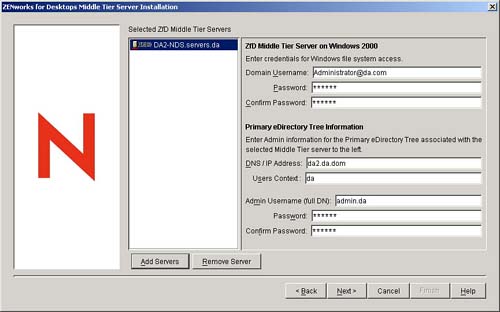
In the section on Primary eDirectory Tree Information, shown in Figure 18.10, enter the following: DNS/IP Enter the address or DNS name of DA-02. Users context Enter the context of the eDirectory tree that contains the user objects that will use this Middle Tier. Admin username Enter the administrators user object (for example, admin.da) and password.
Press Next. Press Finish on the summary screen. The ZENworks Middle Tier system will now install. Press OK on the Please Reboot dialog box. Press No to not view the log files of the installation. Reboot DA-02 to complete the installation.
Step Fifteen: Installing ODBC DriversNow if you installed inventory onto the ZENworks for Desktops server, you need to be able to run reports and queries against this database. To do this, you must install the ODBC driver for the Sybase database. This can be accomplished by doing the following: Log in to DA-02 as admin of eDirectory and administrator of the domain. Insert the ZENworks for Desktop Companion CD. Open the ODBC container on the CD.
Follow the instructions in the README.TXT file on the CD to set up the address of the Sybase and verify that you can make a connection. Step Sixteen: Installing the ZENworks Management AgentsNow you have a ZENworks for Desktops system running in a Windows-only environment. The next step is to install the ZENworks management agents onto your workstations and begin to use the ZENworks features to manage those devices. The full agents may be installed on a workstation by running the SETUP.EXE found in \\DA-02\novell\public\zenworks. The Application Viewer agent is automatically installed when the user first goes to the MYAPPS.HTML page on the ZENworks server (http://DA-02.da.com/myapps.html). If you want to have the Web page install the full agents (approximately 8.5MB), copy the SETUP.EXE file to the \\da-02\inetpub\wwwroot directory and replace the following line in the MYAPPS.HTML: document.write("codebase=\"http://da-02.da.com:80/ZfdWebSw.exe\"");with the following line: document.write("codebase=\"http://da-02.da.com:80/setup.exe\""); |


