Building the Landscape
TerragenTerragen is a scenery-generation package for Windows and the Mac, aimed at producing photorealistic landscape images and animations (http://www.planetside.co.uk/terragen/). It's easy to use, and a beautiful scene can be generated in a few minutes. Figure 27-3. Class diagrams for Terra3D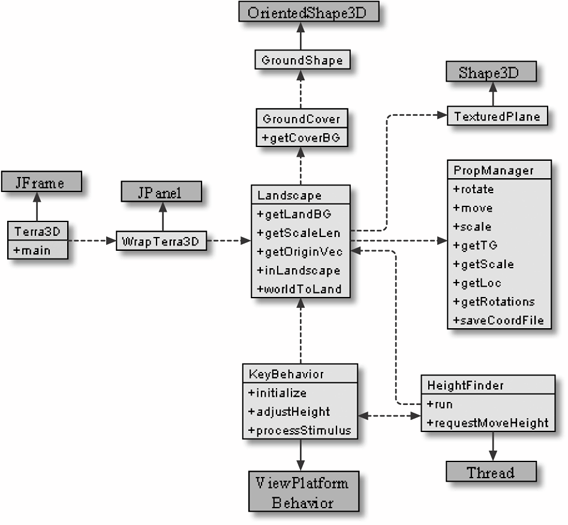 Some examples are at http://www.planetside.co.uk/terragen/images.shtml and http://www.planetside.co.uk/terragen/gallery/gallerymain.php. Terragen is currently free for personal, noncommercial use, though there are some restrictions on the size and resolution of the scenes that can be built. A terrain can be created in Terragen using fractals (I talked about fractal terrains in the last chapter), by painting the shape of the landscape, or as a combination of the two. Terragen supports powerful surface and color maps for decorating the landscape, water effects, clouds, atmospheric elements, lighting, and shadows. Terragen can import and export a wide range of file formats through the use of plug-ins. For example, the Firmament plug-in allows Terragen to read BMPs, STMs, POV-RAY height fields, and U.S. Geological Survey (USGS) DEM (digital elevation model) and spatial data transfer standard (SDTS) files. The For Export Only (FEO) plug-in permits exports to BMP, DXF, OBJ, and RIB files.
Numerous tools can accept, manipulate, and help create Terragen landscapes. A long list is available at http://www.planetside.co.uk/terragen/resources.shtml. For example, 3DEM can read a wide range of USGS and NASA map file formats and save them as Terragen terrains (http://www.visualizationsoftware.com/3dem.html). For instance, you could build a Martian terrain using real data from NASA's Mars Surveys. Using TerragenA user guide explains the various menu items, dialog boxes, and other GUI elements (http://www.planetside.co.uk/terragen/guide/). Carol Brooksbank's tutorial takes a different approach, based around explanations of common tasks (http://www.caroluk.co.uk/terratut/). I highly recommended it. Figure 27-4 shows the Landscape window inside Terragen after a random landscape has been generated with the "Generate Terrain" button. The water level was set at -10 meters with a surface map loaded for light snow. The Rendering Control window is visible behind the Landscape window, showing a preview of the user's current vantage point.
Clicking on the Render Image button in the Rendering Control window displays the scene (see Figure 27-5). Varying levels of detail can be selected; more detail takes longer to display. The landscape mesh can be saved by selecting the FEO Wavefront OBJ item from the Accessories button in the Landscape window. This will only be present if FEO has been installed. Click Ok to save after unchecking the "Swap Y and Z axes" radio box. This will make the floor of the mesh run along the XY plane with heights along the z-axis. A basic landscape like this one will usually generate a 5-MB OBJ file, taking a few minutes to do so. An advantage of the OBJ file is its ASCII format, which means that any text editor can open it (but the editor must be capable of viewing large files). Figure 27-4. Terragen in action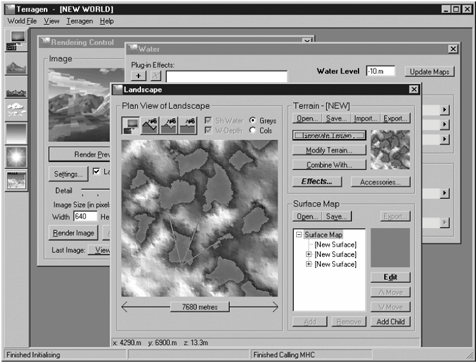 Figure 27-5. Rendered view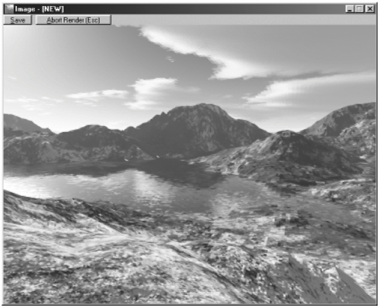 The resulting OBJ file (named test3.obj) contains two groups of data: the vertices making up the mesh, and face information, with each face made from three vertices. For example, here are the first few lines of vertex data in test3.obj: v 0.000000 0.000000 198.037763 v 30.000000 0.000000 190.554714 v 60.000000 0.000000 177.648668 v 90.000000 0.000000 172.938180 v 120.000000 0.000000 170.091105 ... // many more lines The mesh's floor is the XY plane; the z-values are the heights. Each vertex is 30 landscape units apart, and the vertices are ordered by increasing column (y-axis) and row (x-axis) values. The bottom-left corner of the XY floor is at coordinate (0, 0). The last few lines of v data are: ... // many lines, and then... v 7620.000000 7680.000000 217.026916 v 7650.000000 7680.000000 212.388668 v 7680.000000 7680.000000 198.037763 The top righthand corner of the floor is at (7680, 7680). Each v line has an implicit index, starting at 1, and the face lines use them to refer to vertices: f 1 2 258 f 2 259 258 f 2 3 259 f 3 260 259 f 3 4 260 ... // many more lines These define triangle strips and will be loaded into a TRiangleStripArray by Java 3D, a particularly efficient mesh data structure. A good place to read about OBJ support in Java 3D is the documentation for the ObjectFile class, which is used to load an OBJ file. A file may include information about normals, textures, colors, and utilize a separate material file. A specification of the complete OBJ format can be found at http://www.dcs.ed.ac.uk/home/mxr/gfx/3d/OBJ.spec. The OBJ file can be viewed graphically by many packages, including the ObjLoad example in the Java 3D demos (which uses ObjectFile). One issue is the size of the mesh created by Terragen, which may be too large for some software to handle. For example, ObjLoad requires 128 MB of memory to run: java -Xmx128m ObjLoad test3.obj Figure 27-6 shows the landscape as displayed by ObjLoad. Face culling is switched on, so the terrain becomes almost invisible if turned over. Figure 27-6. test3.obj in ObjLoad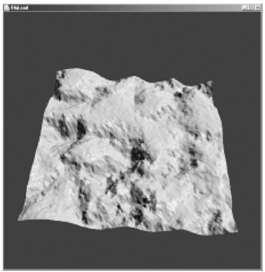 The beautiful Terragen surface texturing is missing but can be obtained by separate means. Extracting a Terragen TextureThe trick for obtaining a texture is to generate an orthographic projection of the terrain when viewed from above. Terragen v.0.9 has an orthographic rendering option in Camera Settings, making it simple to export a texture map. The discussion here is for Version 0.8.68. The camera's viewpoint must be positioned directly above the terrain, looking straight down. The view will suffer from distortion at the edges due to perspective effects, but the effect can be reduced by setting the camera zoom to 1. Sky rendering and terrain shadows should be switched off. Setting the sun's altitude to 90 degrees (directly overhead) helps to minimize shadow effects on the surface map. The rendering window should be increased in size (e.g., to 800 x 800), and rendering set to the highest resolution to produce a detailed image. The result is shown in Figure 27-7. The image can be saved as a BMP (around 2-MB file sizes seem common) and then converted to a JPG by any number of graphics packages (reducing the image to around 500 KB). The most important aspects of the conversion are to clip away the black background and resize the image to form a square. This will remove some of the terrain surface, but the loss isn't noticeable inside Terra3D. The image should be saved as a high-quality JPG. Figure 27-8 contains the final image, ready to be used as a texture. Figure 27-7. The terrain from above Figure 27-8. The terrain texture Figure 27-9 shows the terrain as loaded into Terra3D, with the user standing in roughly the same position as the view presented in Figure 27-5. The poor texture resolution compared to the surface maps in Terragen means that a lot of detail is lost, but what is left is sufficient for game play. Figure 27-10 displays the users' view after they have moved to the other side of the lake and turned to look back toward the viewpoint employed in Figure 27-9. Figure 27-9. Terra3D's view of the terrain Figure 27-10. The other side of the lake |

EAN: 2147483647
Pages: 340