Moving the Viewpoint
Viewpoint CreationVarious viewpoint manipulations are carried out by WrapMaze3D's prepareViewPoint( ):
The FOVThe FOV specifies how much of the scene is visible in terms of an angular spread around the viewpoint. The default is 45 degrees or 22.5 degrees on either side of the perpendicular into the scene (see Figure 25-8). Figure 25-8. Field of view of a user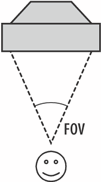 Increasing the FOV permits the user to see farther to the left and right, which is useful in Maze3D since corridors head off to the left and right. The downside is that a fish-eye effect appearing as the FOV is made larger, distorting the view.
Changing the FOV to 90 degrees (from its default of 45 degrees) is straightforward: View userView = su.getViewer( ).getView( ); userView.setFieldOfView( Math.toRadians(90.0)); // wider FOV The user can see more to the left and right, which is useful in a maze for noticing passages leading off to the sides. Clip DistancesClip distances specify the closest and farthest objects that can be seen by the viewer. Java 3D's defaults are 0.1 meters for the front clip plane and 10 meters for the back clip, which roughly corresponds to the limitations of human eyesight. These distance are in real-world units, although it's possible to specify values in virtual world units by using the Java 3D View class methods setFrontClipPolicy( ) and setBackClipPolicy( ) to change the units policy. The back clip value may be too small for a particular application, resulting in objects disappearing when the viewpoint moves far away from them. This can be tested by moving the viewpoint to some distant location in the game and turning around to see if any parts of the scene have disappeared. In Maze3D, I moved the viewpoint out of the maze to the edge of the floor and checked that the maze was still visible. The default front clip value (0.1 meters) is fine for most applications, but the user is likely to bump into walls in the maze. When this occurs, the front of the block or cylinder will be clipped since the viewpoint is closer than 0.1 meters to the object. What's worse is that the other side of the object will be invisible since the user is looking at its interior face, which is not rendered. The result is that users will see right through a brick or cylinder when they get up close to one. This effect is shown in Figure 25-9: the image on the left shows the viewpoint when a user is pressed up against a cylinder and the front clip distance is 0.1 meters. The cylinder is invisible. The image on the right shows the same view when the front clip distance is reduced to 0.05 meters. The cylinder is visible again. Figure 25-9. The same viewpoint with different front clip distances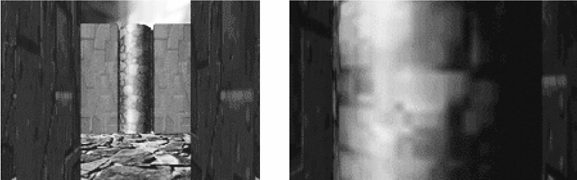 Knowing this problem, a programmer may be tempted to set the front clip distance to 0 with the hope that no clipping will occur, no matter how close the user gets to a piece of scenery. What happens is that the depth ordering of objects in the scene breaks down, with far and near objects partially overlapping each other in arbitrary ways. The breakdown is triggered when the ratio of the back clip to front clip distances becomes too large. The machine's hardware (specifically its depth buffer) is being asked to squeeze too large a range of z-values into too few bits per pixel on screen. The critical ratio depends on the bits per pixel used in the depth buffer: older machines may start to "sweat" at ratios close to 100, but modern cards using 32 bits will be happy with ratios close to 100,000. After the experimentation mentioned above, I chose a back clip distance of 20 meters and a front clip of 0.05 meters, creating a fairly safe ratio of 400: userView.setBackClipDistance(20); userView.setFrontClipDistance(0.05); Adding a SpotlightThe spotlight is meant to be in the player's "hand," lighting the way forward as he or she moves around the maze. This means that the spotlight must be connected to the viewpoint and move as it moves. Chapter 24 went into detail about the view branch where the viewpoint is managed, and Figure 25-10 should remind you of its main components. Figure 25-10. The view branch subgraph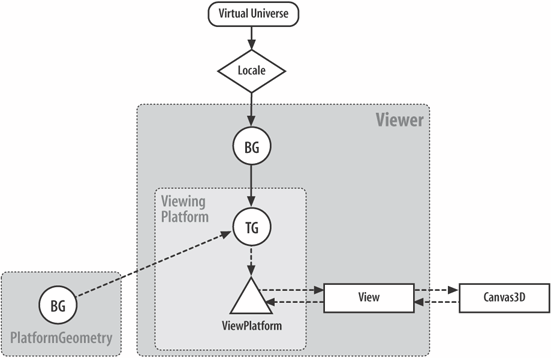 The spotlight must be placed inside a PlatformGeometry node, then attached to the transformGroup (labeled as TG in Figure 25-10) above the ViewPlatform. The code that follows utilizes Java 3D's ViewingPlatform utility class to do this. ViewingPlatform vp = su.getViewingPlatform( ); PlatformGeometry pg = new PlatformGeometry( ); pg.addChild( makeSpot( ) ); vp.setPlatformGeometry( pg ); The construction of the spotlight is done by makeSpot( ). The Java 3D Spotlight node has a position, a direction, and focusing controls for its spread angle and concentration. The spread angle controls the width of the beam; no light is generated outside of the angle. An increased concentration value causes the beam to be focused into a narrower beam, though some light will appear beyond the beam's bounds. The default spread angle is 180 degrees; the default concentration is 0.0, which provides uniform light distribution.
A spotlight affects an object's diffuse and specular reflection, which depends on the orientation and position of the object's surfaces and on its Material node.
The overall effect of a spotlight depends on the spotlight's parameters (position, direction, concentration, spread angle, attenuation) and on the lighting and material properties of the surfaces being lit. This interplay of so many factors makes it a matter of trial and error to get a suitable effect.
The makeSpot( ) method is: private SpotLight makeSpot( ) { SpotLight spot = new SpotLight( ); spot.setPosition(0.0f, 0.5f, 0.0f); // a bit above the user spot.setAttenuation(0.0f, 1.2f, 0.0f); // linear attenuation spot.setSpreadAngle( (float)Math.toRadians(30.0)); // smaller spot.setConcentration(5.0f); // reduce strength quicker spot.setInfluencingBounds(bounds); return spot; } The 30-degree value for setSpreadAngle( ) corresponds to a spread angle of 60 degrees, 30 degrees on each side of the forward direction. The increased concentration focuses the beam, making the sides of the scene somewhat darker. By making the spread smaller and increasing the concentration, the light becomes weaker. The setPosition( ) value moves the SpotLight node slightly above the viewpoint, which places the spotlight at a natural looking location relative to the viewpoint. Adding an AvatarChapter 24 describes one way of adding an avatar: by placing a 2D image just in front of the viewpoint. Another solution is to use a 3D model (e.g., a hand, a gun). To illustrate the idea, makeAvatar( ) adds a cone at the viewpoint, rotated by 90 degrees about the x-axis so its apex is pointing forward: private TransformGroup makeAvatar( ) { Transform3D t3d = new Transform3D( ); t3d.rotX(Math.PI/2); // rotate so top of cone is facing front TransformGroup userTG = new TransformGroup(t3d); userTG.addChild( new Cone(0.35f, 1.0f) ); // a thin cone return userTG; } The transformGroup is then linked to PlatformGeometry: pg.addChild( makeAvatar( ) ); If you wanted to add this cone avatar to the viewpoint in Maze3D, the pg.addChild( ) call could be included in the code fragment on the previous page, when the spotlight is added to PlatformGeometry. Using a 3D model has one major advantage over a 2D image: it can be used as your physical presence in the scene. This is useful if the game contains other players who need to see you (e.g., as in a multiplayer networked application). A 3D model is also a drawback since it may be partially obscured if the viewpoint gets too close to another object in the scene. Positioning the ViewpointThe viewpoint's position and orientation are set up by accessing and changing the transformGroup above ViewPlatform : ViewingPlatform vp = su.getViewingPlatform( ); TransformGroup steerTG = vp.getViewPlatformTransform( ); initViewPosition(steerTG); steerTG is the transformGroup above the ViewPlatform node shown in Figure 25-10. By default, the initial viewpoint is facing into the scene along the z-axis. initViewPosition( ) rotates it by 180 degrees and moves it to the maze's start position: private void initViewPosition(TransformGroup steerTG) { Transform3D t3d = new Transform3D( ); steerTG.getTransform(t3d); Transform3D toRot = new Transform3D( ); toRot.rotY(-Math.PI); // so facing along positive z-axis t3d.mul(toRot); t3d.setTranslation( mazeMan.getMazeStartPosn( ) ); steerTG.setTransform(t3d); } Since the rotation orients the viewpoint in the positive z-axis direction, the translation value doesn't need to be adjusted. Keyboard ControlsThe keyboard behavior is set up inside prepareViewPoint( ) in WrapMaze3D: ViewingPlatform vp = su.getViewingPlatform( ); KeyBehavior keybeh = new KeyBehavior(mazeMan, be, camera2TG); keybeh.setSchedulingBounds(bounds); vp.setViewPlatformBehavior(keybeh); The KeyBehavior class requires a reference to MazeManager (mazeMan), the BirdsEye panel (be), and the transformGroup for the back facing camera (camera2TG). |

EAN: 2147483647
Pages: 340