The Basic 3D Sprite
Creating the SceneFigure 18-3 shows the methods defined in WrapTour3D. Figure 18-3. WrapTour3D methods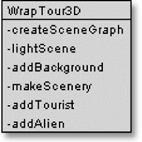 WrapTour3D sets up the checkered floor and lights (similar to previous Wrap classes). However, addBackground( ) uses a scaled image, and there are three new methods: makeScenery( ), addTourist( ), and addAlien( ). These methods are called by createSceneGraph( ) to add scenery, obstacles, and sprites to the scene. The application's scene graph is shown in Figure 18-4. Its details will be explained in subsequent sections. Figure 18-4. Scene graph for the Tour3D scene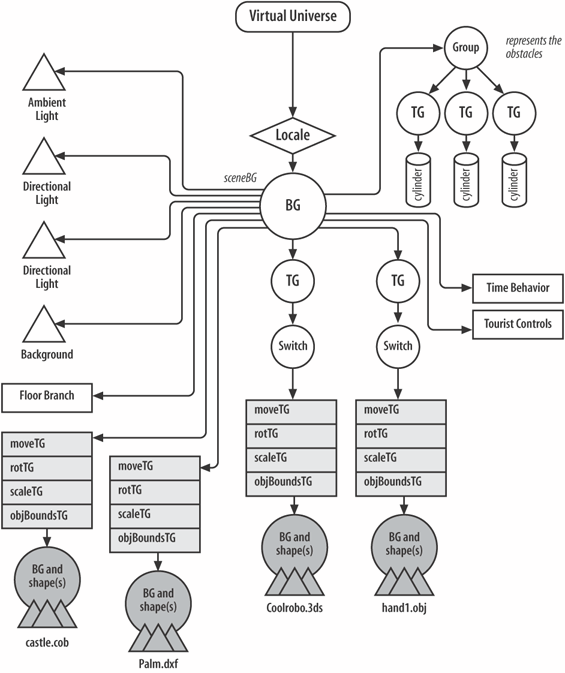 Adding a Background ImageA Java 3D Background node can use a solid color, an image, or a geometric shape (e.g., a sphere or a box) with an image rendered onto it. Here, the application utilizes a picture of a hazy sky, 400 x 400 pixels in size, stored in bigSky.jpg: TextureLoader bgTexture = new TextureLoader("models/bigSky.jpg", null); Background back = new Background(bgTexture.getImage( )); back.setImageScaleMode(Background.SCALE_FIT_MAX); // fit the display back.setApplicationBounds( bounds ); sceneBG.addChild( back );The image is loaded as a texture and then converted to ImageComponent2D form for the Background object. Java 3D 1.3 added several scaling modes to Background; the one employed here scales the image to fit the display window. This can cause significant distortion, which is why I haven't used a detailed image (haze looks pretty much the same even after being distorted). Another scaling mode is Background.SCALE_REPEAT, which tiles the image over the display area. This avoids the distortion caused by scaling but introduces repetition and joins between the tiles. With careful design, tile edges can be hidden, and if the image is large, the repetition will be less obvious. A drawback of using a background image is it remains stationary in the background even when the viewpoint moves. Chapter 25 (about the mysterious maze) shows a way around this by using a shape as the background and placing a texture over it. As the user moves around, she sees different parts of the geometry and, therefore, different parts of the background. Chapter 27 (on terrain generation) places stars in the sky with the same technique. Full-Screen DisplayThere are two approaches to making a full-screen application in Java 3D: the display window's dimensions can be set to match those of the monitor or full-screen exclusive mode (FSEM) can be deployed. These techniques were explained in Chapter 4, in the context of 2D Java games. When writing a Java 3D application, which technique is preferable? In terms of speed, the two are similar since Java 3D passes most graphics processing to OpenGL or DirectX. One advantage of using FSEM is control over screen resolution. A minor disadvantage is that FSEM interacts poorly with Swing components, minor because most full-screen games don't utilize Swing controls. Another limitation is that GraphicsDevice.isFullScreenSupported( ) may return false (e.g., on some versions of Unix). On systems where FSEM is unavailable, FSEM will appear to work by falling back to using a full-size window. In this chapter, I'll use a fixed-size window that fills the screen and grapple with FSEM in the next chapter. The resizing of the display window requires three pieces of code. In the Tour3D class, the menu bars and other JFrame decoration must be turned off: setUndecorated(true); In WrapTour3D, the panel must be resized to fill the monitor: setPreferredSize( Toolkit.getDefaultToolkit( ).getScreenSize( ) ); A full-screen application with no menu bar raises the question of how to terminate the program. The usual approach is to add a KeyAdapter anonymous class to the window that has keyboard focus, which is the Canvas3D object in this application: canvas3D.setFocusable(true); canvas3D.requestFocus( ); canvas3D.addKeyListener( new KeyAdapter( ) { // listen for Esc, q, end, Ctrl-c on the canvas to // allow a convenient exit from the full screen configuration public void keyPressed(KeyEvent e) { int keyCode = e.getKeyCode( ); if ((keyCode == KeyEvent.VK_ESCAPE) || (keyCode == KeyEvent.VK_Q) || (keyCode == KeyEvent.VK_END) || ((keyCode == KeyEvent.VK_C) && e.isControlDown( )) ) { win.dispose( ); System.exit(0); // exit( ) isn't sufficient usually } } });Catching KeyEvents in WrapTour3D doesn't preclude their use in other parts of the application. As you'll see, the TouristControls class utilizes KeyEvents to govern the movement of the robot sprite and to adjust the user's viewpoint. The unusual aspect of my coding is the Window.dispose( ) call, applied to win, a reference to the top-level JFrame created in Tour3D. This is preferable to shutting things down with exit( ) only; a call to exit( ) kills the application but often fails to clear the application's image from the monitor. Adding Scenery and ObstaclesTour3D makes a distinction between scenery and obstacles: scenery comes from external models (e.g., the castle, palm tree) and is loaded via PropManager objects. Obstacles are red columns generated by the code, requiring only a (x, z) location to position them on the floor. A crucial attribute of scenery is its intangibility: the robot and hand sprites can move right through it if they wish. In contrast, a sprite is disallowed from passing through an obstacle. Scenery and obstacle data are read from a text file whose name is supplied on the command line when Tour3D is started. For example, the following call uses the ctour.txt tour file: java -cp %CLASSPATH%;ncsa\portfolio.jar Tour3D ctour.txt The extension of the classpath is to utilize the loaders in the NCSA Portfolio package. The format of a tour file is simple: each line contains the filename of a model or a sequence of coordinates for positioning obstacles. The sequences are prefixed by -o to make them easy to find when the data are read in. The ctour.txt file used to decorate the scene in Figure 18-1 contains: Castle.cob -o (4,4) (6,6) Palm.dxf -o (-2,3) Any number of coordinates can be in an -o sequence; two -o lines are in ctour.txt as an example.
The obstacle coordinates are passed to the Obstacle object, which creates the necessary data structures, including the three on-screen red cylinders. The model filenames are assumed to be located in the models/ subdirectory and to come with coord datafiles for positioning them in the scene. Coord datafiles were introduced in Chapter 16, and they're generated by the Loader3D application as a loaded model that is translated, rotated, and scaled. These details can be stored in a coord datafile for the model and utilized later by the PropManager class in Loader3D when the model is loaded. PropManager is being reused in Tour3D to place a correctly positioned, rotated, and sized model in the scene. The loading of the tour file is done by makeScenery( ) in WrapTour3D. Here's the relevant code fragment from that method: obs = new Obstacles( ); // initialise Obstacle object PropManager propMan; ... // other nonrelevant code BufferedReader br = new BufferedReader( new FileReader(tourFile)); String line; while((line = br.readLine( )) != null) { if (line.startsWith("-o")) // save obstacle info obs.store( line.substring(2).trim( ) ); else { // load scenery propMan = new PropManager(line.trim( ),true); sceneBG.addChild( propMan.getTG( ) ); // add to scene } } br.close( ); sceneBG.addChild( obs.getObsGroup( ) ); // add obs to sceneA PropManager object creates a scene graph branch containing a chain of transformGroups. In Figure 18-4, the chains above the BranchGroups for the castle and palm tree are drawn as rectangles. A chain of TRansformGroups may be considered too much overhead for loading a model, but the overhead (and the chain) can be removed fairly easily: PropManager must be extended with a method which switches off the capability bits in the TRansformGroups: moveTG.clearCapability(TransformGroup.ALLOW_TRANSFORM_READ); moveTG.clearCapability(TransformGroup.ALLOW_TRANSFORM_WRITE); This should be done before the branch is added to the main scene and compiled. Compilation will optimize the chain away to a single TRansformGroup since Java 3D will notice that none of the chain's nodes can be transformed at runtime. However, I haven't made these coding changes since I prefer to leave PropManager unchanged from its first appearance in Chapter 16. ObstaclesThe Obstacle object created by makeScenery( ) maintain three types of information:
A class diagram for Obstacles is given in Figure 18-5. Figure 18-5. Class diagram for Obstacles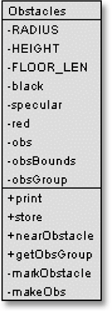 The coding of the class is simplified by restricting the obstacles to integer positions on the checkerboard, which permits array-based data structures and algorithms to be employed. A given (x, z) coordinate is checked for obstacles with nearObstacle( ), called by the sprites from the Sprite3D class. It returns false if the supplied position is outside the floor area or too near an obstacle. Nearness testing is done by determining if a bounding sphere centered at the coordinate intersects with any of the bounding spheres in obsBounds: BoundingSphere bs = new BoundingSphere( pos, radius); for (int z=0; z <= FLOOR_LEN; z++) for(int x=0; x <= FLOOR_LEN; x++) if (obs[z][x]) { // does (x,z) have an obstacle? if (obsBounds[z][x].intersect(bs)) return true; } return false;The bounding sphere is created using Java 3D's BoundingSphere class and is defined by a center point and radius. The bounding spheres for the obstacles are generated as their coordinates are read in from the tour file and stored in the obsBounds[] array. I utilize BoundingSphere's intersect( ) method, which returns true if two bounding volumes intersect. The algorithm given above is exhaustive in that it tests every obstacle against the supplied position (pos). It might be more efficient to use the pos value to limit the number of obstacles considered, but then I would have to store the obstacle information in a more structured, ordered form. That seems overly complicated for this example. Each obstacle is displayed as a red cylinder and placed below a TRansformGroup to orient it on screen, as shown in the scene graph in Figure 18-4. The TRansformGroup moves the cylinder upward by HEIGHT/2, so its base is resting on the floor at the (x, z) coordinate specified for that obstacle in the tour file. |

EAN: 2147483647
Pages: 340
- Structures, Processes and Relational Mechanisms for IT Governance
- Assessing Business-IT Alignment Maturity
- Measuring and Managing E-Business Initiatives Through the Balanced Scorecard
- Technical Issues Related to IT Governance Tactics: Product Metrics, Measurements and Process Control
- Governing Information Technology Through COBIT