User Defined Filters
| [ LiB ] |
User Defined Filters
Many Paint Shop Pro users find User Defined Filters baffling. The Paint Shop Pro 7 documentation was overly technical, and the Paint Shop Pro 8 documentation says almost nothing at all on this topic. So you might not even know where to begin with User Defined Filters.
This section leaves most of the technical details aside and concentrates on a few rules of thumb that will help you to make your own Blur, Emboss, Sharpen, and Edge Detect filters. These filters can be used on any greyscale or 16 million color image.
The Technical Stuff
Let's begin by getting some of the technical stuff out of the way. Open the User Defined Filter matrix by choosing Effec t s >U ser Defined Filters. The User Defined Filter dialog box appears, as shown in Figure 11.36.
Figure 11.36. A new User Defined Filter matrix.
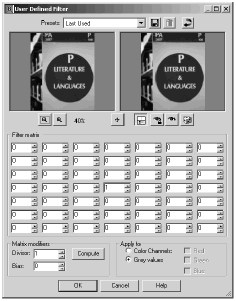
The cells of the matrix represent pixels in an image. The center cell represents the target pixel, and the surrounding cells represent the pixels surrounding the target. The numbers that you place in the cells determine brightness changes in the pixels. A positive number in the center cell increases the target pixel's brightness, and a negative number decreases the target pixel's brightness. Numbers in the surrounding cells combine to further affect the target pixel. The filter examines each pixel in an image separately, calculates how to change each target, and then applies all the results to the image.
In general, you want to keep the overall brightness of the image the same as the original. The total of all the values in the cells helps determine the brightness of the filtered image. If the total equals 1, the filtered image will have the same overall brightness as the original (provided the Divisor is kept at 1 and the Bias is kept at 0). If the total value is greater than 1, the overall brightness increases; if the total value is less than 1, the overall brightness decreases.
NOTE
 NOTE
NOTE
If you experiment with User Defined Filters without understanding how the total of the cell values affects brightness, you might very well end up with filters that do nothing more than turn your image solid white or solid black.
You can maintain the original brightness of your image even if the values of the cells don't total 1. You do this by adjusting the Divisor . If the total of your cells equals 5, setting the Divisor to 5 will maintain the image brightness (because 5 divided by 5 equals 1). Your Divisor doesn't have to be equal to the total of the cell values, but other values will change the image's brightnessnot always to good effect.
NOTE
 TIP
TIP
You don't need to do any math to calculate the proper Divisor . Just click the Compute button to the right of the Divisor box and Paint Shop Pro will compute the value for you and enter it in the Divisor box.
As you'll see when you look at a few examples, the Bias is most useful for embossing filters. The Bias value is added to the modified pixel's brightness and thus has a big effect on the filtered image's contrast.
Blur Filters
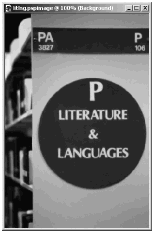
Okay, now you're ready to look at a few examples. Throughout this section, the sample filters are applied to the image in Figure 11.37.
Figure 11.37. Base image to be filtered.
First, take a look at the Blur_More preset that comes with Paint Shop Pro. To see the matrix for this filter, select Blur_More from the Presets drop-down list. Figure 11.38 shows the resulting User Defined Filter dialog box.
Figure 11.38. The Blur_More preset.
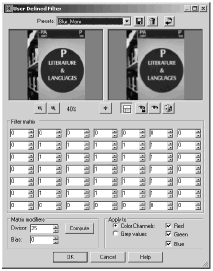
Notice in this filter that the center cell is set to a positive value and that a symmetric pattern of cells surrounding the center cell also contains positive values. The Divisor is set to the total of the cell values. These are the basic characteristics of any blurring filter.
Now we'll make our own Blur filter. Figure 11.39 shows the matrix values and Divisor for a more severe Blur filter, along with the effect of applying this filter to the sample image.
Figure 11.39. A more severe Blur filter.
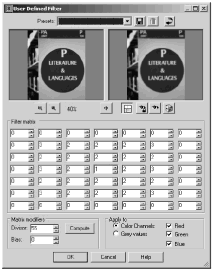
Notice that, again, the center pixel is set to a positive number, and a symmetric pattern of positive cell values is set in the surrounding cells. The total of all the cell values is 55, so to maintain the overall brightness of the original image, the Divisor is set to 55.
Emboss Filters Galore
A color Emboss filter makes an image look embossed while generally maintaining the colors of the original image. The matrix values of such a filter (the Emboss_7 preset), and its effect on the sample image, are shown in Figure 11.40.
Figure 11.40. Emboss_7, a color Emboss filter.
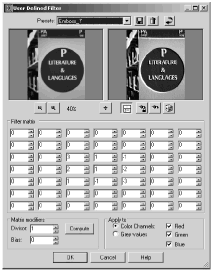
The matrix of this example shows the basic characteristics of color-embossing filters. The center cell value can be either positive or negative. The crucial factor is that cells to one side of the center cell have positive values, and analogous cells to the other side of the center cell are set to 0 or have negative values. The relative position of the positive and nonpositive values determines where the highlights and shadows appear in the embossed image.
Now look at a few embossing filters that more closely resemble Paint Shop Pro's Emboss effect (discussed in Chapter 7, "Paint Shop Pro Effects").
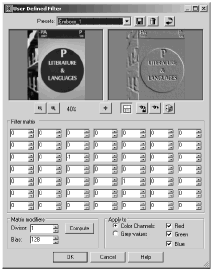
You can create an embossing effect without much color by putting positive values in some of the cells to one side of the center cell and adjusting the Bias. Figure 11.41 shows the matrix and results for one such filter, the Emboss_1 preset.
Figure 11.41. Emboss_1, a basic embossing filter.
NOTE
 TIP
TIP
You can use Bias in any User Defined Filter to affect the contrast of your filtered image. For high-contrast effects, enter grid values that yield a relatively large sum, and enter very large positive or very low negative values for Bias .
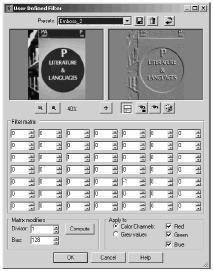
In your embossing filters, you can change where the highlights and shadows appear (and thus change which areas appear raised and which appear recessed) by changing the relative position of the positive and nonpositive cell values. Figure 11.42 shows the result of the Emboss_2 preset, which switches the relative position of the cells of Emboss_1, the basic embossing filter used in Figure 11.41.
Figure 11.42. Emboss_2, the basic embossing filter reversed .
NOTE
 TIP
TIP
If you want your embossed image to have no hint of color, apply the filter only to your image's grey values. In the User Defined Filter dialog box, select Grey values rather than Color Channels .
Sharpen Filters
Now it's time to explore Sharpen filters, which sharpen the focus of a blurry image. For Sharpen, enter a relatively large positive value for the center cell, and enter negative numbers (such as 2 or 1) in a symmetrical pattern in some of the surrounding cells. The smaller the value in the surrounding cells, the more severe the sharpening effect will be. Figure 11.43 displays a basic Sharpen filter (where the central value is 9 and the eight immediately surrounding cells are each set to 1).
Figure 11.43. A Sharpen filter.
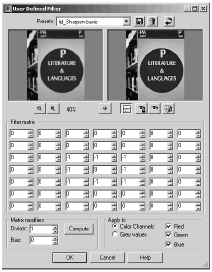
To soften the sharpening effect, increase the value in the center cell and compensate for the increase with the Divisor .
NOTE
 TIP
TIP
You can make any User Defined Filter effect more subtle by increasing the value of the center cell and compensating for the increase with the Divisor .
Edge Detect Filters
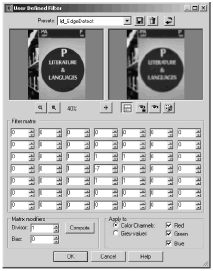
An Edge Detect filter enhances the areas of an image in which there are contrasts in brightness or color. For edge detection, the values entered for any cells surrounding the center cell should be positive, and the value of the center cell should be a negative number that when added to the sum of the surrounding cells yields 1. Figure 11.44 shows an example where the central value is 7 and each of the eight immediately surrounding cells is set to 1.
Figure 11.44. An Edge Detect filter.
Infinite Filter Possibilities
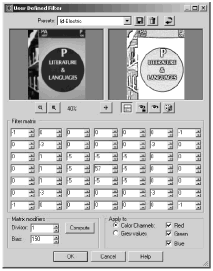
Experiment with variations on the sample filters covered here. For example, the filter shown in Figure 11.45 is a variation of a basic Sharpen filter, with some added peripheral values and a fairly high Bias.
Figure 11.45. A variation on a basic Sharpen filter.
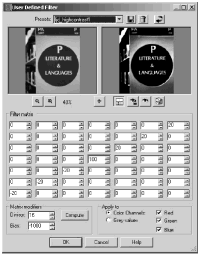
Other variations to try in your own filters include using 0 as your center cell value and/or using Divisors that don't completely compensate for grid sums that aren't equal to 1. Figures 11.46 and 11.47 are examples of such filters.
Figure 11.46. A filter with a center cell value of 0, a Divisor that doesn't equal the grid sum, and an extreme Bias.
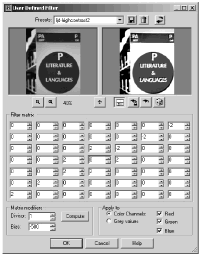
Figure 11.47. A filter with an extreme Bias and a Divisor that doesn't equal the grid sum.
Take a look at the various User Defined Filter presets, and also try out the Randomize button (which is sure to generate some pretty wild results). If you prefer to keep to the basics, Table 11.1 summarizes the rules of thumb for simple User Defined Filters.
Table 11.1. RULES OF THUMB FOR USER DEFINED FILTERS (COMPENSATE FOR SUMS NOT EQUAL TO 1 WITH THE DIVISOR)
| Center Cell Value | Surrounding Cell Values | |
|---|---|---|
| Blur | Positive | Positive |
| Sharpen | Positive | Negative |
| Edges | Negative | Positive |
| Emboss | Positive | Symmetric positive and/or negative |
| [ LiB ] |