Drawings and Paintings from Photos
| [ LiB ] |
Drawings and Paintings from Photos
It's fun and satisfying to create drawings and paintings from photos. The easiest way to create a digital painting in Paint Shop Pro is to use the Brush Strokes effect (Effec t s > Art M edia Effects > Brush Str o kes). There are plenty of ways of getting drawings and paintings by hand, too.
Digital Drawings
You can, of course, create digital drawings purely by hand. With Paint Shop Pro's Paint Brush, you can adjust the brush settings to get a brush that simulates a pencil, chalk, pastels, or charcoal. And it's easy to make a tracing from a photo, too, especially if you have a graphics tablet and stylus. Just add a new layer above your photo, fill the new layer with white, lower the white layer's Opacity so you can see the photo beneath , and trace away.
You can also create digital drawings without touching a brush. There are plenty of variations on this technique, but here's one I rather like:
-
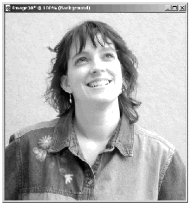
Begin with a color or black-and-white photo that has a simple, light-colored background, like the one in Figure 10.45. If it's a color photo, convert it to greyscale or use Channel Mixer set to Monochrome to make a black-and-white version. You'll usually get the best results if you increase the contrast, as in Figure 10.46.
Figure 10.45. The original photo.
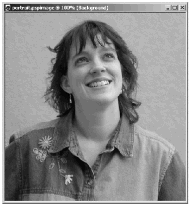
Figure 10.46. A higher-contrast version.
-
Duplicate the Background layer. Choose A djust > Ne g ative Image, and then set the layer's Blend Mode to Dodge. The image then looks completely white or nearly so.
-
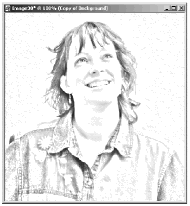
Choose A djust > Bl u r > G aussian Blur and set Radius to a value somewhere between 3 and 10. Use the Preview window to see what value gives you the result you want. The image will then look something like Figure 10.47. If you like this look as is, skip to step 6.
Figure 10.47. Blurring the negative brings out the edges.
-
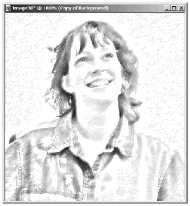
To add some pencil markings to your sketch, duplicate the Background layer again. On your new middle layer, add some noise with A djust > Add / Remove N oise > A dd Noise. Select Gaussian , set Noise to 20, and select Monochrome . Click OK .
-
Set the layer's Blend Mode to Darken. Then choose A djust > Bl u r > M otion Blur. Set Angle somewhere between 45 and 55, and set Strength to whatever value gives you the effect you want. Click OK . The result will look something like Figure 10.48.
Figure 10.48. Pencil marks added.
-
Optional: Merge the layers with L ayers > M erge > M erge All (Flatten). Then adjust the brightness and contrast with Levels, Curves, or Histogram Adjustment.
Digital Paintings
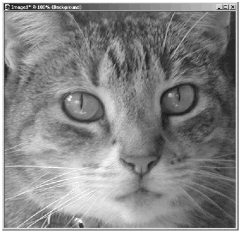
Effects and adjustments that are helpful in creating digital paintings from photos include several of the Edge effects (Dilate, Erode, and Trace Contour), some of the Add/Remove Noise adjustments (Add Noise, Median, and Edge Preserving Smooth), and some of the Blur adjustments (Median, Motion Blur, and Gaussian Blur). Following is an example, starting with the photo in Figure 10.49.
Figure 10.49. The original photo.
-
Open your photo image. Even improperly exposed or blurry photos can work with this technique.
-
Apply Effec t s > E dge Effects > E r ode. Apply the effect two or three more times by pressing Ctrl+Y. In the result, dark areas of the image are expanded, as shown in Figure 10.50.
Figure 10.50. Emphasizing dark areas with Erode.

-
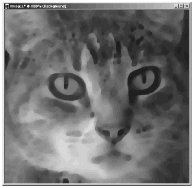
Now apply Edge Preserving Smooth ( A djust > Add / Remove N oise > E dge Preserving Smooth). Set Amount of smoothing quite high. For the example in Figure 10.51, Amount of smoothing was set at 20. If you like the effect you have at this point, you're done. Alternatively, you can emphasize the paintinglike effect by reapplying Edge Preserving Smooth by pressing Ctrl+Y, as I did for the example shown in Figure 10.52.
Figure 10.51. Extreme smoothing produces a painterly effect.
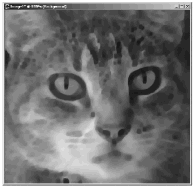
Figure 10.52. More smoothing gives a watercolor-like effect.
-
Optional: Add a texture to your painting with Effec t s > T exture Effects > Te x ture.
Try out other combinations of Edge effects and Add/Remove Noise and Blur adjustments to create your own digital painting effects.
And you're not limited to modifying photos in order to create digital paintings, of course. You can also create your digital artwork completely by hand. For a couple nice examples of this, head over to JP Kabala's Paranormal PSP8 Tutorials ( http://jpkabala.com/paranormal/tutindex.html ) and take a look at her methods for painting marigolds and lilacs.
| [ LiB ] |