Better Black-and-White Photos
| [ LiB ] |
Better Black-and-White Photos
There are several ways to create a black-and-white digital photo. Your digital camera might have a black-and-white setting. Your scanner probably has an option for producing a greyscale scan. Or you can change a color image to greyscale with Paint Shop Pro's I mage > G reyscale. You can get better, more sophisticated black-and-white versions of color images, though, using other methods in Paint Shop Pro. In this section, we'll look at a couple methods of creating and tinting black-and-white photos.
Black-and-White from Channel Mixer
Remember that you can split any color image into its basic color channels and that each color channel is a greyscale bitmap. When you convert a color image to greyscale, Paint Shop Pro blends together the brightness data from the separate color channels. Depending on the particular image, the formula Paint Shop Pro uses can give good, passable, or unsatisfactory results.
Let's look at an example. Figure 10.20 shows the result of applying I mage > G reyscale to a color photo. Compare this to Figure 10.21 (the Red channel), Figure 10.22 (the Green channel), and Figure 10.23 (the Blue channel).
Figure 10.20. The result when the photo is converted to greyscale.

Figure 10.21. The Red channel.
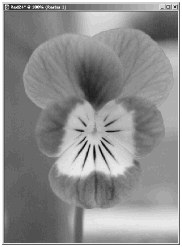
Figure 10.22. The Green channel.
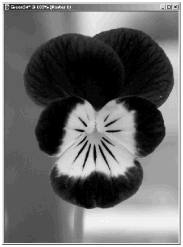
Figure 10.23. The Blue channel.
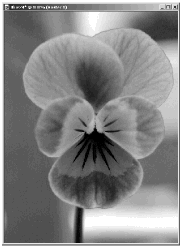
As you can see, the brightness information in each of the separate channels is quite different from the others, revealing different amounts of detail in the different color regions . Wouldn't it be nice if you could combine the brightness information in the different channels, weighting them as you please ? Well, you can: Use Channel Mixer with Monochrome selected.
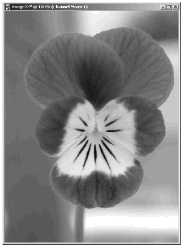
Figure 10.24 shows the results of adding a Channel Mixer adjustment layer above the original flower photo ( L ayers > New Ad j ustment Layer > Channel M ixer). In this case, Red (%) is set to 53, Green (%) to 46, and Blue (%) to 8, with the Monochrome check box checked. This version shows more detailed veining in the flower than the greyscale version or any of the separate color channels except the Red channel. And the Red channel alone isn't the best choice here because with it the flower is too bright, making it less distinct from the background.
Figure 10.24. Version produced using Channel Mixer.
Which settings you use for your own photos will depend on the colors and brightness levels in each particular photo. One thing to keep in mind, though, is that the Blue channel normally contains a lot of noise and thus should generally be the channel with the lowest value. Another general rule of thumb is that the Green channel normally contains much detail. Emphasizing the Green channel is usually a good path to follow for landscapes but generally not for portraits, where minor facial blemishes could be made to look like serious skin problems.
NOTE
 NOTE
NOTE
The Channel Mixer method yields the biggest improvement over converting to greyscale when the photo has significantly different hues but similar levels of brightness. Greyscale eliminates the differences, losing detail. But Channel Mixer enables you to retain the detail, mixing together the information provided by the differences in hue.
Simulating Infrared Photos
You can also use Channel Mixer to simulate special black-and-white film effects. For example, you could simulate the effect of orthochromatic black-and-white film by de-emphasizing the Red channel, thus making red objects appear darker than they normally would. You can also simulate the effect of infrared black-and-white film. Here's how:
-
If your photo includes the sky, then select the sky and promote the selection to a layer ( S elections > P romote Selection to Layer).
-
On the original photo layer, add a Channel Mixer adjustment layer. Select Monochrome and set Green (%) to 200, lowering Red (%) to somewhere between 70 and 90. The reason for emphasizing the Green channel is that infrared light is absorbed by surfaces that normally look green in a color photo. In an infrared photo, green areas such as trees and grass look much brighter than they do in normal black-and-white.
-
If you added a sky layer, make that layer the active layer. Put this layer into a layer group by clicking the New Layer Group button in the Layer palette. Make the sky layer the active layer again, and then add a Channel Mixer adjustment layer. Select Monochrome , and set Red (%) to about 90. This darkens the sky and emphasizes any clouds.
| [ LiB ] |