Optimizing and Previewing Web Graphics
| [ LiB ] |
Optimizing and Previewing Web Graphics
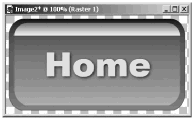
Now let's see how easy it is to optimize Web graphics and create palette transparency using Paint Shop Pro's Web image optimizers. We'll work through some examples using a button on a transparent background, as shown in Figure 9.6.
Figure 9.6. A button for a Web page.
NOTE
 TIP
TIP
Because the edges of a figure are typically antialiased, some fringe of residual color almost always appears around the edges of the opaque figure in a transparent GIF or PNG. To lessen this effect, it's best to use as your transparent color a color that matches the color of the Web page on which the image will be displayed.
If there's a possibility that you'll be using the same image on different pages with different Background colors, place the figure on its own layer, with real transparency surrounding the figure, and save as a PspImage file. You can then alter the color of a layer below the figure's layer, as needed, and use Save Copy As to save a GIF or PNG with that Background color. Change the lower layer's color whenever you need to, and use Save Copy As again to save another copy with another Background color. (Alternatively, as you'll soon see, you can use the GIF Optimizer to translate layer transparency to GIF transparency.)
JPEG Optimizer
Keeping file size small while maintaining good image quality is the central challenge for any Web graphics designer. Paint Shop Pro helps you out in this regard with the file format optimizers for JPEG, GIF, and PNG available under F ile > Expor t .
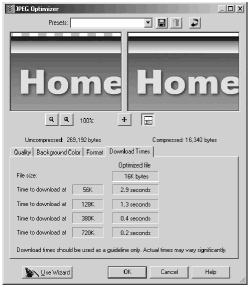
To export an image as a JPEG, choose F ile > Expor t > J PEG Optimizer. This opens the JPEG Optimizer dialog box on its Quality tab, shown in Figure 9.7.
Figure 9.7. The Quality tab of the JPEG Optimizer.
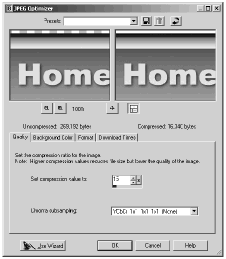
Here, the original image is shown in the image window on the left, with a preview of the image's optimized version shown on the right. In general, it's best to leave Chroma subsampling at its default setting. But if your image contains a lot of red, as the button example does, you might get better results with Chroma subsampling set to None. To adjust the compression level for your image, set the value in the box labeled Set compression value to . When the compression level gives you a small enough file size that still shows acceptable image quality, you're ready to go on to the other tabs in the dialog box.
If your image contains a figure surrounded by transparency, you should click on the Background Color tab, shown in Figure 9.8. (This tab does not appear if there is no layer transparency in your image.)
Figure 9.8. The Background Color tab of the JPEG Optimizer.
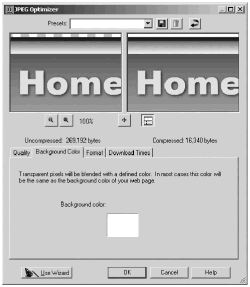
The JPEG file format does not support any kind of transparency, so you'll need to tell Paint Shop Pro what color to use in place of transparency for your JPEG. Click the color box labeled Background color to call up the Color dialog box, and select the color that matches the color of your Web page. Click OK to set the color and exit the Color dialog box.
Now, click the Format tab, shown in Figure 9.9.
Figure 9.9. The Format tab of the JPEG Optimizer.
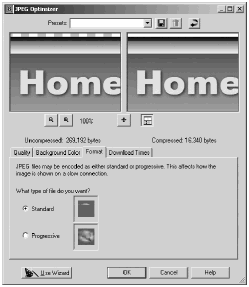
On this tab, you choose whether you want to save your JPEG with Standard encoding or Progressive encoding . For most images, you'll choose Standard encoding , but for large images that download slowly, you'll probably want to choose Progressive encoding . With Progressive encoding , your image will load in stages, with the image becoming more and more distinct. (You might be surprised to learn that for many images, the progressive JPEG version has a smaller file size than the standard version.)
The last tab in the JPEG Optimizer is the Download Times tab, shown in Figure 9.10. Click this tab to see estimates of the download times of your image at various connection speeds. If the estimated download times aren't acceptable, you can click on the Quality tab again and try increasing the compression level.
Figure 9.10. The Download Times tab of the JPEG Optimizer.
If you'd prefer to be stepped through the optimization process, you can bypass the controls on the JPEG Optimizer's tabs by pressing the Use Wizard button at the bottom left of the JPEG Optimizer window. Whether you use the wizard or not, when you're finished optimizing, you're prompted to save your image. You then have an optimized JPEG version of your image on disk, as well as the original version of the image open in Paint Shop Pro.
NOTE
 NOTE
NOTE
In Paint Shop Pro 8.10, the dialog box for the JPEG Optimizer changed a bit. The Background Color tab is eliminated, and on the Quality tab, there's a check box that allows you to choose whether or not to save any EXIF data that might have been recorded if the image originated as a digital photo.
GIF Optimizer
You can also export your image as a GIF, optionally choosing one color to translate to transparency. To export your image as a GIF, choose F ile > Expor t > G IF Optimizer. The first tab you'll see in the GIF Optimizer window is the Transparency tab. GIF Transparency deserves a section of its own, so for now just select None and skip over the Transparency and Partial Transparency tabs.
The tab that you'll use most often, because it's where you'll do your GIF optimizing whether your GIF is to have a transparent background or not, is the Colors tab. (See Figure 9.11.)
Figure 9.11. The Colors tab of the GIF Optimizer.
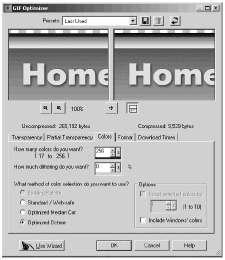
On the Colors tab, you choose what palette creation method to use for your GIF, how many colors to use, and whether to use dithering. In general, you'll get the best image quality with Optimized Octree as the creation method. And you'll get the smallest file sizes with a low number of colors and no dithering. What gives you the best image quality might give you an unacceptable file size, and what gives you the file size you'd prefer might give you unacceptable image quality, so be prepared to make compromises. You might be surprised, though, at how small your file size can be while still maintaining good quality.
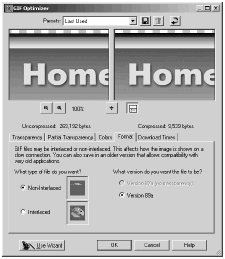
The Format tab (shown in Figure 9.12) enables you to choose whether to save your GIF in Non-interlaced format or Interlaced format. An interlaced GIF loads on a Web page in stages, one set of lines loading before the next set until the image is loaded completely. This doesn't decrease the load time of your GIFin fact, an interlaced GIF typically loads more slowly than a non-interlaced version would, and its file size is largerbut most visitors to your Web page will feel as if the image is loading at an acceptable rate, because they have some of the image to look at while they're waiting.
Figure 9.12. The Format tab of the GIF Optimizer.
In addition, the GIF Optimizer also has a Download Times tab. And if you'd prefer some help rather than making all the settings on your own, you can forgo all these tabs and click the Use Wizard button to call up the GIF Optimizer wizard instead.
Creating Transparent GIFs with the GIF Optimizer
If you want to save your image as a transparent GIF, you can do so from within the GIF Optimizer. Begin by clicking the Transparency tab, shown in Figure 9.13.
Figure 9.13. The Transparency tab of the GIF Optimizer.
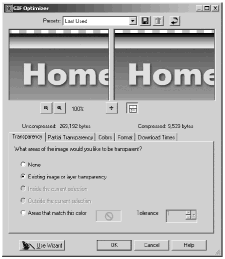
If you don't want any transparency, select None . If your image has layer transparency that you'd like to translate to GIF transparency, or if your image already is a transparent GIF and you'd like to retain its transparency, select Existing image or layer transparency . If you have a selection, you can choose either Inside the current selection or Outside the current selection , whichever defines the area where you want transparency. Another alternative is to select Areas that match this color .
For this option, either accept the current Background color, which is shown in the color box to the right of this option, or change the color by clicking the color box to call up the Color dialog box or by right-clicking the color box to call up the Recent Colors dialog box. You can also set the Tolerance , telling Paint Shop Pro whether you want to match the color exactly or within some tolerance level.
In addition to being able to translate a color to transparency, you can tell Paint Shop Pro how to handle pixels that are partially transparent. Controls for this are located on the Partial Transparency tab, shown in Figure 9.14.
Figure 9.14. The Partial Transparency tab of the GIF Optimizer.
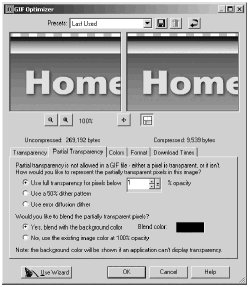
GIF doesn't support partial transparency, so if you have any partially transparent pixels in your image, you need to decide which of these pixels should be translated to full transparency and which should be made fully opaque. You also need to decide whether to blend the partially transparent pixels with a Background color. If you choose to blend with a Background color, be sure to set that color to the color of your Web page.
PNG Optimizer
The third available optimizer is the PNG Optimizer, which you open with F ile > Expor t > P N G Optimizer. You then see the PNG Optimizer dialog box open on its Colors tab, shown in Figure 9.15.
Figure 9.15. The Colors tab of the PNG Optimizer.
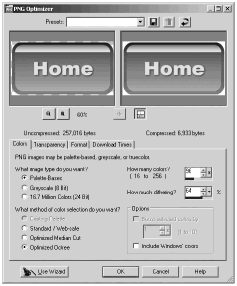
On the Colors tab, you choose whether to save your PNG with paletted color (like a GIF), as a greyscale (with 256 shades of grey), or with 16.7 million colors (like a JPEG). If you choose Palette- Based , the controls for choosing a palette and setting the number of colors and amount of dithering become active.
The Transparency tab, shown in Figure 9.16, lets you choose whether to translate areas of your image to transparency. Be careful here: Although PNG allows you to create transparent areas using alpha channels, most Web browsers do not support alpha channel transparency. Your safest bet if you want transparency is to use paletted color and set a single color as a fully transparent color, just as you would with GIFs.
Figure 9.16. The Transparency tab of the PNG Optimizer.
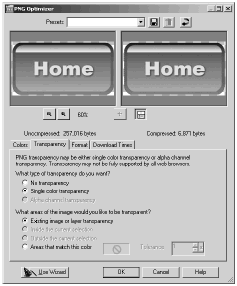
In addition, the PNG Optimizer also has a Format tab (like the one for the GIF Optimizer) and a Download Times tab. And if you'd prefer to forgo all these tabs, click the Use Wizard button to call up the PNG Optimizer wizard instead.
NOTE
 NOTE
NOTE
In Paint Shop Pro 8.10, there's also a tab for Gamma in the PNG Optimizer. This tab is for expert users only. Most users should simply leave the Gamma setting at its default.
Preview in Web Browser
A handy feature for Web designers is the ability to preview your image in your Web browser without leaving Paint Shop Pro. To preview your image, choose V iew > Preview In W eb Browser, which opens the dialog box shown in Figure 9.17.
Figure 9.17. The Preview in Web Browser dialog box.
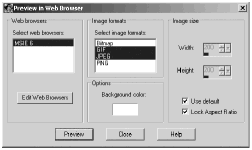
Here you choose the format(s) in which you want your image to be displayed, the dimensions at which to display the image, the Background color of the Web page, and what Web browser to use.
NOTE
 NOTE
NOTE
The first time you use Preview In Web Browser, you'll need to click the Edit Web Browsers button and then choose whatever Web browser(s) you have available. You can choose up to three different browsers to appear in the Preview in Web Browser list.
When you click the Preview button, Paint Shop Pro will run the appropriate optimizer(s) and then display your image. Each version of the image, along with information on the file format and file size, is displayed in the Web browser(s) you selected.
NOTE
 NOTE
NOTE
The Image Mapper and Image Slicer, discussed in the next sections, also allow you to preview your image map or sliced image in your Web browser. Just click the Preview button in the Image Mapper or Image Slicer dialog box. The Preview button is labeled with an image that looks like an eye.
| [ LiB ] |