Layer Basics
| [ LiB ] |
Layer Basics
One of the most popular and powerful features of Paint Shop Pro is layers. You'll probably find that you use layers in the majority of your Paint Shop Pro projects. And if you're a graphic artist whose work involves a lot of compositing, nearly all of your image editing will involve layering.
Layers let you manipulate different components of your image independently. This can enable you to, for example, apply an effect or a filter to only part of your image, reposition or rotate a figure in the image without affecting the background, or blend one part of your image into another.
Paint Shop Pro has four types of layers. In this chapter, we'll look at three of these: raster layers, adjustment layers, and mask layers. You "paint" with pixels on a raster layer. Adjustment layers enable you to affect color, brightness, or contrast on underlying layers without actually changing any data on those layers. Mask layers (also simply called masks) are rather like adjustment layers, except that instead of color , brightness, and contrast, the opacity of underlying layers is affected. We'll explore masks in more detail in Chapter 5, "Mastering Selections, Masks, and Channels." And in Chapter 6, "Working with Vectors," we'll explore the fourth type of layer, vector layers.
Think of a layer as a clear sheet of acetate on which you can paint. A multilayered image is like a stack of these acetate sheets, each with its own image elements. With raster layers, areas of a sheet that are unpainted are transparent, allowing the image elements of lower sheets to show through. Areas of a sheet that are opaque block out image elements on lower sheets. Finally, areas of a sheet that are semitransparent partially reveal image elements on lower sheets.
Extending this analogy further, the order of the sheets in the stack can be changed. One or more sheets can be removed from the stack, either temporarily or permanently, and other sheets can be added to the stack.
Getting Acquainted with Layers
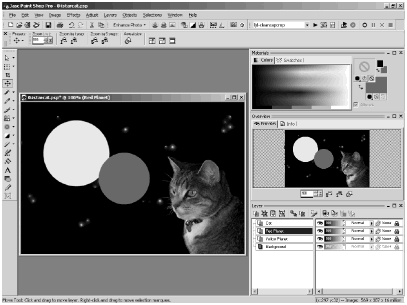
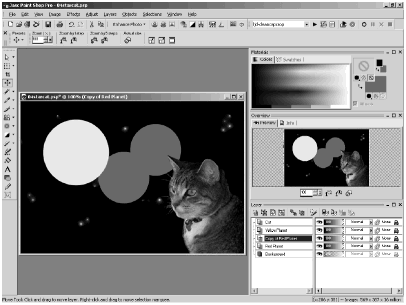
Let's take a look at a simple example of a multilayered image to get a better idea of what layers are. Figure 4.1 shows an image with three layers, one named Background, one named Cat, and one named Yellow Planet.
Figure 4.1. Simple multilayered image.
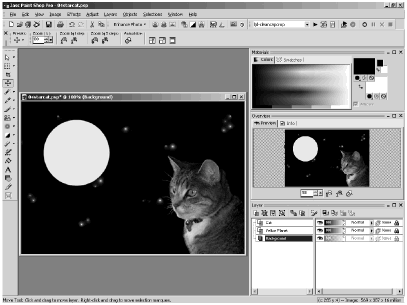
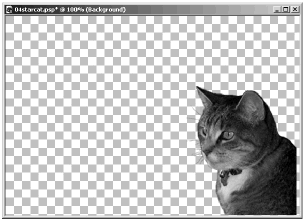
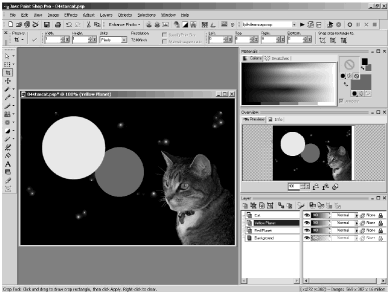
Figures 4.2 through 4.4 show each of the three layers separately. The layer named Background, which is totally opaque, is filled with a dark, starry sky. The Yellow Planet layer contains a solid-yellow circle, with the rest of the layer transparent. The Cat layer contains the head of a cat, with the rest of the layer transparent (the checkerboard pattern that you see "behind" the cat is what Paint Shop Pro shows by default to indicate transparent areas).
Figure 4.2. The Background layer.
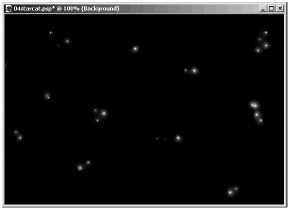
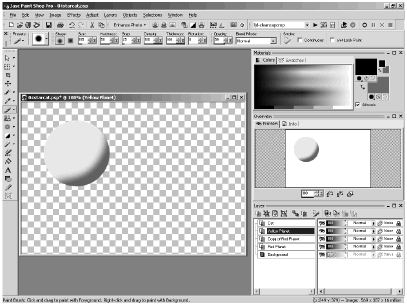
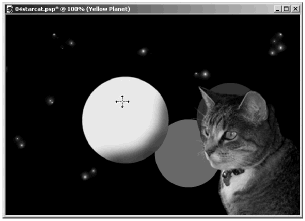
Figure 4.3. The Yellow Planet layer.
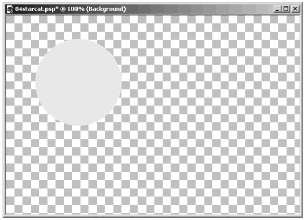
Figure 4.4. The Cat layer.
NOTE
 NOTE
NOTE
If you want to work through this example, you can find it at http://www.courseptr.com/downloads .
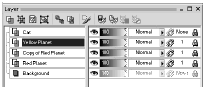
The palette showing on the bottom right of the screen in Figure 4.1 is the Layer palette, which you can toggle on and off by pressing the F8 key on the keyboard. Although there are quite a few ways to manipulate layers, using the Layer palette is generally the easiest way to control layers. Let's examine the Layer palette, shown in Figure 4.5, more closely.
Figure 4.5. The Layer palette.
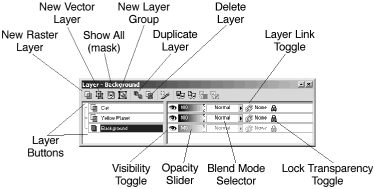
The left pane of the palette includes a column of rectangular, labeled buttons. These buttons, the layer buttons , correspond to each of the layers in your image. The layer button at the bottom of the column corresponds to the " lowest " layer in the stack of layers, and each layer button up the column corresponds to an increasingly higher layer in the stack.
In the right pane of the Layer palette are several more controls for each layer, including a Layer Visibility toggle, which looks like an eye. Above the two panes is a row of clickable icons for various layer commands, including the New Raster Layer button (which looks like a pair of acetate sheets) on the far left and the Delete Layer button (which looks like a pair of acetate sheets with a red X) located several icons to the right.
The following is a quick summary of what the basic Layer palette controls are used for. You'll try out each of these controls, along with a few others, later in the chapter.
-
Layer Button. Click a layer button to make its layer the active layer. In most cases, Paint Shop Pro tools and operations affect only the active layer.
Double-click a layer button to open the Layer Properties dialog box, which is one means of manipulating a layer.
Right-click a layer button to open a menu that contains most of the commands available on the Layers menu on the Paint Shop Pro menu bar.
Position the mouse cursor over a layer button, without clicking, to see a thumbnail of the button's associated layer. The thumbnail disappears when you move the cursor away from the layer button.
-
Opacity Slider. Nontransparent areas on a layer can be entirely opaque or semitransparent. To adjust the opacity of a layer, move the Opacity slider (located in the right pane, just to the right of the Visibility toggle). Moving the slider to the left makes pixels on the layer less opaque, and moving the slider to the right increases the opacity of the pixels. (Keep in mind, though, that you can't use the Opacity control to make pixels any more opaque than they were when they were painted on the layer.)
-
New Raster Layer Button and Delete Layer Button. Click the New Raster Layer button on the Layer palette toolbar to create a new, empty layer "above" the current active layer.
Click the Delete Layer button on the Layer palette toolbar to delete the current active layer.
NOTE
NOTE
The Background layer does not have an active Opacity slider. This special layer, created when you either open a new image with an opaque background or flatten a layered image, does not have a transparency channel. If you have a Background layer and want it to have a transparency channel, right-click any layer button and in the context menu choose Promote Background Layer . The Background layer's name will change from Background to Raster n , where n is a number determined by the current number of raster layers in the image.
An alternative way of promoting the Background to a layer is to double-click the Background's layer button, which brings up the Layer Properties dialog box. Click OK and the Background is automatically promoted and its name changed to Raster n .
NOTE
 TIP
TIP
If you're not sure what an icon on the Layer palette toolbar is for, hover the mouse cursor over the icon. A tool tip will appear that shows the descriptive name of the icon.
Working with Layers
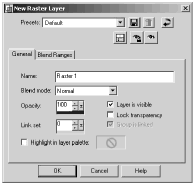
Let's now return to the simple three-layer example shown in Figure 4.1. To add a new layer to this image, click the layer button labeled Yellow Planet to make this the active layer. Then click the New Raster Layer button, which opens the New Raster Layer dialog box, shown in Figure 4.6.
Figure 4.6. The New Raster Layer dialog box.
NOTE
TIP
If you want to add a new layer without opening the Layer Properties dialog box, hold down the Shift key while you click the New Raster Layer button.
Any layer that you create in this way will be given a default name of the form Raster 1, Raster 2, and so on. You can always give such a layer a more meaningful name later on by double-clicking the layer's layer button and entering a new name in the Layer Properties dialog box.
Notice that, in addition to the Name text box, the New Raster Layer and Layer Properties dialog boxes present quite a few other controls corresponding to controls in the Layer palette. For now, all we're going to do with this dialog box is give a name to the new layer. Enter "Red Planet" in the text box labeled Name and then click OK .
An empty layer is now above the Yellow Planet layer. Because this layer is empty, the appearance of the image hasn't changed. If you look at the Layer palette, though, you'll see a new layer button labeled Red Planet above the layer button labeled Yellow Planet. The new layer automatically becomes the active layer.
NOTE
 CAUTION
Before you use a tool or perform an operation on a layered image, be sure the layer that you want to be affected is the active layer.
NOTE
NOTE
The layer button of the currently active layer is highlighted.
Now draw on the new layer. Select the Preset Shapes tool and set the Fill color in the Materials palette to a shade of red and set the Stroke mode to Transparent. In the Tool Options palette, be sure that neither Retain Styles nor Create as vector is selected. Then draw a small circle near the middle of the Red Planet layer.
The image and the Layer palette should now look something like Figure 4.7.
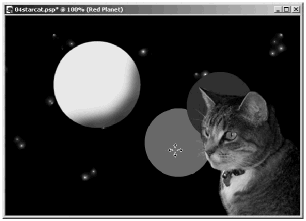
Figure 4.7. Red planet drawn on the Red Planet layer.
Next , try moving the figure that you just drew. Choose the Mover tool and click with it on the red planet figure. Drag the red planet to a new position. To return the figure to its original position, either click the Undo button on the Paint Shop Pro toolbar or press Ctrl+Z.
NOTE
CAUTION
If you click the Mover tool on a figure that is on a layer other than the current active layer, the Mover tool affects that figure, and the figure's layer becomes the active layer.
This can be quite handy when you do it intentionally, but be careful. It's easy to click in the wrong place and unintentionally move an image element on the wrong layer. If you do make a mistake, don't forget that you can easily recover by clicking Undo or pressing Ctrl+Z.
To ensure that the Mover tool affects only the current layer, hold down the Shift key while clicking and dragging with the Mover.
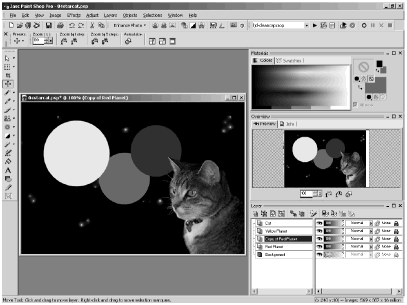
Now move the Yellow Planet layer above the Red Planet layer in the layer stack. You can move a layer up and down in the layer stack by dragging the layer's layer button. Click the layer button of the Yellow Planet and drag it to the top of the layer button of the Red Planet, as shown in Figure 4.8. Keep an eye on the black line that shows up at the top or bottom of the moving layer's layer button; this line indicates the position of the moving layer.
Figure 4.8. Moving the Yellow Planet layer above the Red Planet layer.

After you move the Yellow Planet layer, notice that the yellow planet figure appears to be in front of the red planet figure, as shown in Figure 4.9.
Figure 4.9. The example image after restacking the layers.
NOTE
TIP
You also can move layers by using the Layers menu on the Paint Shop Pro menu bar. Click the layer button of the layer you want to move. Then choose L ayers > A r range from the menu bar and choose one of the menu options, such as Bring to Top , Move Up , Move Down , or Send to Bottom .
Next, let's copy a layer. Right-click the Red Planet layer button and on the context menu choose Duplicate . A new layer is created just above the Red Planet layer, and this new layer has a layer button labeled Copy of Red Planet . Nothing in the image appears different yet, however, because the copied layer is simply overlaying the original Red Planet layer. To see a difference, choose the Mover tool and drag the uppermost red circle away from the red circle on the original Red Planet layer. Then you'll see something like the image in Figure 4.10.
Figure 4.10. Copy of Red Planet layer with its red circle moved up and to the right.
NOTE
NOTE
You also can duplicate a layer by using the Layers menu on the Paint Shop Pro menu bar. Click the layer button of the layer that you want to duplicate and then choose L ayers > Dupl i cate.
Another alternative is to click the Duplicate Layer button on the Layer palette toolbar.
Now edit the circle on the Copy of Red Planet layer, changing the red circle to blue with Paint Shop Pro's Colorize operation. First, be sure that Copy of Red Planet is the current layer, clicking its layer button if you need to. Then choose A djust > H ue and Saturation > C olorize from the menu bar, and set Hue to 175 and Saturation to 255. After you click OK, you'll see something like the image in Figure 4.11.
Figure 4.11. Colorize applied to the Copy of Red Planet layer.
As you see, Colorize affected only the current layer.
This covers the basic Layer operations. The next few sections explore more advanced Layer features and operations.
Layer Visibility and Protect Transparency
Now let's try out the Layer Visibility and Lock Transparency toggles.
Each layer has an associated Layer Visibility toggle, which you use to hide a layer temporarily. One reason to hide a layer is simply to get extraneous material out of your way while you're working on one or more layers of your image. Return to the example image as it was left in Figure 4.11. Suppose that you want to edit the Yellow Planet layer without looking at any of the other elements of your image. You can do so by hiding all the other layers, as in Figure 4.12.
Figure 4.12. Layer palette with all but the Yellow Planet layer hidden.
You may want to add some shading to the planet, perhaps by using the Airbrush tool to spray a darker yellow color lightly along the lower-right edge of the planet to create a shadow. You probably want to add color to the planet but not to the transparent area surrounding the planet. You could accomplish this by using the Magic Wand to select the planet. There's an easier way, however, to restrict your painting to the nontransparent areas of a layer: Simply turn on the Lock Transparency toggle.
With Lock Transparency toggled on, only pixels that are already nontransparent accept paint. With Lock Transparency toggled off, any area of the layer accepts paint. Figures 4.13 and 4.14 illustrate the difference.
Figure 4.13. Painting with Lock Transparency toggled off.

Figure 4.14. Painting with Lock Transparency toggled on.
In the example image, the version made with Lock Transparency on was used. If you're working on this example, you should use this version, too. You should then make all the layers visible again by clicking their Layer Visibility toggles on.
NOTE
NOTE
You can easily hide all layers except the current one by using the Layers menu on the Paint Shop Pro menu bar. Choose L ayers > Vie w > C urrent Only.
To make all currently hidden layers visible and all currently visible layers hidden, choose L ayers > Vie w > I nvert.
To make all the layers visible again, choose L ayers > Vie w > A ll.
Linked Layers
Layer links are used to keep elements on separate layers together so that when you move an element on one of the layers with the Mover tool, all the elements on the other layers in the link set move along, too. In the example image, you might want to keep the three planets together in the same relative alignment. To do this, add each of the planet layers to a single link set.
Linking a layer to another layer (or set of layers) is easyjust click the layer's Layer Link toggle. The Layer Link toggle of a layer that is not a linked to any other layer has None as its label. If no layers are linked yet, clicking a layer's Layer Link toggle changes its label to 1 . Click that same toggle after that to increment the link number and remove the layer from the linked layers labeled 1 . Each click further increments the number until the label returns to None . The number of times the link number is incremented until returning to None depends on how many layers are present in the image. (You also can decrement the layer group number by right-clicking the Layer Link toggle.)
To link each of the planet layers, click once on each planet layer's Layer Group toggle so that a 1 shows on each toggle, as in Figure 4.15.
Figure 4.15. The Planet layers all have link number 1, so they are all linked.
Now, select the Mover tool and drag one of the planets around the image canvas. All three of the planets move together, maintaining their original positions relative to one another (see Figure 4.16).
Figure 4.16. Linked layers move together.
You can have more than one set of linked layers. To add a set of linked layers, select the first layer that you want in the linked set of layers and click its Layer Link toggle until the label is a number different from any other layer. (If you click too many times, the label returns to None , and the layer is removed from any set of linked layers.) Then for the next layer that you want in the new linking, click its Layer Link toggle until the number matches that of the layer that you want to link it to.
In our example, suppose that instead of linking all the planets together, you decide that the red and blue planets should be linked and the yellow planet should be linked with the Cat layer. To accomplish this, click the Layer Link toggles for the red and blue planets so that both are labeled 1 . Then click the Layer Link toggle of the Cat layer until it is labeled 2 . Finally, click the toggle for the Yellow Planet layer until its toggle is also labeled 2 .
Figure 4.17 shows these two sets of linked layers and the effect of dragging the red planet figure after these linkings.
Figure 4.17. You can have multiple sets of linked layers.
NOTE
NOTE
You can directly set the Layer Link designation for a layer by using the Layer Properties dialog box. Bring up the dialog box for a layer by double-clicking the layer's layer button or, for the current layer, by choosing L ayers > P roperties on the Paint Shop Pro menu bar, or by right-clicking the layer's layer button and choosing Properties on the context menu. In the Layer section of the dialog box, set a value in the text box labeled Link Set .
Linked layers are most useful when you have a complex figure with various components on separate layersmaybe a car or a bird in a cage. By keeping the layers of such a figure in their own set of linked layers, you can ensure that the components don't become misaligned if you move any part of the figure.
Layer Groups
Besides linking, multiple layers can be related by grouping. You can group layers that are adjacent to each other in the layer stack to restrict certain operations to those specific layers. As you'll see later in this chapter, layer groups are particularly important when you are using mask layers and adjustment layers. Figure 4.18 shows an example of how a layer group appears in the Layer palette.
Figure 4.18. The Layer palette for an image that includes a layer group.
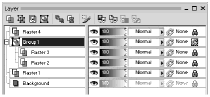
Notice that associated with the layer group header is a Visibility toggle, an Opacity slider, and a Blend Mode drop-down selection list. These controls can be used to affect all of the layers in the layer group.
You can move layers into or out of an existing layer group. One of the easiest ways to do this is to right-click the layer button of the layer that you want to move and then choose Arra n ge > Move I n or Arra n ge > Move O ut.
| [ LiB ] |