Making Selections
| [ LiB ] |
Making Selections
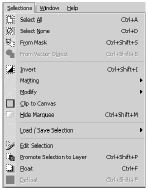
You can restrict image editing to a part of your image by making a selection. Some selection functions are performed with the Selections menu, which is shown in Figure 3.1, and you also can make a selection from a mask. You'll probably make most selections, however, by using one of the selection tools.
Figure 3.1. The Selections menu.
Following are the three tools that you can use to make selections:
-
Selection tool. Use this tool to define a regularly shaped selection by dragging the cursor.
-
Freehand Selection tool. Use this tool to define an irregularly shaped selection by dragging the cursor. Good for isolating a figure in an image.
-
Magic Wand. Use this tool to define a selection based on color , hue, brightness, or opacity. Excellent for selecting a solid-colored area, such as a background in a drawing.
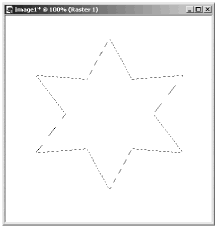
The edges of a selection are marked with a marquee, a flashing line of dashes popularly referred to as " marching ants ." Notice the selection marquee in Figure 3.2, which shows a star-shaped selection on a solid-colored image.
Figure 3.2. A selection marquee (a.k.a. "marching ants").
The edge of a selection can be sharp or soft. To soften the edges of a selection, you can feather the selection. To set the feather, either use the Tool Options palette of a selection tool or, after making a selection, choose S elections > M odify > F eather from the menu bar.
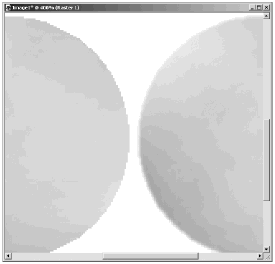
Figure 3.3 shows an example of a nonfeathered selection cut from one image and pasted onto a solid background along with a pasted-in feathered selection. The zoom factor of this example is set to 400 percent so that you can see the difference better. Notice how the edges of the feathered version are softer than the edges of the nonfeathered version.
Figure 3.3. A nonfeathered selection (left) and a feathered selection (right) pasted onto a solid background.
NOTE
 NOTE
NOTE
Another way to blend the edges of a selection with the background is to check Anti-alias in the Tool Options palette of a selection tool. Antialiasing works much like feathering, but the transition between the selection and the background is more limited with antialiasing. Both feathering and antialiasing are covered in more depth later in this chapter, along with cutting and pasting.
You can move selections by clicking inside them and dragging with either a selection tool or the Mover tool (whose icon in the Tool palette looks like two crossed double-headed arrows). Whether the content of the image moves along with the selection depends on whether the selection is a standard selection or a floating selection.
-
Standard selection. A standard selection is like a cookie cutter pressed into your image. Move a standard selection, and the image's contents also move.
-
Floating selection. As its name suggests, a floating selection "floats" above your image. Move a floating selection, and the selection's contents move, but the pixels below the selection remain unaffected.
Figures 3.4 and 3.5 illustrate the difference between standard and floating selections.
Figure 3.4. Moving a standard selection.
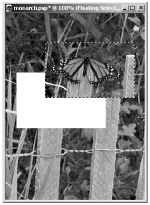
Figure 3.5. Moving a floating selection.
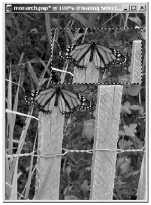
Figure 3.4 shows a standard selection that has been moved up and to the right. Notice how the pixels of the original image have been moved, whereas the area from which the selection was moved is filled with the current Background color.
Figure 3.5 shows a floating selection. This selection has also been moved up and to the right. Here, the floating selection and its contents have moved, but the pixels of the original image are unaffected.
NOTE
 NOTE
NOTE
After you move a standard selection, it automatically becomes a floating selection.
NOTE
 CAUTION
If you try to move a standard selection that contains only transparency, you'll receive the error message "This operation could not be completed because the current layer does not contain any active data within the current selection area."
To reposition the marquee of such a selection, choose the Mover tool, right-click inside the selection area, and drag with the right mouse button depressed. This method of moving only the selection marquee also works when the selection contains pixelsthe pixels are unaffected, but the marquee is repositioned.
NOTE
 NOTE
NOTE
When you have a layer that includes transparency, and you make a selection around a figure on that layer, the selection marquee snaps to the edges of the figure if you move the selection.
To turn off a selection, right-click with a selection tool anywhere on the image canvas, press Ctrl+D, or choose S elections > Select N one.
What you've seen so far applies to all selections. Now it's time to explore each of the selection tools and take a closer look at the Selections menu. In a few places, some things about layers and selections are mentioned. If you don't yet know much about layers , just skip over those remarks for now. You will return to selections in multilayered images in Chapter 5, "Mastering Selections, Masks, and Channels."
The Selection Tool 
The easiest selection tool to use is called, quite appropriately, the Selection tool (see Figure 3.6). You use this tool to define a selection that has any one of several predefined shapes , including Rectangle, Square, Ellipse, Circle, and others. A rectangle, square, or other nonellipsoid selection is defined by dragging from one corner to the diagonally opposite corner, whereas a selection in the shape of an ellipse or circle is defined by dragging from the center outward.
Figure 3.6. Defining a selection with the Selection tool.
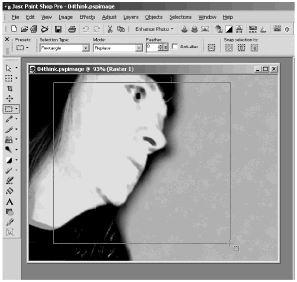
You use the Tool Options palette to set the Selection Type (that is, the shape of the selection) and whether the selection is feathered or antialiased. Other controls for this tool include the Mode (Replace, Add, or Remove), the Custom Selection button, and the Create selection from buttons .
The Freehand Selection Tool 
You won't always want a regularly shaped selection. To make irregularly shaped selections, use the Freehand Selection tool (also called the lasso).
When the Freehand Selection tool is active, four Selection Types are available in the Tool Options palette: Edge Seeker (Figure 3.7), Freehand (Figure 3.8), Point to Point (Figure 3.9), and Smart Edge (Figure 3.10). Except for Smart Edge, there is no real difference in the appearance of the tool in these various modes. The difference in the tool's behavior is significant, though.
Figure 3.7. Edge Seeker enables you to drag the mouse along an edge, with the selection marquee snapping to the edge. Excellent for isolating a figure on a background.
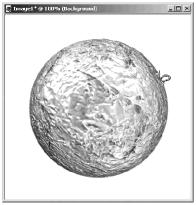
Figure 3.8. Freehandenables you to drag the mouse to draw a freeform selection.
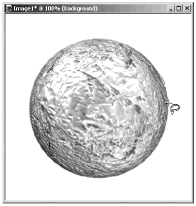
Figure 3.9. Point to Point enables you to click various points, usually around the edges of a figure, to define the edges of your selection. This has the effect of roping off a figure or other area of your image.

Figure 3.10. Smart Edge enables you to click along the edge of a figure, with Paint Shop Pro defining the selection edge based on differences in contrast. Good for isolating a figure on a background.
NOTE
 NOTE
NOTE
To undo the last selection point that you set with Edge Seeker, Point to Point, or Smart Edge, just press the Delete key. Repeat as needed to undo previous selection points.
In addition to controls for setting Selection type , Mode , Feather , and Anti-alias , the Tool Options palette for the Freehand Selection tool in all its selection types has a control for Smoothing . Increase the value for Smoothing to reduce the jaggedness of the selection edge.
Edge Seeker and Smart Edge also have a control labeled Sample Merged . This control is meaningful only for multilayered images. When this control is checked, the selection is made
NOTE
 TIP
TIP
If you make your own Picture Tubes, you might find that Edge Seeker and Smart Edge are especially useful for creating tube elements from scanned images. Make sure that the background you use during the scan contrasts with the objects that you're scanning. (You might, for example, cover the objects with a light-colored cloth if the scanner cover provides a background that's too dark.) Then use Edge Seeker or Smart Edge to isolate the scanned objects. You might need to adjust the selection a bit, but Edge Seeker or Smart Edge will do most of the work.
(To make your own Picture Tubes, see Chapter 11, "Adding to Your Toolkit.")
as if all visible layers in the image were merged into a single layer. When this control is not checked, the selection is made based only on the pixels on the currently active layer.
Edge Seeker has one other control: Range . This control determines how far from the selection point Paint Shop Pro should look for an edge to snap to.
The Magic Wand 
One of the handiest of Paint Shop Pro's tools is the Magic Wand, which can truly be magical . The Magic Wand enables you to make selections based on the color, hue, brightness, or opacity of a target pixel that you click on in your image. The pixels that are selected will either match the target pixel exactly or fall within a tolerance range, depending on the settings you select.
The Tool Options palette for the Magic Wand has controls for Mode , Match mode , Tolerance , Sample Merged , Feather , and Anti-alias (see Figure 3.11). You can also choose whether to add the antialiasing inside or outside the selection.
Figure 3.11. Tool Options palette for the Magic Wand.
![]()
Match Mode
Match mode determines what the Magic Wand uses as the basis for selection. The following lists the available Match mode settings, along with a description of how each setting affects the Magic Wand's selection criteria:
-
None. Pixels are selected with no restriction. In other words, all pixels are selected.
-
RGB Value. The pixels selected match the Red-Green-Blue color value of the target pixel. This is the mode you undoubtedly will use most often.
-
Color. The pixels selected match the color of the target pixel (that is, the hue and saturation only). This enables you to make a selection without regard to the pixel's brightness.
-
Hue. The pixels selected match the Hue value of the target pixel (where, for example, 0 is red, 85 is green, and 170 is blue). This enables you to make a selection without regard to the pixel's saturation or brightness.
-
Brightness. The pixels selected match the target pixel's brightness rather than its color. This might be useful, for example, if you want to select a dark figure on a light background.
-
All Opaque. The selection includes all contiguous pixels in nontransparent areas.
-
Opacity. The pixels selected match the target pixel's level of opacity.
Tolerance
Tolerance determines how closely pixels must match the target pixel. A Tolerance setting of 0 restricts the selection to pixels that match the target exactly. A Tolerance of 200, the maximum, makes your selection match all areas of your image. Different intermediate Tolerance values match more or less closely to the target. Figures 3.12 through 3.14 show examples of the selections made by clicking on the same pixel with the Magic Wand with Match mode set to Brightness and with Tolerance settings of 10, 40, and 90, respectively.
Figure 3.12. Tolerance set to 10.
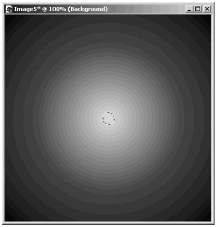
Figure 3.13. Tolerance set to 40.
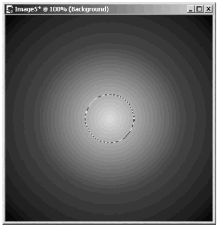
Figure 3.14. Tolerance set to 90.
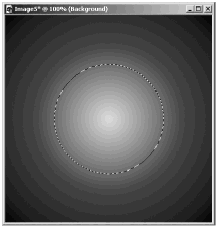
NOTE
 CAUTION
Keep in mind that Tolerance and Match mode can influence each other. When Tolerance is set to 200, all areas are matched regardless of the Match mode setting. When Match mode is set to None, all areas are matched regardless of the Tolerance setting.
Feather and Sample Merged
Feather settings work just as they do with the other selection tools, and Sample Merged works just as it does with the Freehand Selection tool. Feather settings soften the edges of the selection, blending them in with the background. Sample Merged treats all visible layers of a multilayered image as if the layers were merged together as a single layer, operating on the pixels on all the visible layers.
Adding to and Subtracting from a Selection
When you make a complex selection, you normally start with a simple selection and then edit that selection by adding to it or subtracting from it. Paint Shop Pro provides an easy way to add to and subtract from a selection. With any of the selection tools, set the Mode to Add to add to a selection or set the Mode to Remove to subtract from a selection. (If you want to make a new selection, without regard to any previously defined selection, set the Mode to Replace.)
Another way to add to a selection, no matter what the Mode is set to, is to hold down the Shift key and click or drag. Unless you've set up Paint Shop Pro to use a precise cursor, a plus sign (+) will appear near the cursor to remind you that you're adding to the selection. To subtract from a selection, no matter what the Mode is set to, hold down the Ctrl key and click or drag. A minus sign (-) will appear near the cursor to remind you that you're subtracting from a selection.
Suppose that you start with an image such as the one in Figure 3.15, and you want to select the two lower spheres but not the sphere in the upper-right corner.
Figure 3.15. An image that contains figures you want to select.

To start, you can choose the Magic Wand, set it to a fairly high Tolerance setting, and then click one of the lower spheres. The result might look something like Figure 3.16.
Figure 3.16. Beginning the selection.
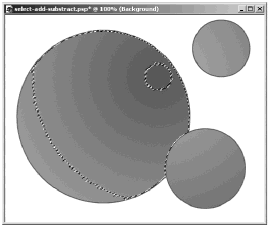
That didn't quite do the trick. What you could do, then, is click the Undo button and try again at a higher Tolerance setting, but that really isn't necessary. Instead, just Shift-click with the Magic Wand in one of the unselected areas that you want included in the selection. Continue in this way until you have the entire area that you want selected.
Figure 3.17 shows an intermediate step in adding to the selection, and Figure 3.18 shows the complete selection.
Figure 3.17. Adding to the selection.

Figure 3.18. The complete selection.

Another approach that you can take with the image in Figure 3.15 is to start by selecting the white background and then inverting the selection with S elections > I nvert. This produces the selection in Figure 3.19.
Figure 3.19. Select the figures by selecting the background and inverting the selection.
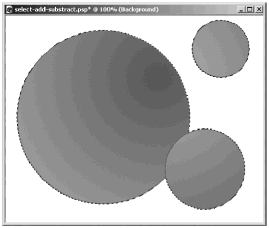
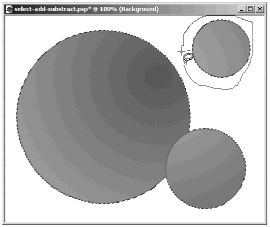
Now you want to eliminate the upper sphere from the selection. An easy way to do this is to choose the Freehand Selection tool and set it to Freehand mode. Then hold down the Ctrl key and drag around the area that you want to remove from the selection. Figure 3.20 shows this step in progress, with the end result being the same as you saw in Figure 3.18.
Figure 3.20. Subtracting from the selection.
The Selections Menu
The Selections menu enables you to alter a selection, make a selection from a mask, "promote" a selection to a layer, save a selection to disk or to an alpha channel, load a selection from disk or from an alpha channel, and modify or edit a selection.
Many of the items on the Selections menu, such as From Mask, are examined in Chapter 5, but for now take a look at the items that enable you to alter a selection.
Select All and Select None
The first two items on the Selections menu are Select All and Select None, which do exactly as their names suggest. Choosing Select All selects all areas of an image (or, in a multilayered image, all areas on a layer). Choosing Select None turns off a selection and is equivalent to right-clicking your image with a selection tool.
NOTE
 NOTE
NOTE
In most cases, using S elections > Select A ll is unnecessary. By default, most Paint Shop Pro operationsincluding, for example, E dit > C opyaffect the entire flat image or layer anyway.
Select All is most useful when you don't actually want the entire image or layer selected. To get the selection you want, you might first choose Select All and then choose S elections > M odify. We'll see an example of this later in this chapter.
Invert
The fifth item on the Selections menu is Invert . This is a handy operation, especially when used in combination with the Magic Wand (as you saw earlier in this chapter). When using the Magic Wand, you'll often find that selecting what you don't want selected is easier than selecting what you do want selected. If you select the areas of your image that you don't want and then choose S elections > I nvert, the selection is inverted, and the resulting selection is the part of the image that you did want selected.
NOTE
 TIP
TIP
You can easily invert an existing selection by pressing Shift+Ctrl+I.
Matting
The next Selections menu item, Matting , has three subitems: Defringe , Remove Black Matte , and Remove White Matte . Each of these works only with floating selections (discussed later in this chapter) and only with greyscale or 16-million color images.
NOTE
 NOTE
NOTE
To use any of the Matting operations on a selection, you must have a floating selection. If you have a standard selection instead, choose S elections > F loat to change your selection to a floating selection.
Defringe , Remove Black Matte , and Remove White Matte are used to remove pixels that are blended into the edge of a selection as a result of feathering or antialiasing. Remove Black Matte and Remove White Matte are for removing black and white fringe, respectively. Defringe is for removing any other Background color fringe.
NOTE
 TIP
TIP
You'll probably find that you get much better results if you defringe by hand. Select the area outside your figure using the Magic Wand. Expand the selection by a pixel or so with S elections > M odify > E xpand. Then feather the selection a bit with S elections > M odify > F eather. Press the Delete key, and then turn off the selection with S elections > Select N one.
Modify
The Modify menu selection can be used for all sorts of things. The operations under Modify include such operations as Contract , Expand , and Feather , each of which is pretty much self-explanatory. Use Contract to make a selection smaller by a number of pixels, use Expand to make a selection larger by a number of pixels, and use Feather to feather a selection by a number of pixels. The other operations available under S elections > M odify are explained here:
-
Select Similar. Expands the selection within the current Tolerance setting, which usually changes the basic shape of the selection quite drastically. You can choose to include pixels that are discontiguous with the selected pixels or restrict the expansion to contiguous pixels only. Figures 3.21 through 3.23 illustrate this difference. Figure 3.21 shows the original selection, Figure 3.22 shows the results of applying Select Similar with Tolerance set to 20 and Contiguous selected, and Figure 3.23 shows the result of applying Select Similar with the same Tolerance setting of 20 and Discontiguous selected.
Figure 3.21. Original selection.
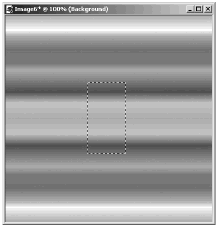
Figure 3.22. Select Similar with Contiguous selected.
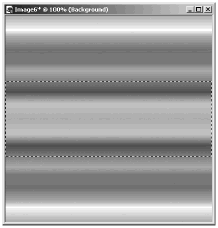
Figure 3.23. Select Similar with Discontiguous selected.
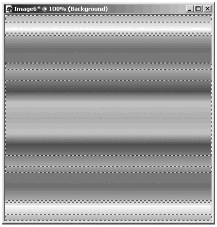
-
Select Color Range. Also expands the selection based on the color of pixels in the current selection, within the current Tolerance .
Enables you to add or subtract pixels of a particular color from the current selection. When you choose S elections > M odify > Select Co l or Range, the dialog box that appears lets you set the color that you want to add to or eliminate from the selection, within whatever Tolerance level you choose. There is also a control for Softness , which determines how hard or soft the modified selection edges will be.
Here's one of the times that choosing Select All can come in handy. Suppose that you have black hollow shapes on a multicolored background, as in Figure 3.24, and you want to select everything but the shapes.
Figure 3.24. Original image with black hollow shapes.
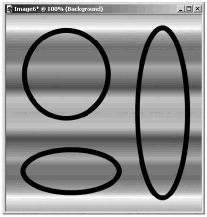
You can choose S elections > Select A ll, followed by S elections > M odify > Select Co l or Range with the color set to black and Subtract color range selected. The result is shown in Figure 3.25.
Figure 3.25. S elections > M odify > Select Co l or Range applied after S elections > Select A ll.
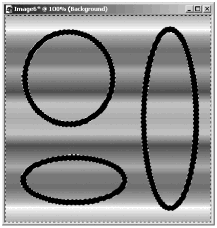
This is a good way to isolate either the content of an outlined image or the outline itself. Isolating an outline is just what you want if you're trying to add a metallic texture to a hand-drawn stained-glass window, for example. To select only the outline, use the method just described followed by S elections > I nvert.
Be careful when you use Select Color Range, however. All instances of the color that you choose will be added to or eliminated from the selection. This might go too far, adding areas that you don't want or eliminating areas of the selection that you do want to include in the selection.
NOTE
 TIP
TIP Remember that with Windows 2000 and later Windows versions you can set the color in any color box to a color sampled from your image (or one appearing elsewhere on your screen). Position the cursor over the color box, holding down the Ctrl key. Then with the Ctrl key down, move the cursor to the color you want to sample and click.
Use this method with Select Color Range to set the target color to a color that appears in your image.
-
Inside/Outside Feather. Enables you to add feathering to your selection.
-
Unfeather. Enables you to remove feathering from your selection.
-
Shape-based Anti-alias. Enables you to add antialiasing to your selection, based on the selection's shape.
-
Recover Anti-alias. Enables you to restore antialiasing to a pasted-in selection.
-
Remove Specks and Holes. Sometimes when you use the Magic Wand to create a selection, or when you use Select Color Range to add to a selection, the selection includes stray specks or has small holes in it. You can eliminate these with S elections > M odify > Remo v e Specks and Holes.
-
Smooth. Smooths the edges of a hand-drawn selection.
-
Select Selection Borders. Creates a selection from the edges of the current selection. You choose the width of the new selection and whether it is created inside the current selection edge, outside the edge, or straddling the edge.
Hide Marquee
The next item in the Selections menu, Hide Marquee, can be quite useful. In fact, setting Hide Marquee is a good idea when you're defringing by hand; that way, the effect on the edge is clear during the editing, because the marquee isn't covering the edge. Hide Marquee makes the selection marquee invisible until you uncheck Hide Marquee again. The selection border is still thereyou just can't see it. Use Hide Marquee whenever you need to see what's happening at the edge of your selection.
NOTE
 CAUTION
After you check Hide Marquee, it's easy to forget that you have a selection! If you're trying to paint in your image and nothing seems to happen, or if your paint is applied only in part of your image, check whether the selection marquee is hidden. You might have a selection set and not know it.
| [ LiB ] |