The Paint Brush and Airbrush
| [ LiB ] |
The Paint Brush and Airbrush 

The Paint Brush and Airbrush are the most basic painting tools. They differ from each other only in the way they apply "paint" to an image. The Paint Brush applies paint in dabs. When you keep your mouse in one place while holding down either mouse button, you get the same effect as you do when simply single-clicking the mouse button. The Airbrush, on the other hand, applies paint like an aerosol spray can. If you keep the mouse in one place and hold down one of the mouse buttons , paint is applied until you release the mouse button. In other respects, however, these two tools are similar.
Basic Brush Settings
Let's take a look at the settings you can use with the Paint Brush and Airbrush.
NOTE
 TIP
TIP
Although you usually do freehand painting when you use the Paint Brush or Airbrush tool, you can also use these tools to draw straight lines. To draw a straight line, click where you want to begin the line. Hold down the Shift key and click where you want the line to endleft-click to produce a line in the Foreground material, or right-click to produce a line in the Background material. As explained a bit later in this chapter, you can also use the Pen tool, with somewhat different effects, to create straight lines.
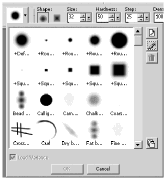
With the Paint Brush selected, open the Tool Options palette (if the palette isn't already visible) by pressing F4 to see the controls shown in Figure 1.1. (Most of these controls are also present in the Tool Options palette of the Airbrush.)
Figure 1.1. The Tool Options palette for the Paint Brush.
![]()
When using either the Paint Brush or the Airbrush, you can control the brush shape and size, the width and rotation of the brush or spray, the density and hardness of the brush or spray, and the "steps" between the dabs or spray bursts painted when you drag the mouse. You can also control the opacity of the paint and how the paint is blended with whatever is already on the image canvas. Here's what the basic brush settings control:
-
Shape. Sets the basic shape of the brush. Available basic brush shapes are Square and Round.
-
Size. Sets the diameter of the brush. Available brush sizes range from 1 to 500 pixels.
-
Hardness. Controls how hard or how diffuse the edges of the brush are. Ranges from 0 (most diffuse) to 100 (completely hard).
-
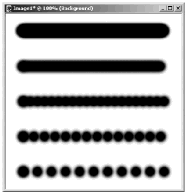
Step. Controls how the brush shape is repeated as you drag the mouse while you're painting. The lower the Step value, the smoother and more continuous the line that's drawn with the brush. As the Step value increases , the repeated brushstrokes or spray bursts that form the line become more pronounced individually and less continuous as a line, as demonstrated in Figure 1.2. Ranges from 1 ( closest ) to 200 (farthest apart).
Figure 1.2. Step set to 1, 25, 50, 75, 100 (from top to bottom).
-
Density. Controls how solid the brush is. Ranges from 1 (least dense) to 100 (completely solid).
-
Thickness . Controls the width of the brush in its narrowest dimension. Create an Oval brush by reducing the thickness of a Round brush. Create a Rectangular brush by reducing the thickness of a Square brush. Ranges from 1 (minimum thickness) to 100 (maximum thickness).
-
Rotation. Controls the angle of the brush. Ranges from 0 degrees to 359 degrees. Rotation has no effect on a Round brush at maximum width. Use it to adjust the angle of an Oval, a Square, or a Rectangular brush.
-
Opacity. Controls the opacity of the paint applied. Ranges from 1 (least opaque) to 100 (most opaque ).
-
Blend Mode. Controls how the new paint blends together with existing paint on the image.
NOTE
TIP
To see the effect that these settings have on your brush, keep an eye on the preview window just to the left of the Shape controls in the Tool Options palette.
Clicking the brush preview or the button next to it opens a drop-down list of custom brush shapes (shown in Figure 1.3). And to the left of the custom brush control is a drop-down list of brush presets. You can use both the custom brush shapes and the presets to load custom brushes. And, as you'll see in Chapter 11, "Adding to Your Toolkit," you can create your own custom brushes.
Figure 1.3. Custom brush drop-down list.
To get a feel for what effect the different brush options have, let's try a few variations. Figure 1.4 shows what you get with the Charcoal preset, the Highlighter preset, and the Squeaky Marker preset. When you load a brush preset, be sure to see what settings are used to produce the particular brush effect.
Figure 1.4. Examples of Charcoal (top), Highlighter (middle), and Squeaky Marker (bottom).

Other controls available with the Paint Brush (but not the Airbrush) are Wet Look Paint , Continuous , and Stroke . The Highlighter example in Figure 1.4 shows the effect of Wet Look Paint . With Wet Look Paint , paint applied with a soft brush (that is, a brush with a low Hardness setting) resembles a watercolor or ink wash (semitransparent with a more opaque edge).
To understand Continuous and Stroke , you first have to keep in mind how the Paint Brush normally applies paint. Paint applied in a single stroke produces a uniform effect, even where part of the stroke overlaps another part. When Continuous is not checked, if you release the mouse button and begin a new stroke, any semitransparent paint that overlaps another area of semitransparent paint affects the previously painted area. If you instead want the paint for a series of strokes to behave as paint does for a continuous stroke, check Continuous . And if at some point you want the paint to be applied as a new stroke when Continuous is in effect, just click the Stroke button.
Brush Variance
The basic brush characteristics aren't the only ones that you can change to create different effects with the Paint Brush and Airbrush tools. You can also get some complex effects with Brush Variance. If the Brush Variance palette isn't showing on your workspace, press F11 or choose V iew > P alettes > B rush Variance. You'll then see the Brush Variance palette, shown in Figure 1.5.
Figure 1.5. The Brush Variance palette.
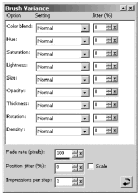
With Brush Variance, you can create a brush that uses paint that varies in color , hue, saturation, lightness, or opacity. Or the brush itself can be made to vary in size, thickness, rotation, or density. You can make the variations dependent on several different conditions, such as the direction of the stroke or the stylus pressure (if you're using a pressure-sensitive stylus and graphics tablet). With the Jitter controls, the variations can also be created more or less randomly .
Here's a brief overview of the settings available for each brush or paint characteristic that can be controlled with Brush Variance:
-
Normal. No variance at all, except for any random variance introduced by Jitter .
-
Pressure. Varies according to the amount of pressure applied with a stylus on a pressure-sensitive graphics tablet.
-
Altitude. Available only with a graphics tablet. Varies according to the up-and-down tilt of a stylus on a graphics tablet.
-
Azimuth. Available only with a graphics tablet. Varies according to the right-to-left tilt of a stylus on a graphics tablet.
-
Twist. Available only with a graphics tablet. Varies as a stylus on a graphics tablet twists .
-
Fingerwheel and Z Wheel. Available only with input devices that have these features.
-
Direction. Varies with the direction of the brushstroke.
-
Fade In. Begins at 0 and fades to the value set in the Tool Options palette.
-
Repeating Fade In. Like Fade In, but in a repeating pattern.
-
Fade Out. Begins at the value set in the Tool Options palette and fades to 0.
-
Oscillating Fade. Repeatedly fades in and out.
Several other controls appear in the bottom pane of the Brush Variance palette. Fade rate (pixels) determines the length of a fade-in or fade-out in pixels. For example, if you set the fade rate of Size to fade out at 300, then the brush will completely fade out after it has been dragged a length of 300 pixels.
Position jitter (%) determines whether and to what extent the position of a brush impression is random. At a setting of 0, the position of an impression is precisely where the cursor is when you click your mouse button. At a high setting, the position of the impression varies from the cursor position. This control yields particularly interesting results when used in conjunction with Impressions per step . With Impressions per step set to 1, you get exactly one impression at each step interval as you drag the brush. With higher settings, you get multiple impressions at each step.
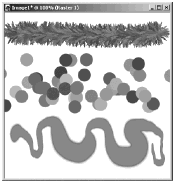
Several of the presets make use of Brush Variance. For example, Figure 1.6 shows the effects of Chenille, Confetti, and Ink Wash.
Figure 1.6. Brush Variance examples: Chenille (top), Confetti (middle), and Ink Wash (bottom).
In Chapter 11, we'll take a closer look at brush variance.
| [ LiB ] |