Using the Form Elements Array
If you’re using JavaScript code to enhance the capabilities of HTML pages (or, perhaps to provide the core functionality of the HTML pages), it’s good to know that there are a number of useful arrays of HTML objects you can access. This section shows you one of those arrays, the HTML form elements array. Each object in the form elements array is an element of the HTML form with which the array is associated. It’s important to understand that arrays are often made up of objects that are more complex than text string or numbers (such as the HTML form elements in this example). In addition, this section serves as a bridge to the next chapter of this book, Chapter 7, “ Working with Objects,” which begins the discussion of programming with objects in earnest.
The point of this example is to see how many check boxes you can check if you could check check boxes. Well, not exactly. Seriously, the point is to show you that you can work with the HTML form elements array in JavaScript, which is an array of objects—and not to do anything terribly important with that array.
As a preparatory step, let’s add JavaScript code that adds an HTML form and 100 check boxes to an HTML page, as shown in Listing 6-13.
Listing 6.13: Adding 100 Check Boxes to an HTML Page
document.write("<FORM> <CENTER>") document.write("<font size=6 face='Courier'>"); for (var i = 0; i < 10; ++i) { document.write(i); } document.write("</font> <br>"); for (var i = 0; i < 10; ++i) { document.write("<font size=6 face='Courier'>"); document.write(i); document.write("</font>"); for (var j = 0; j < 10; ++j) { document.write('<INPUT TYPE="checkbox" '); document.write('onClick="uClicked(this)">'); } document.write("<BR>"); } | Way Cool Note | I’m sneaking in something a little bit new and pretty cool here, namely the HTML for the form is itself written in JavaScript. (All those document.write statements are inserting HTML, not just literal text.) You can use this technique to programmatically vary the HTML written (and used for display). |
Each HTML check box element is supplied with an onClick event handler that calls the function uClicked. (Event Chapter 8, “ Understanding Events and Event-Driven Programming,” explains event-driven programming in detail.) The uClicked function is passed the object that was clicked (the check box) using the this keyword.
The uClicked function itself merely determines if the check box that invoked the function was checked or unchecked and displays an appropriate alert box depending on its state (see Figure 6-15):
function uClicked (theBox){ if (!theBox.checked) alert ("You unchecked the box."); else alert ("You checked the box."); } 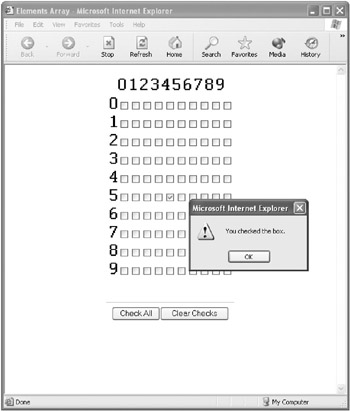
Figure 6-15: An alert box shows that the box was checked.
Next, let’s add two buttons at the bottom of the form. The Check All button will be used to check all the check boxes that are in the HTML form. The Clear Checks button will clear all the checks. Here are the document.write statements that create the buttons and invoke the checkAll and clearChecks functions, respectively, when clicked:
document.write('<INPUT TYPE="button" VALUE="Check All" '); document.write('onClick="checkAll(this.form)">') document.write('<INPUT TYPE="button" VALUE="Clear Checks" '); document.write('onClick="clearChecks(this.form)">') Here’s the checkAll function itself, which iterates through the form elements array to check all the check boxes:
function checkAll(form){ for (var i = 0; i < 100; ++i) { form.elements[i].checked = true; } } Note that the code in the checkAll function, as well as the code in the clearChecks function, relies on the fact that the 100 elements of the form elements arrays are check boxes (and therefore have a checked property). If you didn’t know for sure which kind of element you were dealing with, you’d have to check its type to make sure it had a checked property before trying to set the checked property. I’ll show you more about this in Chapter 7, “ Working with Objects.”
Here’s the clearChecks function, which unchecks where checkAll checked but is otherwise the same:
function clearChecks(form){ for (var i = 0; i < 100; ++i) { form.elements[i].checked = false; } } Listing 6-14 shows the entire code. If you open it in a Web browser, you can click the Check All button to check all the check boxes (as shown in Figure 6-16).
Listing 6.14: Using the HTML Form Elements Array
<HTML> <HEAD> <TITLE> Elements Array </TITLE> </HEAD> <BODY> <SCRIPT> function uClicked (theBox){ if (!theBox.checked) alert ("You unchecked the box."); else alert ("You checked the box."); } function clearChecks(form){ for (var i = 0; i < 100; ++i) { form.elements[i].checked = false; } } function checkAll(form){ for (var i = 0; i < 100; ++i) { form.elements[i].checked = true; } } document.write("<FORM> <CENTER>") document.write("<font size=6 face='Courier'>"); for (var i = 0; i < 10; ++i) { document.write(i); } document.write("</font> <br>"); for (var i = 0; i < 10; ++i) { document.write("<font size=6 face='Courier'>"); document.write(i); document.write("</font>"); for (var j = 0; j < 10; ++j) { document.write('<INPUT TYPE="checkbox" '); document.write('onClick="uClicked(this)">'); } document.write("<BR>"); } document.write("<BR>"); document.write("<HR SIZE=1 WIDTH=40%>"); document.write('<INPUT TYPE="button" VALUE="Check All" '); document.write('onClick="checkAll(this.form)">') document.write('<INPUT TYPE="button" VALUE="Clear Checks" '); document.write('onClick="clearChecks(this.form)">') document.write("</CENTER> </FORM>") </SCRIPT> </BODY> </HTML> 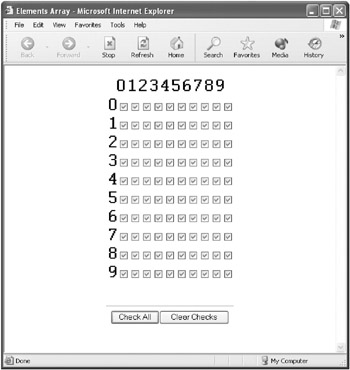
Figure 6-16: When the Check All button is clicked, the form elements array is used to check all the check boxes.
Unchecking a check box causes the appropriate message to be displayed (see Figure 6-17).
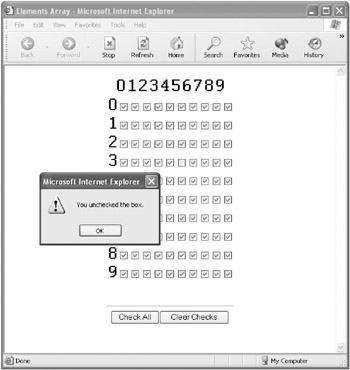
Figure 6-17: When the check box is unchecked, an alert box is displayed.
If you click Clear Checks, then all the check boxes are cleared (see Figure 6-18).
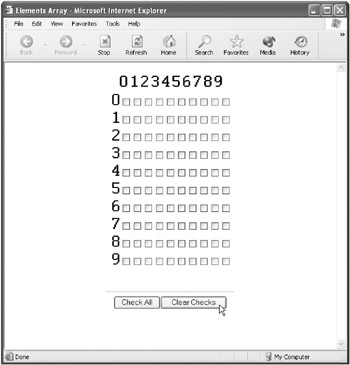
Figure 6-18: When the Clear Checks button is clicked, the form elements array is used to uncheck all the check boxes.
EAN: 2147483647
Pages: 115