Section 5.11. Deleting a Car
5.11. Deleting a CarHopefully, at this point you are getting into a groove. As you incrementally add functionality to the website, you will tend to complete the same steps in order each time:
Let's add the final bit of functionality for this chapterallowing the user to delete cars. First, we'll modify the View in Figure 5-6. Figure 5-6. carList.jsp with delete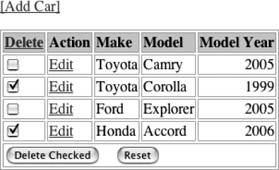 The final carList.jsp in Example 5-26 allows the user to check individual cars and delete them in bulk. Notice that clicking on the Delete column header checks all of the records. Clicking the "Reset" button unchecks all records. Example 5-26. carList.jsp <%@ taglib prefix="c" uri="http://java.sun.com/jsp/jstl/core" %> <html> <head> <link rel="stylesheet" type="text/css" href="default.css"> <script language="JavaScript"> function checkAll(field) { for (i=0; i < field.length; i++) { field[i].checked = true; } } </script> </head> <body> <p><a href="controller?action=addCar">[Add Car]</a></p> <form name="deleteForm" method="post" action="controller"> <input type="hidden" name="action" value="deleteCar" /> <table> <tr> <th><a href="javascript:checkAll(document.deleteForm.id)">Delete</a></th> <th>Action</th> <th>Make</th> <th>Model</th> <th >Model Year</th> </tr> <c:forEach items='${carList}' var='car'> <tr> <td><input type="checkbox" name="id" value="${car.id}"></td> <td><a href="controller?action=editCar&id=${car.id}">Edit</a></td> <td>${car.make}</td> <td>${car.model}</td> <td >${car.modelYear}</td> </tr> </c:forEach> <tr> <td colspan="5"> <input type="submit" name="Delete Checked" value="Delete Checked" /> <input type="reset" name="Reset" value="Reset" /> </td> </tr> </table> </form> </body> </html> This list is now wrapped in an HTML form. Each record's checkbox field has the same name: ID. This means that if you check multiple records, the IDs will be sent up to the deleteCar action in ControllerServlet as a string array. The next thing we must do to implement delete functionality is modify the Controller in Example 5-27. Example 5-27. ControllerServlet.java else if(DELETE_CAR_ACTION.equals(actionName)) { //get list of ids to delete String[ ] ids = request.getParameterValues("id"); //delete the list of ids CarDAO carDAO = new HibernateCarDAO( ); if(ids != null) { carDAO.delete(ids); } //prepare the list request.setAttribute("carList", carDAO.findAll( )); destinationPage = "/carList.jsp"; } Finally, we'll add the delete( ) method to the DAOs. Example 5-28 shows the JDBCCarDAO implementation. Example 5-28. JDBCCarDAO.java public void delete(String[ ] ids) { DataSource dataSource = null; Connection conn = null; Statement stmt = null; String sql = "delete from CAR where id in("; try { dataSource = ServiceLocator.getDataSource(DATA_SOURCE); conn = dataSource.getConnection( ); stmt = conn.createStatement( ); StringBuffer idList = new StringBuffer( ); for(int i = 0; i < ids.length; i++) { idList.append(ids[i]); if(i < (ids.length - 1)) { idList.append(","); } } stmt.executeUpdate(sql + idList.toString( ) + ")"); } catch (Exception e) { System.out.println(e); } finally { try { if(stmt != null){stmt.close( );} if(conn != null){conn.close( );} } catch(Exception e) { System.out.println(e); } } } Example 5-29 shows the greatly simplified code in HibernateCarDAO. Example 5-29. HibernateCarDAO.java public void delete(String[ ] ids) { Session session = null; Transaction tx = null; try { session = ServiceLocator.getHibernateSession(HIBERNATE_SESSION_FACTORY); tx = session.beginTransaction( ); for(int i=0; i < ids.length; i++) { CarDTO car = (CarDTO) session.get(CarDTO.class, new Integer(ids[i])); session.delete(car); } tx.commit( ); } catch (Exception e) { try{tx.rollback( );} catch(Exception e2){System.out.println(e2);} System.out.println(e); } finally { try { if (session != null) {session.close( );} } catch (Exception e) { System.out.println(e); } } }
Remember that you can always run the Ant script in the SQL subproject to repopulate the database. |
EAN: 2147483647
Pages: 197