Section 10.2. Creating and Editing Ad Campaigns
10.2. Creating and Editing Ad CampaignsWhen you create and activate an AdWords account, as I've just explained, you must create an Ad Campaign and an Ad Group at the same time as you open your account. But once your account is in use, it is likely that it will contain multiple Ad Campaigns. Many of these Ad Campaigns will contain multiple Ad Groups. For example, if you are a webmaster attempting to generate traffic to multiple sites, it makes sense to create an Ad Campaign for each of your sites. Within each Ad Campaign for a particular one of your web properties, create an Ad Group containing a specific ad, along with the keywords it targets. Ad Campaigns allow you to organize your AdWords account along functional lines, by creating a separate Ad Campaign for each web site, for instance. Within each Ad Campaign, multiple Ad Groupsone per adallow you to experiment with how ads are written and which keywords they target. The relationship between an AdWords account and the AdWords Campaigns and Groups it contains is shown in Figure 10-17. Figure 10-17. An AdWords account usually contains multiple AdWords Campaigns, each of which usually contains multiple AdWords Groups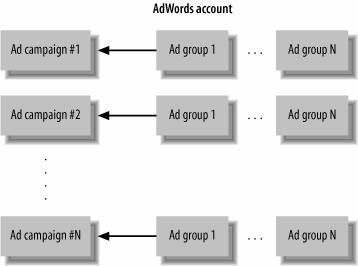 For example, a webmaster might have campaigns defined for a photography site and a wireless networking site. Each campaign would probably contain several different ad groups, with each ad group containing a different ad and targeted at somewhat different keywords. When you log on to AdWords, the first thing you will see is the Campaign Summary window, and you will probably have multiple Ad Campaigns defined in it, as shown in Figure 10-18, for example. Figure 10-18. It's common to define multiple Ad Campaigns within your AdWords account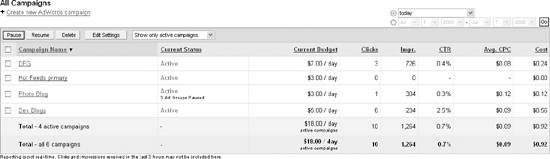
10.2.1. Creating a New CampaignTo create a new AdWords Campaign, from the Campaign Summary window, click the Create new AdWords campaign link (shown in the upper left of Figure 10-18).
Once you've clicked the Create new Adwords campaign link, things work almost identically to the campaign creation process you followed when you created your AdWords account (see "Signing up for an Account," earlier in this chapter), except that you can name your new Ad Campaign anything you like, as shown in Figure 10-19. Figure 10-19. It's good to name new campaigns so that you can identify the purpose of the campaign at a glance
10.2.2. Editing Campaign SettingsYou'll often want to change the settings for one of your existing Ad Campaigns for a whole host of reasons, including:
10.2.2.1. Pausing, resuming, and deleting an ad campaignProactive advertising managers find themselves often temporarily stopping (pausing) an Ad Campaign. This is a good way to see which of several campaigns works bestyou can pause each of several campaigns in turn. After your comparison is complete, you can resume the Ad Campaign that works best. You may also want to delete an Ad Campaign if you no longer have any interest in it.
To pause, resume, or delete an Ad Campaign, check the box in the Campaign Summary window next to the campaign to select it (the campaign DFG is shown selected in Figure 10-20). Next, click Pause, Resume, or Delete, as desired. Figure 10-20. Webmasters often find they are pausing and resuming campaigns to meet the needs of their budget, and this window makes it easy to perform the operation on multiple campaigns at once
Clicking Edit Settings with one or more campaigns selected lets you change Ad Campaign settings. 10.2.2.2. The campaign summaryThere's more to Ad Campaigns than whether they are runningin fact, much more! To start editing campaign settings, click the Ad Campaign link in the Campaign Summary window. A window like the one shown in Figure 10-21 will open, providing access to a campaign's Ad Groups. The summary window for the specific Ad Campaign is used to drill down into the campaign's Ad Groups (see "Ad Groups," later in this chapter). You can also use it to change settings for the entire Ad Campaign. Excluding sites. Excluding a web site means making sure that your ads do not appear on that site. You may wish to exclude specific web sites for an entire campaign, for example, because you don't want your ads to appear on a competitor's site. Or, you may have seen a site that is contextually relevant but that you don't think provides a good environment for your ads. Figure 10-21. The Campaign Summary window lets you review information about all the Ad Groups within a campaign Whatever your reasoning, it's easy to exclude specific domains by clicking the Add link that follows the words "no excluded sites," shown in Figure 10-21. The Site Exclusion window, shown in Figure 10-22, will open.
Figure 10-22. You can make your ads not appear on specific domains using the Site Exclusion window To exclude a domain, subdomain, or directory within a domain, add it to the text box shown in Figure 10-22, and click Exclude Sites. Adding negative keywords. Negative keywords are used to make sure your ad doesn't run on a content site with the specified negative keyword. For example, if you are trying to drive traffic to a digital photography site by targeting keywords such as "photo," you might want to add "film" as a negative keyword to make sure your ads don't run on sites that primarily cover older, film-based photography. Negatives keywords can be added at the Ad Group or Ad Campaign level. To add a negative keyword to an Ad Campaign, from the summary screen for the campaign (Figure 10-21), click the Add link following the words "No campaign negative keywords". The Edit Campaign Negative Keywords window, shown in Figure 10-23, will open.
Figure 10-23. Using negative keywords is a good way to make sure that ads in a campaign don't end up targeted to inappropriate content by allowing you to paint with broad strokes and then eliminate inappropriate matching (for example, a match against "photography" that uses "film" as a negative keyword is likely to target digital photography) In the Edit Campaign Negative Keywords window, add words you want to negatively target in the Enter words manually text box and click Add Keywords.
Changing campaign settings. To edit Ad Campaign settings themselves, click the Edit Campaign Settings link in the Campaign Summary window for the campaign (Figure 10-21). The Edit Campaign Settings window will open (Figure 10-24).
Figure 10-24. The Edit Campaign Settings window is used to change many campaign settings, including whether ads appear on search results, on content, or both Most of the settings you can edit with the Edit Campaign Settings are exactly the same as the settings used when creating a new Ad Campaign. However, there are two important settings that you can access from the Edit Campaign Settings window that you cannot configure when setting up a new campaign:
Optimizing ad service. By default, the Automatically optimize ad serving box shown under How often to show my ads in Figure 10-24 is checked. This means that AdWords will give priority in ad placement to your keywords that are performing well (meaning a better click-through rate). The logic here is that since these keywords are performing better than your other keywords, they will probably continue to do so. However, there are a couple of reasons you might want to experiment with turning this option off. You might want to give your underperforming keywords a chance by serving ads against them in equal proportion with the better-performing keywords (after all, if the underperforming keywords never get to serve ads, they have no way to better their performance).
By unchecking this option, all your keywords will be served equally, not just your high-performing keywords. Where ads display. All AdWords ads are displayed on Google search results pages. By default, your ads will also be displayed on the AdSense search and content networks (see Chapter 8 for information about these programs). In the Where to show my ads category shown in Figure 10-24, uncheck search network if you don't want your ads to appear on AdSense search results pages, and uncheck content network if you don't want your ads to appear in AdSense web content.
|

EAN: 2147483647
Pages: 145