Check-in and Check-out
Daily check-ins and check-outs are an essential part of a developer's workflow. Checking out simply means that you are operating with the files you already have in your personal workspace. Checking in refers to items that are re-inserted into the repository. The source code is represented as a tree structure, with branches and other logical elements.
| Important | Unlike Visual SourceSafe, Team Foundation version control does not necessarily retrieve files from the source repository. This is an important point to consider. |
Checking in an item
A changeset contains all of the information related to a check-in, such as work item links, revisions, notes, policies, and owner and date/time details. Team Foundation Source Control bundles all of the information together into this container. A changeset is created once you check code into the repository, and as a container it reflects only the changes you checked in at a particular date and time. You can also view it as the state of the repository at a particular time and date. The usefulness of a changeset comes from the fact that you can, on a very atomic level, return to any point in time and troubleshoot your code.
| Note | Team Foundation Server contains four types of artifacts: work items, changesets, source code files, and builds. For example, you can associate a work item to a source code file. You can also link builds to work items if you wish. This is a really powerful concept — imagine that you are having trouble with a build. You can automatically call up the changeset with the problem code. You can also generate a work item to get a developer to fix the problem. The integration possibilities are endless. |
All developers forget to check-in their code at one point or another. You can implement automatic check-ins by changing the environment settings in your project. Specifically, you can check an option called Check-in Everything When Closing a Solution or Project.
The Pending Changes window enables you to view all of the checked-out files in your project. After your solution has been added to version control, the window shown in Figure 20-9 will appear on the bottom half of the screen.
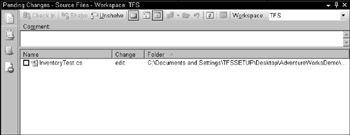
Figure 20-9
Checking out an item
Checking out an item means that you are working with your local repository for the purpose of editing or manipulating it. There are several ways you can check out an item within Visual Studio 2005. Items that are checked in are represented in the Solution Explorer with small padlocks at the left of the program icon, as shown in Figure 20-10.
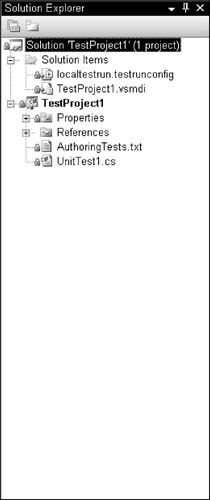
Figure 20-10
As soon as you select files and click the Check Out button, the Solution Explorer replaces the blue lock icon with a checkmark icon. This visually confirms that all the files have been checked out. There are three lock options you can configure:
-
Check-In: This option allows other users to check out the files, but they can't check them in.
-
Check-Out: This option prevents other users from checking in/out the corresponding source files.
-
None: This option allows other users to pend changes to the source files.
Creating and administering check-in policies
Check-in policies enable project managers and development leads to control the source management process within a team. Three types of policies are available by default in Team System: Code Analysis, Testing Policy, and Work Items.
To configure your check-in policies, right-click on your Team Foundation project and select Team Project Settings ![]()
Figure 20-11
If you click the Add button in the Source Control Settings dialog box (refer to Figure 20-11), you will be prompted to select a check-in policy type. Select one of the three options (shown in Figure 20-12) and click the OK button. The default policy types included in Team Foundation Source Control are as follows:
-
Code Analysis. This option will add a static code analysis quality check before source code can be inserted into the code repository. The code analysis check will be dependent on the project level settings. For example, if you selected code analysis for C/C++ in your project, the engine will automatically use that test as a "quality gate" or quality assurance before code is reintroduced into the source.
-
Testing Policy. You can apply testing policies to check the correctness of your code before it is checked in. For example, you may want to require Unit Testing to verify the default values in your application. For more information about testing policies, please refer to the testing chapters in the book.
-
Work Items. You may want to require that a work item needs to be associated to every check-in. That way, changes can be documented, which will make it easier to track any problems.
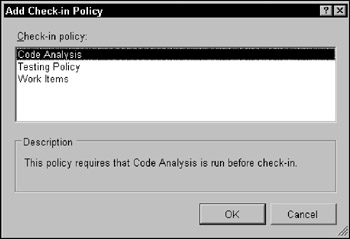
Figure 20-12
Once the check-in policy has been created, try checking in code without complying with the new policies. The Policy Failure window, shown in Figure 20-13, will appear. At this point, you will have the option to override the policy requirement and comment on the failure.
If you click on the Cancel button, the Pending Changes – Policy Warnings window will appear (with a detailed explanation of each warning, as shown in Figure 20-14).
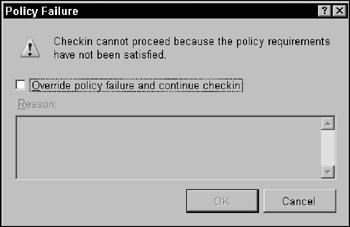
Figure 20-13
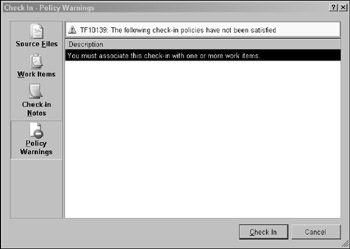
Figure 20-14
EAN: 2147483647
Pages: 220