Web Tests
Web tests enable verification that a web application's behavior is correct. They issue an ordered series of HTTP requests against a target web application and analyze each response for expected behaviors. You can use the integrated web test recorder to create a test by observing your interaction with a target web site through a browser window. Once the test is recorded, you can use that web test to consistently repeat those recorded actions against the target web application.
| Important | Although you will likely use web tests with ASP.NET web applications, you are not required to do so. In fact, while some features are specific to testing ASP.NET applications, any web application can be tested via a web test, including applications based on classic ASP or even non-Microsoft technologies. |
Previously, Visual Studio Enterprise Edition included a product called Application Center Test (ACT). Like Team System web tests, ACT could be used to record and replay tests against a target web application. Unfortunately, those tests were driven using interpreted scripts, and lacked support for many common scenarios. Team System web tests address those limitations by offering automatic processing of redirects, dependent requests, and hidden fields, including Viewstate. Furthermore, they feature full support for HTTPS communications. In addition, coded web tests can be written in any .NET language, enabling you to take full advantage of the power and flexibility of such languages.
| Note | There is no direct support for conversion of web tests from other frameworks such as Application Center Test. For most tests, simply re-recording the tests with Team System is the best option. However, if you have a large suite of complex tests, you might delay conversion and wrap execution of those tests as generic tests. For details on generic tests, see Chapter 17. |
Later in this chapter, you will learn how to add your web tests to load tests to ensure that a web application behaves as expected when many users access it concurrently.
Creating a sample web application
Before we create web tests, we'll need a web application to test. While we could create a web test by interacting with any live web site such as Google, Monster, or Microsoft, those sites can certainly change and will likely not be the same at the time you read this chapter. Therefore, we'll base the remainder of this chapter on a sample site that we'll quickly create using one of the starter sites included with Visual Studio.
Start with an empty solution and create a new project by right-clicking on the solution and choosing Add ![]() New Web Site. Choose Personal Web Site Starter Kit, enter the name "SampleWeb," and then press OK.
New Web Site. Choose Personal Web Site Starter Kit, enter the name "SampleWeb," and then press OK.
Visual Studio will then create a new personal website, with full support for users and authentication and features such as a photo album, links, and a place for a resume.
We'll use this site as the basis of some recorded web tests. Later, we'll use these web tests from a load test to put stress on this site to determine how well it will perform when hundreds of friends and family simultaneously converge to view our photos.
Creating users for the site
Before we create tests for our website, we need to create a few users for the site. We'll do this using the Web Site Administration Tool that is included with ASP.NET applications created with Visual Studio. Select Website ![]() ASP.NET Configuration.
ASP.NET Configuration.
On the resulting page, select Security, and then Create or Manage Roles. Enter "Administrators" as the role name, and then click Add Role. Repeat this process to add a role named "Friends."
| Note | Note that the first time the site is run, the application start event will also create these roles for you. |
You now have two roles into which users can be placed. Click the Security tab again, and then click Create user. You will then see the window shown in Figure 15-1.
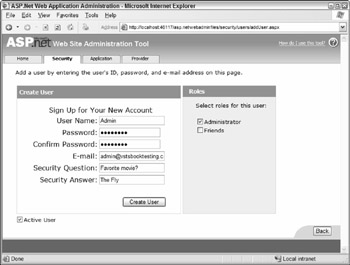
Figure 15-1
Our tests will assume the following users have been created:
-
Admin, in the Administrator role
-
Ken, in the Friends role
-
Mike, in the Friends role
-
Dave, in the Friends role
Enter any values you wish for the Password, E-mail, and Security Question fields.
| Note | Choosing a valid password can be tricky, and the help text is somewhat cryptic. By default, passwords must be at least seven characters long and have at least one non-alphanumeric character. In this example, we use "@qwerty@." You can modify these settings through the membership provider settings of machine.config or web.config. |
Configuring the sample application for testing
It is common, but certainly not required, to run web tests against a website hosted on the local development machine. If you are testing against a remote machine, you need to create a virtual directory or web- site and deploy your sample application. You may also choose to create a virtual directory on your local machine.
Visual Studio 2005 includes a new feature called the ASP.NET Development Server. This is a lightweight web server, similar to but not the same as IIS, that chooses a port and temporarily hosts a local ASP.NET application. The hosted application accepts only local requests and is torn down when Visual Studio exits.
The Development Server defaults to selecting a random port each time the application is started. In order to execute web tests, you'd have to manually adjust the port each time it was assigned. To address this, you have two options.
The first option is to select your ASP.NET project and choose Properties. Change the Use Dynamic Ports property to false, and then select a port number, such as 5000. You can then hard-code this port number into your local web tests.
The second, and more flexible, option is to use a special value, called a context parameter, which will automatically adjust itself to match the server, port, and directory of the target web application. You'll learn how to do this shortly.
Later in this chapter, you'll see that unlike web tests, load tests are typically run against sites hosted on machines other than those conducting tests.
Creating and configuring web tests
There are three main methods for creating web tests. The first, and by far the most common, is to use the web test recorder. The second method is to create a test manually, using the Web Test Editor to add each step. Finally, you can create a coded web test that specifies each action via code. You can also generate a coded web test from an existing web test. We describe coded web tests later in this chapter.
To create a new web test, you may either create a test project beforehand or allow one to be created for you. If you already have a test project, right-click on it and select Add ![]() New Test. If you don't have a test project, choose Test
New Test. If you don't have a test project, choose Test ![]() New Test. You will see the Add New Test dialog, as shown in Figure 15-2.
New Test. You will see the Add New Test dialog, as shown in Figure 15-2.
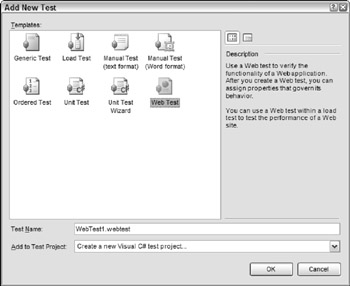
Figure 15-2
You have several test types from which to choose. Select Web Test and give your test a name. Web tests are stored as XML files with a .webtest extension.
| Important | See Chapter 13 for more details on creating and configuring test projects. |
Finally, you can either choose an existing test project or specify that a new one be created. After clicking OK, if you opted to create a new test project, you will be prompted to enter a name for that test project. In this example, we'll use "SampleWebTestProject."
| Note | Once you have a test project, you can quickly create other web tests by right-clicking on your test project and selecting Add |
Recording a web test
Once your web test is created, an instance of Internet Explorer will be launched with an integrated Web Test Recorder docked window. Begin by typing the URL of the application you wish to test. For the SampleWeb application on a local machine, this will be something like http://www.localhost:5000/SampleWeb. Remember that supplying a port number is only necessary if you're using the built-in ASP.NET Development Server, and is generally not necessary when using IIS.
Recording a web test is straightforward. Using the integrated web browser, simply use the web application as if you were a normal user. Team System automatically records your actions, saving them to the web test.
First, log in as the Admin user (but do not check the "Remember me next time" option). The browser should refresh, showing a "Welcome Admin!" greeting. This is only a short test, so click Logout at the upper-right corner.
Your browser should now appear as shown in Figure 15-3. The steps have been expanded so you can see the details of the Form Post Parameters that were recorded automatically for you. You'll learn more about these later in this chapter, but for now notice that the second step automatically includes Viewstate, as well as the User Name and Password form fields we used to log in.
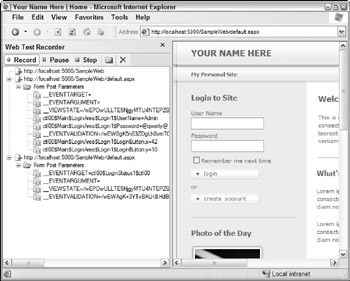
Figure 15-3
Also note that the Web Test Recorder window is docked within Internet Explorer. As you conduct your usage scenario, the steps taken are listed as each request is submitted. You have several options while recording. The Pause button temporarily suspends recording and timing of your interaction with the browser, enabling you to use the application or get a cup of coffee without affecting your web test. Click the X button to clear your recorded list. The other button, Add a Comment, enables you to add documentation to your web test, perhaps at a complex step. These comments are very useful when you convert a web test to a coded web test, as you'll see later.
| Note | Calls to web pages are normally composed of a main request followed by a number of dependent requests. These dependent requests are sent separately to obtain items such as graphics, script sources, and stylesheets. The web test does not record these dependent requests. You'll see later that all dependent requests are determined and processed automatically when the web test is run. |
Configuring web test run settings
When you're done recording your web test, click Stop and the browser will close, displaying the Web Test Editor with your recorded web test, as shown in Figure 15-4.
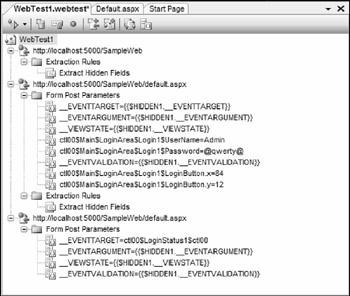
Figure 15-4
The Web Test Editor displays your test as a series of requests to be sent to the web application. Notice that, just as you saw in Figure 15-3, there are three distinct requests. These are the three requests you submitted through the browser: the initial page, the login request, and the logout request.
Frequently, you'll need to use the Web Test Editor to change settings or add features to the tests you record. This may include adding validation, extracting data from web responses, and reading data from a source. We'll cover these topics later in the chapter, but for now, we'll use this test as recorded.
Parameterizing the web server
You may recall from the earlier "Configuring the sample application for testing" section that using the ASP.NET Development Server, while convenient, poses a slight challenge because the port it uses is selected randomly with each run. While you could set your website to use a static port, there is a better solution.
Using the Web Test Editor, click on the rightmost button, labeled Parameterize Web Servers. You could also right-click on the web test name and choose Parameterize Web Servers. In the resulting dialog, click the Change button. You will see the Change Web Server dialog, shown in Figure 15-5.
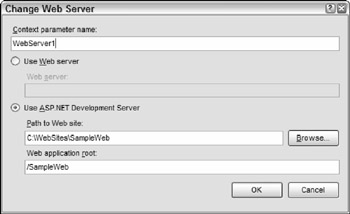
Figure 15-5
Use this dialog to configure your web test to target a standard web application service, such as IIS, or to use the ASP.NET Development Server. In our example, we are using the Development Server, so choose that option and enter or browse to the location of the SampleWeb site. The Web application root in this case is simply the name of the site, /SampleWeb. Click OK and you'll see a new context parameter in the list.
Close the Parameterize Web Servers dialog. You will notice the Web Test Editor has automatically updated all request entries, replacing the static web address with a reference to this context parameter, using the syntax {{WebServer1}}. In addition, the context parameter WebServer1 has been added at the bottom of the web test under Context Parameters. Refer to Figure 15-10 to see the effect of this on our sample web test.
| Note | Context parameters, named variables that are available to each step in a web test, are described in the "Extraction rules and context parameters" section, later in this chapter. |
Now you can run the web test and Team System will automatically find and connect to the port and address necessary when the ASP.NET Development Server is started. If you have more than one target server or application, you can repeat this process as many times as necessary, creating additional context parameters.
Web test run settings
Before you run a web test, you may wish to review the settings that will be used for the test's runs. Choose Test ![]() Edit Test Run Configurations, and then select the Local Test Run option. Select the Web Test entry from the list on the left side and you will see the options shown in Figure 15-6.
Edit Test Run Configurations, and then select the Local Test Run option. Select the Web Test entry from the list on the left side and you will see the options shown in Figure 15-6.
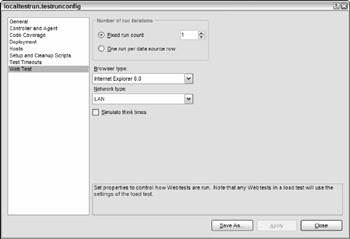
Figure 15-6
The option group "Number of run iterations" enables you to specify a specific number of times your web tests will be executed when included in a test run. Note that you should not enter a large number here to simulate load through your web test. Instead, you will want to create a load test, covered later in this chapter, referencing your web test. Also, if you assign a data source to your web test, you may instead choose to run the web test one time per entry in the selected data source. We cover data-driven web tests in detail later in this chapter.
The Browser Type setting enables you to simulate using one of a number of browsers as your web test's client. This will automatically set the user agent field for requests sent to the web test to simulate the selected browser. By default, this will be Internet Explorer 6.0, but you may select other browsers such as Netscape or a Smartphone.
Similar to the Browser Type setting, Network Type is used to simulate the type of connection a user has when accessing the web application. This can be used to simulate local LAN users down to 28.8k dial-up modem users.
| Note | If you want to test more than one browser and/or network type, you'll need to run your web test multiple times, selecting a different browser and network each time. However, you can also add your web test to a load test and choose your desired browser and network distributions. This will cause each selected type to be simulated automatically. You'll learn how to do this in the "Load Tests" section of this chapter. |
The final option, Simulate Think Times, enables the use of delays in your web test to simulate the normal time taken by users to read content, modify values, and decide on actions. When you recorded your web test, the time it took for you to submit each request was recorded as the Think Time property of each step. If you turn this option on, that same delay will occur between the requests sent by the web test to the web application. Think times are disabled by default, causing all requests to be sent as quickly as possible to the web server, resulting in a faster test. You will see later in this chapter that think times serve an important role in load tests.
| Note | Note that these settings affect every run of this web test. You'll see later that the Web Test Run Settings dialog enables you to override these settings for a single run. |
Running a web test
To run a web test, click the Run button, the leftmost button on the Web Test Editor toolbar, as shown in Figure 15-4. As with all other test types in Team System, you can use the Test Manager and Test View windows to organize and execute tests. See Chapter 13 for full details on these windows.
| Note | You can also run web tests from the command line. See the "Command-line Test Execution" section later in this chapter. |
Observing test execution and results
When the test run is started, a window specific to that web test execution will appear. If you are executing your web test from the Web Test Editor window, you will need to click the Run button in this window to launch the test. The results will automatically be displayed, as shown in Figure 15-7. You may also choose to step through the web test, one request at a time, by choosing Run Test (Pause Before Starting), available via the drop-down arrow attached to the Run button.
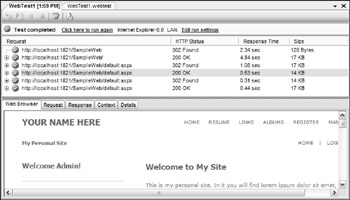
Figure 15-7
Note that if you choose to run your web tests from Test View or Test Manager, the results will be summarized in the Test Results window, docked at the bottom of the screen. To see each web test's execution details, as shown in Figure 15-7, double-click on the web test's entry in the Test Results window.
This window displays the results of all interactions with the web application. A toolbar, the overall test status, and two hyperlinked options are shown at the top. The first will rerun the web test and the second allows you to change the browser type and network settings via the Web Test Run Settings dialog.
| Note | Changes made in this dialog will only affect the next run of the web test and will not be saved for later runs. To make permanent changes, modify the web test's run configuration using Test |
Below that, each of the requests sent to the application are shown. You can expand each top-level request to see its dependent requests. These are automatically handled by the web test system and can include calls to retrieve graphics, script sources, cascading stylesheets, and more.
Each item in this list shows the request target as well as the response's status, time, and size. A green check indicates a successful request and response, whereas a red icon indicates failure.
| Note | Identifying which requests failed and why can be difficult if you have a large number of requests. Unfortunately, there is no summary view to see only failed requests with the reason for failure (for example, violating a validation rule). For large web tests, you will need to scroll through all of the requests and open failed requests to see failure details. |
The lower half of the window enables you to see full details for each request. The first tab, Web Browser, shows you the rendered version of the response. As you can see in Figure 15-7, the response includes "Welcome Admin!" text, indicating that you successfully logged in as the Admin account.
The Request tab shows the details of what was supplied to the web application, including all headers and any request body, such as might be present when an HTTP POST is made.
Similarly, the Response tab shows all headers and the body of the response sent back from the web application. Unlike the Web Browser tab, this detail is shown textually, even when binary data such as an image is returned.
The Context tab lists all of the context parameters and their values at the time of the selected request. Finally, the Details tab shows the status of any assigned validation and extraction rules. This tab also shows details about any exception thrown during that request. We describe context parameters and rules later in this chapter.
Editing a web test
You'll often find that a recorded web test is not sufficient to fully test your application's functionality. You can use the Web Test Editor, as shown in Figure 15-4, to further customize a web test, adding comments, extraction rules, data sources, and other properties.
| Important | We recommend that you run a recorded web test once before attempting to edit it. This will verify that the test was recorded correctly. If you don't do this, you might not know whether a test is failing because it wasn't recorded correctly or because you introduced a bug through changes in the Web Test Editor. |
Setting request properties
Right-click on a request and choose Properties. If the Properties window is already displayed, simply selecting a request will show its properties. You will be able to modify settings such as cache control, target URL, and whether the request automatically follows redirects.
The Properties window also offers a chance to modify the think time of each request. For example, perhaps a co-worker dropped by with a question while you were recording your web test and you forgot to pause the recording. Use the Think Time property to adjust the delay to a more realistic value.
Adding comments
Comments are useful for identifying the actions of a particular section of a web test. In addition, when converting your web test to a coded web test, your comments will be preserved in code.
Because the requests in our example all refer to the same page, it is helpful to add comments to help distinguish them. Add a comment by right-clicking on the first request and choosing Insert Comment. Enter Initial site request as the comment text. Add comments to the other two requests, such as Login as Admin and Logout.
Adding transactions
A transaction is used to monitor a group of logically connected steps in your web test. A transaction can be tracked as a unit, giving details such as number of times invoked, request time, and total elapsed time.
| Note | Don't confuse web test transactions with database transactions. While both are used for grouping actions, database transactions offer additional features beyond those of web test transactions. |
To create a transaction, right-click a request and select Insert Transaction. You will be prompted to name the transaction and select the start and end request from drop-down lists.
Transactions are primarily used when running web tests under load with a load test. You will learn more about viewing transaction details in the "Viewing and interpreting load test results" section later in this chapter.
Extraction rules and context parameters
Extraction rules are used to retrieve specific data from a web response. This data is stored in special parameters, called context parameters, that live for the duration of the web test. Context parameters can be read from and written to by any request in a web test. For example, you could use an extraction rule to retrieve an order confirmation number, storing that in a context parameter. Then, subsequent steps in the test could access that order number, using it for verification or supplying it with later web requests.
| Note | Context parameters are similar in concept to the HttpContext.Items collection from ASP.NET. In both cases, you can add names and values that can be accessed by any subsequent step. Whereas HttpContext.Items entries are valid for the duration of a single page request, web test context parameters are accessible through a single web test run. |
Referring to Figure 15-4, notice that the first request has an ExtractHiddenFields entry under Extraction Rules. This was added automatically when we recorded our web test because the system recognized hidden fields in the first form we accessed. Those hidden fields are now available to subsequent requests via context parameters.
A number of context parameters are set automatically when you run a web test, including the following:
-
$TestDir: The working directory of the web test.
-
$WebTestIteration: The current run number. For example, this would be useful if you selected more than one run in the Test Run Settings and needed to differentiate the test runs.
-
$ControllerName and $AgentName: Machine identifiers used when remotely executing web tests. You'll learn more about this subject later in the chapter.
A significant limitation of web test contexts is that they cannot be shared between web tests. For example, you may have several web tests, each of which performs a common action on your site, such as "Create new user," "Log user in," and "Delete user account." Ideally, you would like to have the ID of the user created in the first web test automatically flow into the context of the "Log in user" web test. Unfortunately, this is not supported, even if you wrap the web tests with an ordered test. The suggested workaround for this is to convert the web tests to coded web tests, and then use a controlling coded web test to launch each of the web tests, enabling them to access the context of the previous tests.
To add an extraction rule to a web test, right-click on any request and select Add Extraction Rule. The dialog shown in Figure 15-8 will appear.
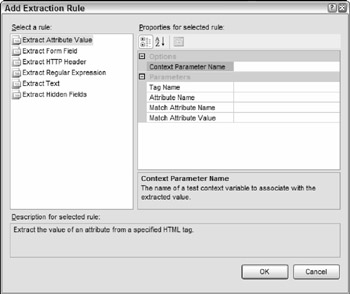
Figure 15-8
The built-in extraction rules can be used to extract any attribute, HTTP header, or response text. Use ExtractRegularExpression to retrieve data that matches the supplied expression. Use ExtractHiddenFields to easily find and return a value contained in a hidden form field of a response. Extracted values are stored in context parameters whose names you define in the properties of each rule.
You can add your own custom extraction rules by creating classes that derive from the ExtractionRule class found in the Microsoft.VisualStudio.TestTools.WebTesting namespace.
Validation rules
Generally, checking for valid web application behavior involves more than just getting a response from the server. You need to ensure that the content and behavior of that response is correct. Validation rules offer a way to verify that those requirements are met. For example, you may wish to verify that specific text appears on a page after an action, such as adding an item to a shopping cart. Validation rules are attached to a specific request and will cause that request to show as failed if the requirement is not satisfied.
Let's add a validation rule to our test to ensure that the welcome message is displayed after we log in. Right-click on the second request and choose Add Validation Rule. You will see the dialog shown in Figure 15-9.
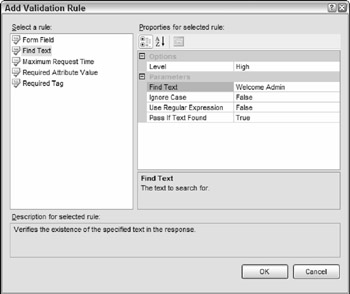
Figure 15-9
As with extraction rules, you can also create your own custom validation rules, by inheriting from the base ValidationRule class, found in the WebTestFramework assembly, and have them appear in this dialog. Choose the Find Text rule and set the value Welcome Admin to the Find Text parameter. Set Ignore Case to false, and Pass If Text Found to true. This rule will search the web application's response for a case-sensitive match on that text and will pass if found. Click OK and the web test should appear as shown in Figure 15-10.
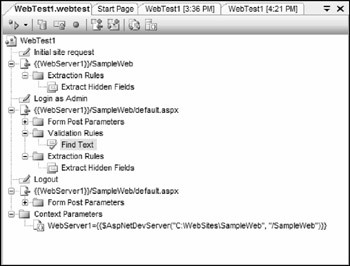
Figure 15-10
Verify that this works by running or stepping through the web test. You should see that this test actually does not work as expected. You can use the details from the web test's results to find out why.
View the Details tab for the second request. You'll see that the Find Text validation rule failed to find a match. Looking at the text of the response on the Response tab shows that instead of "Welcome Admin" being returned, there is a tab instead of a space between the words. You will need to modify the validation rule to match this text.
To fix this, you could simply replace the space in the Find Text parameter with a tab. However, you could use a regular expression as well. First, change the Find Text parameter to Welcome\s+Admin. This indicates you expect any whitespace characters between the words, not just a space character. To enable that property to behave as a regular expression, set the Use Regular Expression parameter to true.
Save your web test and rerun it. The web test should now pass.
The functionality that extraction and validation rules provide comes at the expense of performance. If you wish to call your web test from a load test, you might wish to improve performance at the expense of ignoring a number of extraction or validation rules.
Each rule has an associated property called Level. This can be set to Low, Medium, or High. When you create a load test, you can similarly specify a Validation Level of Low, Medium, or High. This setting specifies the maximum level of rule that will be executed when the load test runs. (Note that this means High level rules are run in fewer cases than Low and Medium rules.) For example, a validation level of Medium will run rules with a level of Low or Medium, but will exclude rules marked as High.
Data-driven web tests
You can satisfy many testing scenarios using the techniques described so far, but you can go beyond those techniques to easily create data-driven web tests. A data-driven web test connects to a data source and retrieves a set of data. Pieces of that data can be used in place of static settings for each request.
For example, in your web test, you may wish to ensure that the login and logout processes work equally well for all of the configured users. You'll learn how to do this next.
Configuring a data source
The first step in creating a data-driven web test is to define a data source. Using the Web Test Editor, you can either right-click on the top node of your web test and select Add Data Source or click the Add Data Source button on the toolbar.
Configure the connection to your data source. Be certain to use the Test Connection option to verify your connection before continuing. Once the connection is established, you will be prompted to select one or more tables or views from the source. When the data source is added, you will see it at the bottom of your web test in the Web Test Editor.
Expand the data source to see the selected table(s). Click on a table and view the Properties window. Notice that one of the settings is Access Method. This has three valid settings:
-
Sequential: Reads each record in first-to-last order from the source. This will loop back to the first record and continue reading if the test uses more iterations than the source has records.
-
Random: Reads each record randomly from the source and, like sequential access, will continue reading as long as necessary.
-
Unique: Reads each record in first-to-last order, but will do so only once.
Use this setting to determine how the data source will feed rows to the web test.
Binding to a source
Several types of values can be bound to a data source, including form post and URL query parameters' names and values, HTTP headers, and file upload field names. To bind a name or value to a data source, select the item in the Web Test Editor and view the Properties window. Click the appropriate setting and then click on the down arrow that appears in the box.
You will then see the data binding selector, as shown in Figure 15-11.
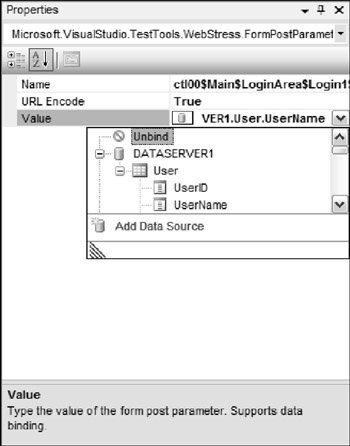
Figure 15-11
Expand the desired data source, choose the correct table or view, and then click on the column you wish to bind to the current property. A database icon will appear in that property indicating that it is a bound value. You can select the Unbind entry to remove any established data binding.
| Note | Binding to the results of stored procedures is not supported for web tests. |
Before you run your web test, you need to indicate that you want to run the test one time per row of data in the data source. Refer back to the Configuring Web Test Run Settings section and Figure 15-6. In the web tests section of your test run settings, choose the "One run per data source row" option of the "Number of playback runs" panel.
The next time you run your web test, it will automatically read from the target data source, supplying the bound fields with data. The test will repeat one time for each row of data in the source.
Coded web tests
As flexible as web tests are, there may be times when you need more control over the actions that are taken. Web tests are stored as XML files with .webtest extensions. Team System uses this XML to generate the code that is executed when the web test is run. You can tap into this process by creating a coded web test, enabling you to execute a test from code instead of from XML. Coded web tests enable you to perform actions not possible with a standard web test. For example, you can perform looping and branching. Essentially, a coded web test is limited only by your ability to write code. The language of the generated code is determined by the language of the test project that contains the source web test.
A coded web test is a class that inherits from either a base WebTest class for C# tests or from a ThreadedWebTest base for Visual Basic tests. These classes can be found in the Microsoft.VisualStudio.TestTools.WebTesting namespace. All of the features available to web tests that you create via the IDE are implemented in classes and methods contained in that namespace.
| Note | While you always have the option to create a coded web test by hand, the most common, and the recommended, method is to generate a coded web test from a web test that was recorded with the Web Test Recorder and then customize the code as needed. |
You should familiarize yourself with coded web tests by creating a number of different sample web tests through the IDE and generating coded web tests from them to learn how various web test actions are accomplished with code.
Using the example web test, click the Generate Code button (the next to last button on the Web Test Editor toolbar). You will be prompted to name the generated file. Open the generated file and review the generated code.
Here is a segment of the C# code that was generated from our web test (some calls have been removed for simplicity):
public override IEnumerator<WebTestRequest= GetRequestEnumerator() { // Initial site request ... yield return request1; // Login as Admin WebTestRequest request2 = new WebTestRequest ((this.Context["WebServer1"].ToString() + "/SampleWeb/default.aspx")); request2.ThinkTime = 10; request2.Method = "POST" FormPostHttpBody request2Body = new FormPostHttpBody(); request2Body.FormPostParameters.Add("ctl00$Main$LoginArea$Login1$UserName", "Admin"); request2Body.FormPostParameters.Add("ctl00$Main$LoginArea$Login1$Password", "@qwerty@"); request2.Body = request2Body; if ((this.Context.ValidationLevel >= Microsoft.VisualStudio.TestTools.WebTesting.ValidationLevel.High)) { ValidationRuleFindText rule2 = new ValidationRuleFindText(); rule2.FindText = "Welcome\\s+Admin"; rule2.IgnoreCase = false; rule2.UseRegularExpression = true; rule2.PassIfTextFound = true; request2.ValidateResponse += new EventHandler<ValidationEventArgs=(rule2.Validate); } ExtractHiddenFields rule3 = new ExtractHiddenFields(); rule3.ContextParameterName = "1"; request2.ExtractValues += new EventHandler<ExtractionEventArgs=(rule3.Extract); yield return request2; // Logout ... yield return request3; } This GetRequestEnumerator method uses the yield statement to provide WebTestRequest instances, one per HTTP request, back to the web test system.
Visual Basic test projects generate slightly different code than C# tests because Visual Basic does not currently support iterators and the yield statement. Instead of having a GetRequestEnumerator method that yields WebTestRequest instances one at a time, there is a Run subroutine that uses the base ThreadedWebTest.Send method to execute each request.
Regardless of the language used, notice that the methods and properties are very similar to what you have already seen when creating and editing web tests in the Web Test Editor. You'll also notice that the comments you added in the Web Test Editor appear as comments in the code, making it very easy to identify where each request begins.
Taking a closer look, you see that the Find Text validation rule you added earlier is now specified with code. First, the code checks the ValidationLevel context parameter to verify that you're including rules marked with a level of High. If so, the ValidationRuleFindText class is instantiated and the parameters you specified in the IDE are now set as properties of that instance. Finally, the instance's Validate method is registered with the request's ValidateResponse event, ensuring that the validator will execute at the appropriate time.
You can make any changes you wish and simply save the code file and rebuild. Your coded web test will automatically appear alongside your other tests in Test Manager and Test View.
| Note | Another advantage of coded web tests is protocol support. While normal web tests can support both HTTP and HTTPS, they cannot use alternative protocols. A coded web test can be used for other protocols, such as FTP. |
For detailed descriptions of the classes and members available to you in the WebTesting namespace, see Team System's Help under "Team Test API" and "Microsoft.VisualStudio.TestTools.WebTesting Namespace."
EAN: 2147483647
Pages: 220