9.11 Recovering deleted messages and mailboxes from backup media
|
| < Day Day Up > |
|
Sometimes users delete important messages (or their entire mailbox). Subsequently, they may come to you to recover the deleted items from the backup media. Unfortunately, retrieving a single mailbox or a single message is not a simple process. Thankfully, there are often ways to avoid having to recover the data from the backup media.
When an Outlook user deletes a message, the message is moved into the user's Deleted Items folder. Often, the user can recover the missing items by looking in this folder. Even after the Deleted Items folder has been emptied, it may be possible to recover the deleted items without using the backup media. You can configure Exchange 2003 so that it does not immediately delete mail or mailboxes for a specified number of days. This period is known as the deleted item retention period, and you can tailor the duration to meet the needs of your organization. If the missing item was deleted within the deleted item retention period, the user can recover the item without your assistance. Most requests to restore user mailboxes or individual messages can be avoided if users are familiar with the Deleted Items folder and the deleted item retention period.
Before Exchange 2003, restoring a mailbox or a single message from backup media required that you restore the Information Store to a different Exchange server to avoid affecting other users on the production Exchange server. Exchange 2003 makes this process much easier. The procedure for Exchange 2003 uses the following major steps:
-
Create a Recovery Storage Group (RSG).
-
Enable the RSG.
-
Restore the backed up database into the RSG.
-
Extract selected messages from the recovered database.
-
Merge the recovered messages into the production database.
The details for these major steps are described in the following sections.
Create Recovery Storage Group
-
Start ESM from the Windows Start menu by selecting All Programs →Microsoft Exchange →System Manager.
Note By default, administrative groups and routing groups are not displayed. If you have not already enabled these, right-click on the Exchange organization and select Properties to display the organizational properties. Select the Display administrative groups check box to allow the administrative groups to be displayed, and select the Display routing groups check box to display the routing groups. You must restart ESM after enabling display of administrative groups and routing groups.
-
Expand the Administrative Groups section.
-
Expand the administrative group (e.g., First Administrative Group) that contains the server where the deleted mailbox was located.
-
Expand the Servers section.
-
Right-click on the server where the deleted mailbox was located and select New →Recovery Storage Group. The RSG is a new feature with Exchange 2003. The RSG is simply a storage group that provides a context within the production Exchange organization for recovering individual items (e.g., mailboxes, folders, messages) or entire databases from backup media. You can create one RSG on each server, even for those servers that already have the maximum four storage groups. Because of the RSG, you no longer need a separate recovery server.
-
In the RSG Properties dialog box (Figure 9.25), select OK to create the RSG.

Figure 9.25: Recovery Storage Group Properties
Enable Recovery Storage Group
-
To use the RSG, you must enable an Exchange database that will be associated with the RSG. To enable the RSG, right-click on the newly created RSG in ESM and select Add Database to Recover.
-
You can only use the RSG to recover the database you associate with the RSG. In the Select database to recover dialog box (Figure 9.26), select the database to be recovered and then select OK. ESM will display the Mailbox Store Properties dialog box (Figure 9.27).
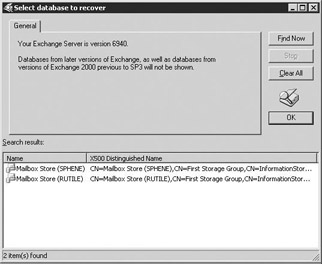
Figure 9.26: Select Database to Recover dialog box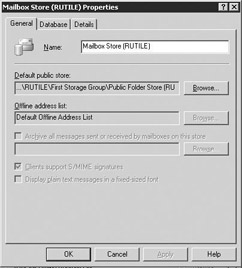
Figure 9.27: Mailbox Store Properties dialog box -
Select OK in the database properties dialog box. ESM will list the unmounted database under the RSG (Figure 9.28).
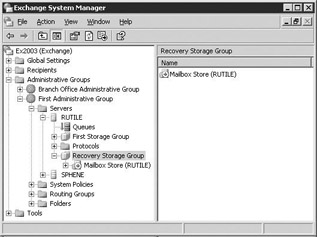
Figure 9.28: Unmounted recovery database -
Right-click on the newly created unmounted database and select Properties. Select the Database tab (Figure 9.29).
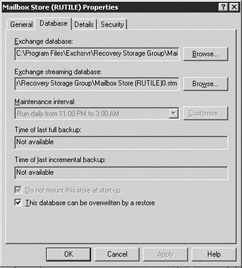
Figure 9.29: Mailbox Store Properties - Database tab -
On the Database tab, select the This database can be overwritten by a restore check box and then select OK.
Restore backed up database into Recovery Storage Group
-
From the Windows Start menu, select All Programs →Accessories →System Tools →Backup. On the Backup or Restore Wizard welcome window, select the Advanced Mode hyperlink to start the Backup Utility.
Note If you clear the Always start in wizard mode check box, you can avoid the Welcome to the Backup or Restore Wizard window in the future by going directly to the Backup Utility.
-
In the Backup Utility window, select the Restore and Manage Media tab (Figure 9.30).
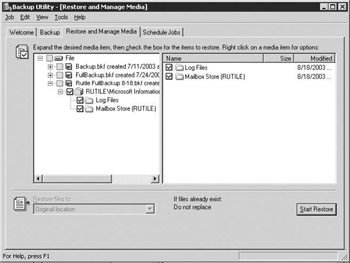
Figure 9.30: Backup Utility - Restore and Manage Media tab -
On the Restore and Manage Media tab, double-click the backup file containing the files you want to restore. Use the check boxes to select the data that you want to restore.
-
Select Start Restore to display the Restoring Database Store dialog box (Figure 9.31).
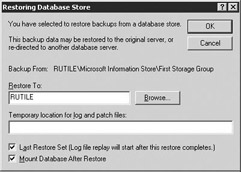
Figure 9.31: Restoring Database Store dialog box -
Enter a directory name in the Temporary location for log and patch files field. This directory should be different from the one where the original log files are stored and should have sufficient disk space to store the files. During the restore process, Exchange will first apply the older transactions logs from the temporary directory and then apply the more recent logs from the original location.
You will notice that the recovery procedure does not ask where it should restore the backup files. When you have enabled the RSG, the recovery process always restores backups to the databases located in the RSG. To restore directly to a production database, you have to delete the RSG or set an undocumented registry key to bypass the RSG.
-
The recovery procedure replays the transaction logs once all files have been written back to disk. Select the Last Restore Set check box and the Mount Database After Restore check box if any of the following conditions apply:
-
You are restoring from a normal (full) backup without any incremental or differential backups.
-
You are restoring from the final incremental backup.
-
You are restoring from the final differential backup.
-
-
Select OK to begin restoring the database. The recovery process will copy the database from the backup media.
-
When you restart ESM, you can expand the RSG and the recovered database to view the mailboxes (Figure 9.32). Verify the contents of the restored database.
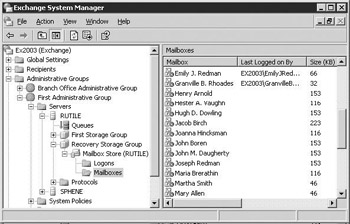
Figure 9.32: Recovered database
Extract selected messages from recovered database
-
Start the Exchange Mailbox Merge Wizard (ExMerge.exe). ExMerge allows you to extract data from mailboxes in one Exchange database and then merge the extracted data into mailboxes in another Exchange database. When combined with the Exchange 2003 RSG and backup tapes, ExMerge allows you to recover data, such as deleted messages or deleted mailboxes, that are no longer in your deleted item recovery area. ExMerge can use a significant percentage of the processor; therefore, whenever possible, you should avoid running ExMerge on production Exchange servers.
Note ExMerge.exe is located in the \support\utils\i386\ directory on the Exchange 2003 CD. You must copy Exmerge.exe and Exmerge.ini to the C:\Program Files\exchsrvr\BIN folder.
-
In the ExMerge welcome window, select Next to continue.
-
In the Procedure Selection window (Figure 9.33), select Extract or Import (Two Step Procedure) and then select Next. The two-step procedure creates intermediate personal stores (.PST files) in the first step and then merges the .PST file data into the destination production store during the second step.
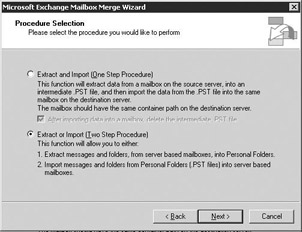
Figure 9.33: Exchange Mailbox Merge Wizard - Procedure Selection -
In the Two Step Procedure window (Figure 9.34), you can select to extract data to Personal Folders or to import data from Personal Folders. Select Step 1: Extract data from an Exchange Server Mailbox and then select Next.
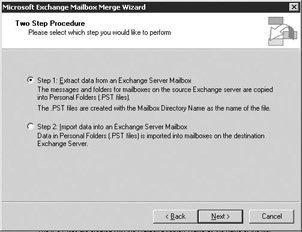
Figure 9.34: Exchange Mailbox Merge Wizard - Two Step Procedure -
In the Source Server window (Figure 9.35), enter the name of the Exchange server from which you want to extract data. You also can specify an Active Directory DC and a port number to use for LDAP queries. If you do not specify a DC, ExMerge will use the first available DC. If you do not specify a port number, ExMerge will use port 389. ExMerge will use the DC to extract a list of storage groups and databases available on the Exchange server.
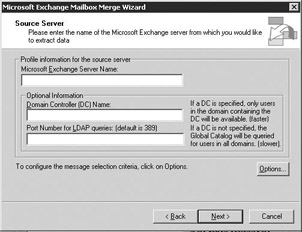
Figure 9.35: Exchange Mailbox Merge Wizard - Source Server -
Select Options to display the Data Selection Criteria window. You can use the five tabs on the Data Selection Criteria window to specify the criteria ExMerge will use to select the data that should be extracted from the source store.
-
Data tab On the Data tab (Figure 9.36), you can select the types of data to be extracted from the source store. You can select any combination of the following options:

Figure 9.36: Data Selection Criteria - Data tab-
User messages and folders. Select this check box to extract all types of messages, including e-mail messages, contacts, appointments, tasks, notes, and journal items. This is the default option.
-
Associated folder messages. Select this check box to extract associated messages in user folders. Associated messages are special, hidden messages that are used to store user settings, such as folder rules and folder views.
-
Folder permissions. Select this check box to extract folder permissions. If you select this check box, all existing permissions on the target store will be replaced by the permissions from the source store. This option is most useful when extracting data from a backup and importing it into a server in the original site.
-
Items from Dumpster. Select this check box to extract data from the deleted item recovery area-commonly referred to as the dumpster. Even after a user empties the Deleted Items folder, it may be possible to recover the deleted items without using the backup media. You can configure Exchange so it does not immediately delete mail or mailboxes for a specified number of days. This period is known as the deleted item retention period, and you can tailor the duration to meet the needs of your organization. If the missing item was deleted within the deleted item retention period, the user can recover the item from the deleted item recovery area without your assistance. The Items from Dumpster check box only extracts messages that were deleted from the Deleted Items folder. If a user permanently deleted messages from other folders, ExMerge cannot extract them from the deleted item recovery area.
-
-
Folders tab On the Folders tab (Figure 9.37), you can specify the set of folders for ExMerge to process or to ignore. ExMerge matches folders on the basis of an exact character match rather than folder type. For example, if you select the '\Inbox' folder, ExMerge will not match inbox folders in other languages or inbox folders that you have renamed. If you select the Apply action to sub folders of the selected folders check box, ExMerge will ignore subfolders whenever you have told ExMerge to ignore the parent folder and will process subfolders whenever you have told ExMerge to process the parent folder.
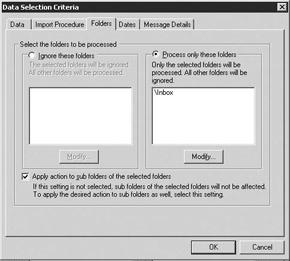
Figure 9.37: Data Selection Criteria - Folders tab -
Dates tab On the Dates tab (Figure 9.38), you can specify that you want ExMerge to select items from the source store on the basis of the delivery or modification date. ExMerge will ignore any messages that do not fall within the date range you specify. Specifying date selection criteria when importing .PST files into the target store will cause the import process to fail. To extract and import items that have a specific date range, you must enter the date range selection criteria when exporting items from the source store and then omit the date range selection criteria when importing the extracted .PST files into the target store. If you specify a range of dates for selection criteria, you also can select Delivery Time or Last Modification Time to specify the date attribute ExMerge should compare.

Figure 9.38: Data Selection Criteria - Dates tabNote If you selected the Items from Dumpster check box on the Data tab, ExMerge will ignore the range of dates when extracting items from the dumpster.
-
Message Details tab On the Message Details tab (Figure 9.39), you can specify that you only want ExMerge to select messages that include certain attachments, have a certain text string in the subject line, or both. Specifying message details criteria when importing .PST files into the target store will cause the import process to fail. To extract and import items that have a specific subject line or attachment, you must enter the message details criteria when exporting items from the source store and then omit the criteria when importing the extracted .PST files into the target store. You can use the Subject string compare criteria dropdown list and the Attachment name string compare criteria drop-down list to select how ExMerge will perform string comparison. The options are as follows:
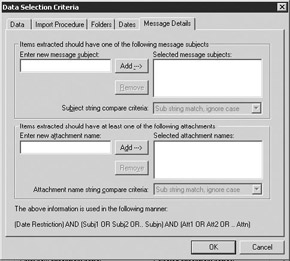
Figure 9.39: Data Selection Criteria - Message Details tab-
Substring match, ignore case. ExMerge will look for items that have the specified text string within the subject line or attachment names. The comparison will be sensitive to case.
-
Full-string match, ignore case. ExMerge will look for items that contain the entire specified text string. The comparison will not be sensitive to case.
-
Exact match. ExMerge will look for items that contain the entire specified text string. The comparison will be sensitive to case.
-
-
When you have entered your data selection criteria, select OK to return to the Source Server window (see Figure 9.35). In the Source Server window, select Next to continue.
-
ExMerge will query the Active Directory DC to extract a list of storage groups and databases available on the Exchange server and will display the database selection options on the Database Selection window (Figure 9.40). To extract items recovered from backup tapes, select one or more databases from the RSG. Select Next to continue.
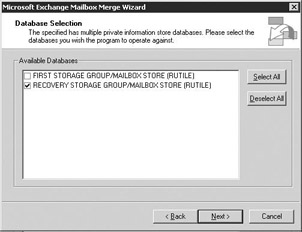
Figure 9.40: Exchange Mailbox Merge Wizard - Database Selection -
ExMerge collects the list of mailboxes from the selected source databases and displays the list on the Mailbox Selection window ( Figure 9.41). The mailbox size is a rough estimate; the actual size might be greater than the displayed size, especially if you are extracting data from the dumpster. Select the mailboxes from which ExMerge should extract data and then select Next to continue.
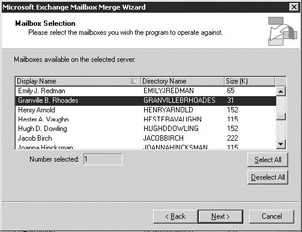
Figure 9.41: Exchange Mailbox Merge Wizard - Mailbox Selection -
In the Locale Selection window, select the locale that ExMerge should use when connecting to a mailbox. Specifying the locale allows ExMerge to work with any supported language mailbox. ExMerge extracts data from the source mailbox using the locale with which the source mailbox was created. When importing data into the destination mailbox, the locale controls the language in which the mailbox folders will be created. Select Next to continue.
-
In the Target Directory window (Figure 9.42), select the folder where you would like ExMerge to store .PST files containing the extracted data. The Required field shows the estimated amount of free disk space that is required to hold the extracted .PST files. However, this is just a rough estimate, and if you have specified any selection criteria (e.g., date ranges, folders, subject line, or attachment name), ExMerge will not display any estimate because it cannot calculate the required space before examining each mailbox. ExMerge will create a separate .PST file for each selected mailbox. The names of the .PST files will be MailboxDirectoryName .PST. Select Next to continue.
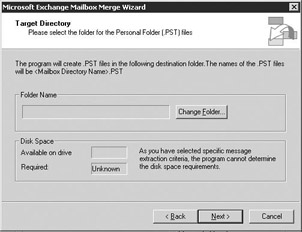
Figure 9.42: Exchange Mailbox Merge Wizard - Target Directory -
In the Save Settings window, you can save all of your program settings so that you can run ExMerge in batch mode at a later time. Select Next to begin the mailbox extraction process. ExMerge will display a Process Status window showing the status of the extraction.
-
When ExMerge is finished, select Finish in the Process Status window. ExMerge creates (or appends to) a log file containing any errors and messages indicating the progress of the current operation. By default, this log file is named ExMerge.log and is created in the same directory as the ExMerge.exe file.
Merge recovered messages into production database
| Note | The user running the following ExMerge procedure must have Send As and Receive As rights for the target mailboxes. |
-
Start ExMerge. In the ExMerge welcome window, select Next to continue.
-
In the Procedure Selection window (see Figure 9.33), select Extract or Import (Two Step Procedure) and then select Next.
-
In the Two Step Procedure window (see Figure 9.34), select Step 2: Import data into an Exchange Server Mailbox and then select Next.
-
In the Destination Server window (Figure 9.43), enter the name of the destination Exchange server. You also can specify an Active Directory DC and a port number to use for LDAP queries. If you do not specify a DC, ExMerge will use the first available DC. If you do not specify a port number, ExMerge will use port 389. ExMerge will use the DC to extract a list of storage groups and databases available on the destination Exchange server.
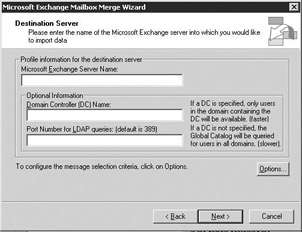
Figure 9.43: Exchange Mailbox Merge Wizard - Destination Server -
Select Options to display the Data Selection Criteria window. ExMerge lists the same five tabs on the Data Selection Criteria window that were available to specify the criteria that ExMerge used to select the extracted data from the source store. However, when importing data to a destination server, you should only use the Import Procedure tab. You use the Data, Folders, Dates, and Message Details tabs to specify the selection criteria (e.g., date ranges, folders, subject line, or attachment name) for extracting messages from the source store. To import items that have specific selection criteria, you must enter the selection criteria when exporting items from the source store and then omit the selection criteria when importing the extracted .PST files into the target store.
-
Import Procedure tab On the Import Procedure tab (Figure 9.44), you can select how ExMerge should add items to the target store. You can select any one of the following options:
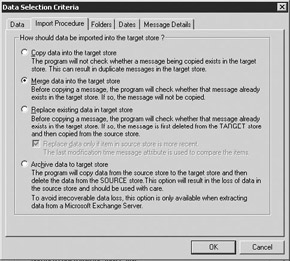
Figure 9.44: Data Selection Criteria - Import Procedure tab-
Copy data into the target store. Select this option to copy each item from the .PST file into the target store without checking whether the item already exists in the target store. Because this option can result in duplicate messages in the target store, you should use this option only if you are certain that the target store does not contain any of the messages in the .PST file.
-
Merge data into the target store. Select this option to merge .PST data into the target store. ExMerge will check whether an item already exists in the target database before copying the item from the .PST file. This is the default (and preferred) option because it avoids creating duplicate messages.
-
Replace existing data in target store. Select this option to overwrite any existing items in the target store. When ExMerge finds a duplicate item in the target store, it will delete the item and then copy the new item from the .PST file. This option can result in data loss if the items in the target store have been modified and are different from those in the .PST file. To avoid this potential problem, you can select the Replace data only if item in source store is more recent check box. If you select this check box, ExMerge will compare the last modified time for the duplicate items before replacing the item that already exists in the target store. ExMerge will overwrite the item in the target store only if the copy of the item in the .PST has been more recently modified.
-
-
When you have entered your import procedure options, select OK to return to the Destination Server window (see Figure 9.43). In the Destination Server window, select Next to continue.
-
ExMerge collects the list of mailboxes available on the destination Exchange server and displays the list on the Mailbox Selection window (Figure 9.45). Select the mailboxes into which ExMerge should merge data and then select Next to continue.
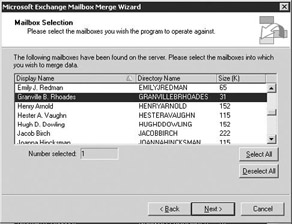
Figure 9.45: Exchange Mailbox Merge Wizard - Mailbox Selection -
In the Locale Selection window, select the locale that ExMerge should use when connecting to a mailbox. Select Next to continue.
-
In the Target Directory window (see Figure 9.42), select the folder where you told ExMerge to store the .PST files containing the extracted messages. Select Next to continue.
-
In the Save Settings window, you can save all of your program settings so that you can run ExMerge in batch mode at a later time. Select Next to begin the mailbox merge process. ExMerge will display a Process Status window showing the status of the merge.
-
When ExMerge is finished, select Finish in the Process Status window.
|
| < Day Day Up > |
|
EAN: 2147483647
Pages: 128