8.1 Managing recipient policies
 | ||||||||
| Chapter 8 - Addresses, Address Lists, and Offline Address Lists | |
| Monitoring and Managing Microsoft Exchange 2000 Server | |
| by Mike Daugherty | |
| Digital Press 2001 | |
| |
8.3 Managing details templates
When an Outlook user selects a user from an address list and requests to see the properties of the address list entry, Outlook displays a dialog box that includes the users name , address, department, phone numbers , e-mail addresses, and so on. Exchange 2000 details templates define the appearance and content of this dialog box.
There are actually several different details templates because address lists can contain several different types of objects. Exchange 2000 provides the following details templates:
-
User
-
Group
-
Public Folder
-
Search Dialog
-
Mailbox Agent
-
Contact
-
Exchange Send Options
Since Exchange 2000 supports multiple foreign languages, there are copies of these details templates for several languages.
These details templates can be modified to meet your corporate requirements. You can change the appearance of the dialog boxes that users will see, and you can add or delete fields from the resulting dialog boxes. The appearance and content is defined by template controls. Each label, field, check box, list, tab, and drop-down list contained in the dialog box has its own template control. You can modify the details template by changing, adding, or removing these template controls.
8.3.1 Modifying a details template
You can modify the details template by changing, adding, or removing these template controls. You can use the following procedure to modify a details template:
-
Start the System Manager from the Windows 2000 Start menu by selecting Programs Microsoft Exchange System Manager.
-
Expand the Recipients and the Details Templates sections. This will display the language list.
-
Select the language containing the template you want to modify. The details templates for this language will be displayed in the details pane. Templates are available for user, group, public folder, search dialog, mailbox agent, contact, and Exchange send options.
-
In the details pane, right-click on the template you want to modify, and select Properties.
-
The General tab shows the name of the help file that users will see (Figure 8.31).
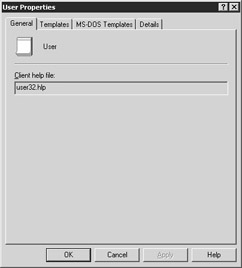
Figure 8.31: The General tab -
Select the Templates tab to modify the template controls that will be used for desktop systems using Windows 32-bit operating systems (Figure 8.32). The template controls listed on the Templates tab, describe the labels and information that will be displayed when a user selects to view the details about an entry in an address list, such as the Global Address List.
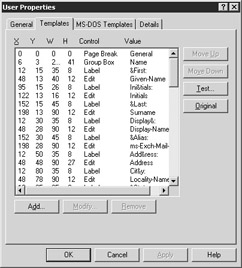
Figure 8.32: The Templates tab -
When a user selects to view the details about a recipient in the Global Address List, the user is presented with information about the selected recipient, including names , addresses, telephone numbers, etc. However, your company may be using one of the Exchange custom attributes to track employee badge numbers. This badge number information will only be displayed if you add a template control for this custom attribute to the details template. You can begin adding a template control to an existing details template by selecting the Add button to display a list of the template control types you can add.
In the Select Control Type dialog box, select the template control type you want to add, and select OK to display the Control dialog box. Each template control type has its own Control dialog box where you enter the information needed to describe your use of the template control. Table 8.2 describes the purpose of each template control type and the information you need to supply.
In the Control dialog box, enter the information needed to describe your use of the selected template control, and then select OK to return to the Properties dialog box.
Table 8.2: Template Controls Control
Description
Label
Use this control to create a label in a template. Labels are text fields that typically identify another control or field. You must supply the following information to define this control.
-
X and Y . These values specify the position of the control. The position is specified as the distance between the control and the top ( Y value), left ( X value) corner of the dialog box.
-
Width and Height . These values define the width and height of the control.
-
Text . This is the text for the label.
Edit
Use this control to create an editable field for text entry.
-
X and Y. These values specify the position of the control.
-
Width and Height . These values define the width and height of the control.
-
Field . Use this drop-down list to select the attribute that will be displayed. For example, if your company is using the first Exchange custom attribute to track employee badge numbers, you can use this control to display ms-Exch-Extension-Attribute-1 .
-
Length . This is the maximum number of characters allowed in the field.
-
Multiline . Use this check box to allow multiple lines in the field.
Page Break
Use this control to create a page break in a template. A page break causes the resulting tem- plate dialog box to contain multiple tabs. The first control in a template must be a Page Break that marks the start of the first tab.
-
Text . this text will appear on the tab.
-
Help context . Use this text box to type the help context ID for the tab.
Group Box
Use this control to group related controls and fields on the template.
-
X and Y . These values specify the position of the control.
-
Width and Height . These values define the width and height of the control.
-
Text . this text will be used for the group label.
Check Box
Use this control to create a check box that lets users turn an option on or off.
-
X and Y . These values specify the position of the control.
-
Width and Height . These values define the width and height of the control.
-
Field . Use this drop-down list to select the attribute that will be used to determine the initial (on/off) value for the check box.
-
Text . this text will be used for the check box label.
List Box
Use this control to create a list box for showing multiple values. For example, the list box control is used to display a users direct reports .
-
X and Y . These values specify the position of the control.
-
Width and Height . These values define the width and height of the control.
-
Field . Use this drop-down list to select the attribute that will be displayed in the field.
-
Display horizontal scroll bar . Use this check box to insert a horizontal scroll bar in the list box.
-
Display vertical scroll bar . Use this check box to insert a vertical scroll bar in the list box.
Multi-Valued List Box
Use this control to configure a multi-valued list box. For example, this control is used to display a users e-mail addresses.
-
X and Y . These values specify the position of the control.
-
Width and Height . These values define the width and height of the control.
-
Field . Use this drop-down list to select the attribute that will be displayed in the field.
Multi-Valued Drop Down
Use this control to create a multi-valued drop-down list.
-
X Y and . These values specify the position of the control.
-
Width and Height. These values define the width and height of the control.
-
Field. Use this drop-down list to select the attribute that will be displayed in the field.
-
-
To edit an existing template control, select the control you want to edit, and then select Modify to display the Edit Control dialog box.
In the Control dialog box, change the values and select different options for the control type you selected. Then select OK to return to the Properties dialog box.
-
To remove a details template control that is no longer needed, select the control and then select the Remove button.
-
The template controls listed on the Templates tab, describe the labels and information that control the appearance of the dialog box that will be displayed when a user selects to view the details about an entry in an address list, such as the Global Address List. For the most part, the order that the template controls are listed on the Templates tab is independent of the template controls position on the resulting address list details dialog box since all of the controls (except the Page Break) control have their own positioning information. The one exception to this position-independence is that all template controls that are to appear on a given tab must be listed after the Page Break control that identifies the beginning on the controls for that tab. Therefore, for the most part, the only reason for arranging the template controls in a specific order is to organize them in a logical order that makes it easier for you, the administrator, to find them. You can also change the order of a template control to move it from one tab to another.
To change the order of a details template control, select the control you want to move, and then select Move Up or Move Down.
-
Once you have added, removed, or modified the appropriate template controls, you can select the Test button to verify that your changes affect the appearance of the resulting dialog box as you intended.
-
Changes do not always go as planned. You can easily correct simple mistakes. However, what if you corrupt a details template so badly that you cannot easily correct the mistakes? In a case such as this, the easiest way to recover may be to select the Original button to revert to the original details template that was created when you first installed Exchange 2000. The Original button will permanently overwrite any changes you may have made to the template.
-
Select the MS-DOS Templates tab to modify the template controls that will be used for desktop systems using Windows 16-bit operating systems. You manage the MS-DOS Templates tab in the same way as the Templates tab.
-
Use the Administrative note field on the Details tab to enter additional information about the template.
-
Select Apply, and then select OK to modify the template.
| |
EAN: 2147483647
Pages: 113