Multipass Techniques
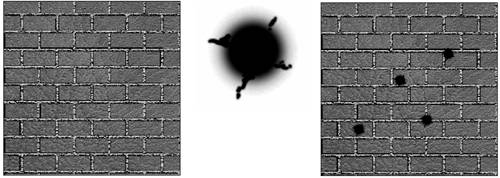
| Imagine that you want to paint a large brick wall. You use a tiled brick pattern, which gives the wall a solid look. We have already seen how to achieve this by conventional texture mapping. But a plain brick wall is not very appealing, so you decide to add the ability to represent bullet marks dynamically on the wall as the player shoots a gun at it. To achieve this effect, you initially consider having two texture maps (one of the empty wall and another one of the same wall with a bullet mark), using the appropriate one at the proper time. But this is not practical. What if the user shoots at a different location on the wall, or even worse, shoots several times? Will you end up having N texture maps for what was supposed to be a simple effect? The solution to this problem (and many others) is to multipass rendering techniques. We can use several layers of texture, which can be blended together, so the composite result looks good while keeping a reasonable memory footprint. With a multipass approach, we would only have a brick texture and a small texture map representing the bullet mark (with no bricks). You can see both maps in Figure 18.5. Figure 18.5. Bricks and bullets, showing the original map (left), the bullet mark (middle), and the composite image (right).
Then, we would paint a first layer or pass with the brick texture. After the first pass, we would add a second layer with the bullet mark texture in the right spot on the wall. We just need to be careful to blend both maps properly, so the right effect is achieved. Multipass rendering techniques are a great tool to increase the realism of scenes. Here is a list of possible uses:
Multipass rendering is, on the other hand, slower than the traditional, single-pass approach. We will be sending more geometry to the frame buffer because we will use extra texturing passes to encode special effects, so the application will suffer a significant slowdown. Coding a multipass rendering algorithm is just a bit more complex than coding a regular rendering algorithm. The key steps for an N-pass rendering block are
As an example, here is the source code to render a quad using a multipass approach in OpenGL: // set first texture glBindTexture(GL_TEXTURE_2D,layer0id); // render quad, first pass glBegin(GL_QUADS); glColor3f(1,1,1); glTexCoord(0,0); glVertex3f(-1,0,-1); glTexCoord(0,1); glVertex3f(-1,0,1); glTexCoord(1,1); glVertex3f(1,0,1); glTexCoord(1,0); glVertex3f(1,0,-1); glEnd(); // accept co-planar fragments glDepthFunc(GL_LEQUAL); // set the blending mode glEnable(GL_BLEND); glBlendFunc(GL_ONE,GL_ONE); // set second texture glBindTexture(GL_TEXTURE_2D,layer1id); // render second pass glBegin(GL_QUADS); glColor3f(1,1,1); glTexCoord(0,0); glVertex3f(-1,0,-1); glTexCoord(0,1); glVertex3f(-1,0,1); glTexCoord(1,1); glVertex3f(1,0,1); glTexCoord(1,0); glVertex3f(1,0,-1); glEnd(); glDepthFunc(GL_LESS); // return to normal depth mode glDisable(GL_BLEND); // don't need blending any more The first rendering pass of the preceding code needs no explanation. It just paints a quad with a texture map. But notice that we will be rendering the exact same quad in the second pass, using a different texture this time. That is the reason we need to change the default Z-buffer behavior. By default, a Z-buffer is modified by a fragment if (and only if) the fragment's Z-value is strictly smaller than the Z-value stored in the Z-buffer. To allow a second rendering pass, we must relax this restriction and allow a fragment if its Z-value is smaller or equal to the contents of the Z-buffer. A second item to watch out for is the blending equation. If we did not use blending, the second quad would overwrite the first quad, and all we would see would be the second texture map. To avoid this, we must use a blending function, which combines the different layers according to a blending equation. Blending equations are specified in terms of a source and destination fragment. To understand the roles of both, remember that the source fragment is painted to the destination fragment. So, in a two-pass rendering routine such as the preceding one, the source fragment is what we will paint to the frame buffer (thus, the new data will be added to the composition), whereas the destination fragment represents what is already in the frame buffer (usually, data from previous rendering passes). The blending equation specifies how the source and destination fragment will be combined together in a multipass core. Here is a general view of this equation: destination = destination * destination_factor + source * source_factor Clearly, all we need to do is provide the multiplication factors so we can compute the output value for that pixel. Multiplication factors are usually not provided directly but as a symbolic constant. Table 18.1 contains symbolic constants.
And the blending equation is specified by the following calls: OpenGL: void glBlendFunc(source_factor, destination_factor); DirectX: pd3dDevice9->SetRenderState(D3DRS_SRCBLEND, source_factor); pd3dDevice9->SetRenderState(D3DRS_DESTBLEND, destination_factor); Both APIs are absolutely equivalent in this respect, only minor syntactic differences exist. But getting blending modes right takes some practice, so here is a reminder of the most popular combinations of source and destination:
Multipass techniques can be extended to any number of passes. You can add dirt, then apply a diffuse lighting effect, and add specular highlights on top of that. But remember that performance will decrease as the number of rendered triangles increases. Additionally, note that painting geometry with blending enabled is frequently slower than without blending, so performance will decrease drastically if you don't control blending use. |
EAN: N/A
Pages: 261