Delivering Streaming Media
| As you learned from Chapter 9, "Introducing Streaming Media," streaming media solves major issues with viewing audio-video media directly from an origin server. That is, without streaming, users have to wait for the video-file downloads to complete before viewing the content in their video players. With video streaming, the client video player displays video frames directly to the user as packets arrive on the network, which is similar to standard television broadcasting. The Cisco CE can deliver Windows or RealNetworks streaming media: Note Make sure you understand the concepts from Chapter 9 before configuring on your CEs the streaming media services that you will learn about in this section. You will learn how to stream MPEG1/2/4 and Apple QuickTime in Chapter 14.
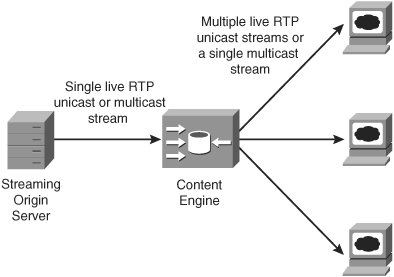
Figure 13-11 illustrates the relationship between these encoders and origin servers in the context of the streaming media components that you learned about in Figure 9-1 from Chapter 9. Figure 13-11. Windows Media Technology and Real Media Streaming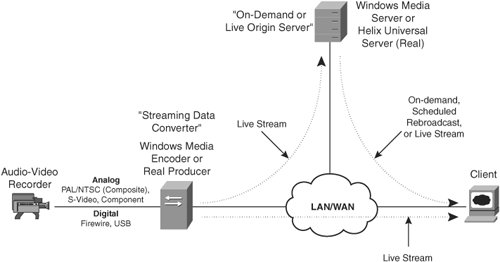 Streaming Video-on-DemandVoD is a multimedia presentation that users can request and view at their convenience. As you learned in Chapter 9, VoDs are files that are encapsulated in the specific streaming container file format of the vendor software within which you author the presentation. To stream RTSP VoDs, the Cisco CE runs an RTSP gateway to which it sends incoming RTSP requests. Upon receiving an RTSP request, the RTSP gateway selects a back-end streaming media proxy to which it will forward the request. The CE supports either the WMT or Real Media RTSP back-end proxies, as Figure 13-12 illustrates. By inspecting the browser type in the "User-agent:" header of the RTSP request and the media type of the file requested, the RTSP gateway selects a back-end proxy to which it will forward the request. Figure 13-12 illustrates an example in which a client sends an RTSP PLAY method request for an employee product training VoD called "prodtrain.rm." Figure 13-12. Video-on-Demand Streaming Using the RTSP Gateway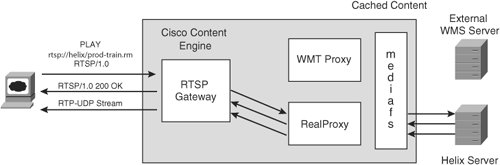 Note In Figure 13-12, you can assume that the client has already directly requested the Session Description Protocol (SDP) file or Synchronized Multimedia Integration Language (SMIL) file from the origin server by using HTTP. You learned about this process previously from Figure 9-3 in Chapter 9. Bear in mind that, if you configure HTTP web caching, the CE may also cache and serve the SDP or SMIL file to clients. Additionally, assume that the client has already issued the SETUP RTSP command through the RTSP gateway, in the same manner as the PLAY method that was shown in Figure 13-12. Note The CE can also cache MMS VoDs. MMS requests need not be processed by the RTSP Gatewaythe CE passes MMS requests directly to the WMT proxy. When a client requests an RTSP or MMS VoD, the CE first determines whether it has the entire VoD that the client requested in its media file system (mediafs). If not, the CE determines which back-end proxy to send the RTSP request to or sends the MMS request directly to the WMT proxy. In the example in Figure 13-12, an RTSP request is destined to the RealProxy back-end server. The RealProxy server then connects to the origin server and requests the streaming object on behalf of the client. The RealProxy server attempts to request the file using HTTP streaming over TCP, by specifying the HTTP protocol in the RTSP SETUP method, to ensure that the CE reliably receives the object without errors that the network may introduce. If only a partial object exists in the mediafs, the CE waits for the rest of the file before sending it to the client. In the event that a client cancels or aborts the transfer early, the CE attempts to back-fill missing content, by continuing the download from the origin server to ensure that the VoD object is available for subsequent requests. When the CE receives the entire file, it disconnects from the origin server and originates the VoD to the client itself. If the CE already has the entire file, it connects to the origin server only to determine that the file is the most up-to-date version of the presentation or to authenticate the client. The CE disconnects from the origin server immediately. In other words, with VoD streaming, there is no dependency on the origin server for delivery of the content, other than to verify the freshness of the content or when end-to-end authentication is required on the origin server. Splitting Live and Prerecorded BroadcastsAs you learned from this Chapter, CEs provide services for video streaming, content adaptation, authentication, URL filtering, and server SSL acceleration. Additionally, CEs offer stream splitting services to requesting clients for delivering scheduled live and prerecorded broadcasts from your WMS or Helix-origin servers. The CE treats live streams that you schedule on the WMS or Helix origin servers no differently from prerecorded streams. Note Prerecorded broadcasts are also known as scheduled rebroadcasts, or simply rebroadcasts. With stream splitting, a CE receives an incoming stream and fans it out to requesting clients, as Figure 13-13 illustrates. Stream splitting saves bandwidth and network resources by avoiding the origin server having to originate a single stream per user. Figure 13-13. Live and Rebroadcast Stream Splitting Note Caching of live broadcasts is not available because streaming servers do not format live streams as actual files. Alternatively, they encode the media from the source and send it in data packets directly to clients. During a live presentation, the presentation always originates from the origin server as a single stream to the incoming interface of the CE. Both front- and back-end streams can be either multicast or unicast, resulting in the four combinations of stream delivery outlined in Table 13-4.
In a unicast-to-unicast configuration, the CE receives the live or rebroadcast stream as unicast and splits it to clients as individual unicast streams. In a unicast-to-multicast configuration, the CE generates a multicast stream from the single unicast input stream and sends it to a multicast group that you can configure on your CE. As long as you enable multicast on the downstream network, as you learned in Chapter 5, "IP Multicast Content Delivery," the routers will forward the multicast group traffic to group members without duplication of the stream. For unicast-to-unicast streams, each client receives a distinct live stream causing potential duplicates of traffic streams on the network, depending on the location of the requesting clients. These first two methods in Table 13-4 are also known as pull-splitting because client requests trigger the CE to proactively "pull" the unicast stream from the origin server on behalf of the requesting clients. Instead of simply having clients request a multicast stream directly from the origin server, you can configure multicast-to-multicast as listed in Table 13-4. Multicast-to-multicast is beneficial because you can perform the value-added services on your CE that you learned about previously in this Chapter, such as content authentication, URL filtering, and ICAP services. These last two methods are known as push-splitting because the CE simply joins the upstream live multicast stream to split the stream to clients. That is, the origin server blindly "pushes" the stream to the network for the CE to receive by joining the multicast group. Streaming Windows Media TechnologyTo enable the WMT streaming server on your CE, you must purchase a separate WMT license key from Cisco. To view and accept the Cisco license agreement on your CE, enter the following commands: show wmt license-agreement config terminal wmt accept-license-agreement You can then install your WMT key onto your CE to enable WMT, by using the following command on your CE: wmt license-key licensekey To enable the WMT on your CE, use the following command: wmt enable Alternatively, you can evaluate the WMT license for 60 days, by using the command rtsp proxy media-real evaluate Now that you have a WMT license installed, you can configure either VoD or live/rebroadcast streaming. Configuring Windows Media Video on DemandYou can configure your CE to cache and stream Windows Media VoD files to your requesting clients, on behalf of the origin WMS server. To enable the WMT proxy that you learned about previously for VoD caching on your CE, you can use the following command: wmt cache enable You also learned previously how to configure your router to redirect MMS and RTSP traffic to your CE using WCCP. The CE accepts both Windows MMS and RTSP requests for content, similar to the following URLs: mms://wms.cisco.com/tac/cetraining.asf rtsp://wms.cisco.com/tac/cetraining.asf Recall with transparent redirection that your clients specify the origin server IP address or domain name in the URL. However, if you are using direct proxy mode, you must specify the CE IP address or domain name in the Windows media player proxy settings. By default, the CE caches WMT objects to its streaming media file system (mediafs) by listening to the MMS port 1755 and RTSP port 554. You can disable or reenable WMT VoD caching using the no wmt cache enable or wmt cache enable commands, respectively. As you learned previously, you can preload WMT files to your CE by using URL lists. To save peak-hour WAN network bandwidth to your branch offices, you can preload WMT VoD files to your branch office CEs during off-hours. You can then inform your branch office users of the URL to view the VoD. Configuring the CE Internal WMS Server for Live and Scheduled Rebroadcast PresentationsThe Cisco CE supports both the WMS server and proxy for live stream splitting:
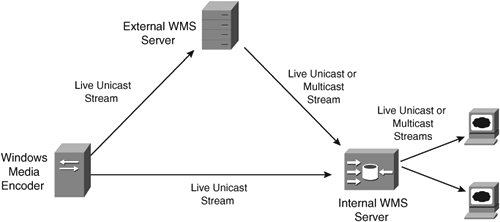
Note The WMT proxy, internal WMS server, and RealProxy are available for standalone CE streaming. However, the RealSubscriber (for streaming prepositioning Real Media VoDs) and the Cisco Streaming Engine (for streaming prepositioned Apple QuickTime [QT] and MPEG4 VoDs and splitting live Apple QT and MPEG4 streams) are available within only a full ACNS deployment using a Content Distribution Manager (CDM). See Chapter 14 for more information. Configuring Unicast-to-Unicast Live SplittingTo configure unicast-to-unicast stream splitting with the internal WMS server, you must define a broadcast alias that points to the source of the live unicast stream from the WME or external WMS server. The broadcast alias is also known as a publishing point. The WME captures audio and video from the live inputs, such as a video camera and microphone, and "publishes" the encoded output to the unicast publishing point that you configure on the external WMS server for clients to view. In other words, publishing points are simply a way to assign to live unicast streams a unique name that clients can use to make requests for the live stream. Figure 13-14 shows how the internal WMS server on the CE can acquire the live stream either directly from the WME or from an external WMS server. Figure 13-14. Live Broadcasting from the Internal WMS Server To create the broadcast alias, you can use the following command: wmt broadcast alias-name broadcast-alias source source-url Note You cannot create scheduled WMT rebroadcasts on the CE for delivery via unicast. However, you can create scheduled rebroadcasts and deliver them to clients using multicast. You will learn more about scheduled rebroadcasts in the section "Configuring Unicast- or Multicast-to-Multicast Scheduled Rebroadcasts." For example, if you want to create a broadcast alias called "myceolive" for the external WMS source located at "mms://wms.cisco.com/ceo-live," you can use the command wmt broadcast alias-name myceolive source mms://wms.cisco.com/ceo-live Notice that the source URL also contains a publishing point called "ceo-live," which you must configure on the external WMS server itself. Additionally, you can use "rtsp://", "rtspu://" for retrieving the stream from the origin server. Refer to your WMS server and WME product documentation for more information on how to encode and deliver live audiovideo streams. Now that you have created a broadcast alias, clients can request the live unicast presentation from their Windows media player using a URL containing the protocol, CE IP address, or domain name and the broadcast alias as follows: mms://ce1.cisco.com/myceolive Configuring Multicast-to-Unicast Live SplittingTo configure multicast-to-unicast live stream splitting with the internal WMS server, you must also create a broadcast alias on your CE for the live multicast stream from the external WMS server (WME servers do not support multicast streaming). However, you must specify the source of the multicast by referring to the multicast description file of the source stream. WMS uses multicast description (.nsc) files to describe live multicast streams. The .nsc file provides information about the multicast stream, such as IP multicast addresses, ports, and streaming formats, so that requesting clients can receive and decode the live stream. Clients that wish to receive a multicast stream can first request the .nsc file. The client media player then extracts information from the file to join the multicast group and decode the streaming content. The CE does the same to receive the multicast stream from the external WMS server. For example, to configure a broadcast alias to split a live multicast stream from "http://wms.cisco.com/ceo-live.nsc" into individual unicast streams, you can use the command wmt broadcast alias-name myceolive source http://wms.cisco.com/ceo-live.nsc You must be sure to create the multicast description file "ceo-live.nsc" on the external WMS server. Once you have done that, your clients can request a unicast stream using the same URL as before with unicast-to-unicast in their media player: mms://ce1.cisco.com/myceolive Note Because clients use the IP address or domain name of the CE to make requests for the live internal WMS server content, you do not need to configure WCCP redirection or the client media player's proxy settings. Configuring Multicast-to-Multicast Live SplittingTo enable your CE to split a live multicast or unicast stream into a multicast stream with the internal WMS server, you must create a multicast station on your CE. To configure a multicast station, use the command wmt multicast station-configuration station-name multicast-dest-IP dest-port stream-source-url For example, to create a station called "myceolive" that multicasts the stream to the IP 238.1.1.1 on UDP port 4321, from the external WMS multicast source at "mms://wms.cisco.com/ceo-live.nsc," you can use the command wmt multicast station-configuration myceolive 238.1.1.1 4321 http://wms.cisco.com/ceo-live.nsc You must start the multicast station on the CE with the command wmt multicast-station start myceolive Note To configure multicast on your CE, you must obtain a separate multicast license and install it on your CE. The CE collects the information in the "ceo-live.nsc" from the external WMS server along with the IP multicast addresses that you specify with this command to dynamically create another .nsc file called "myceolive.nsc." Your clients use the CE-generated .nsc file as the publishing URL in their Windows media players: http://ce1.cisco.com/myceolive.nsc Configuring Unicast-to-Multicast Live SplittingTo configure a unicast-to-multicast live stream with the internal WMS server, you must specify the unicast publishing point that you created on the external WMS server as follows: wmt multicast station-configuration myceolive 238.1.1.1 4321 mms://wms.cisco.com/ceo-live With both unicast- and multicast-to-multicast configurations, the client media players extract information from the "myceolive.nsc" file (that the CE creates) to join the multicast group. Using the multicast technologies that you learned about in Chapter 5, "IP Multicast Content Delivery," and the streaming media technologies that you learned about in Chapter 9 the client then can receive and decode the live multicast stream. Configuring Unicast- or Multicast-to-Multicast Scheduled RebroadcastsTo schedule a rebroadcast of the live stream with the internal WMS server, you can configure your WME server to unicast-push the live stream to your external WMS server (or configure your external WMS server to unicast-pull the live stream from the WME server). You can then configure the external WMS server to convert that live stream into the WMS streaming container format (.asf), to schedule and distribute the file as a rebroadcast VoD on your CE. The command to schedule a rebroadcast event is wmt multicast schedule-start station-name minute hour day month You can specify the scheduled rebroadcast of the streaming container file called "ceo-rebroad.asf" sourced from your WMS server at 1:55 PM, September 29th, using the wmt multicast commands as follows: wmt multicast station-configuration myceolive 238.1.1.1 4321 mms://wms.cisco.com/ceo-rebroad.asf wmt multicast station-configuration myceolive schedule-start 55 13 29 9 With this configuration, branch office clients can, starting at 1:55 PM, September 29th, request the rebroadcast using the publishing URL "mms://ce1.cisco.com/myceolive.nsc" in their media players. You can also preload the "ceo-rebroad.asf" file to your branch-office CEs ahead of time during off-hours to save peak-hour WAN bandwidth at the time of the scheduled rebroadcast. Streaming Real MediaTo stream VoDs and split live Real Media, you can enable the RealProxy on your Cisco CEs. You can use the RealProxy for caching and splitting both unmanaged and managed VoDs and live streams. As with the WMT proxy, when you simply enable RealProxy, the CE caches VoDs and splits live Real Media streams to your clients automatically, without any additional configuration. To enable RealProxy on your CE, you must purchase a separate RealProxy license key from Cisco. To view and accept the license agreement, enter the following commands: show rtsp proxy media-real license-agreement config terminal rtsp proxy media-real accept-license-agreement You can then install the RealProxy key onto your CE, using the following command on your CE: rtsp proxy media-real license-key licensekey Once you install the key, you can enable RealProxy using the command rtsp proxy media-real enable Like the WMT proxy, the RealProxy feature on the Cisco CE supports both VoD caching and live unicast stream splitting, by default. However, to configure advanced options on the RealProxy server, such as multicast splitting, you must use the CE web interface. To log in to the CE secure web interface, enter the CE domain name or IP address into your browser URL field, and specify port 8003. Entering the CE username and password takes you to the CE home page shown in Figure 13-15. Figure 13-15. The Cisco CE Web-Interface Home Page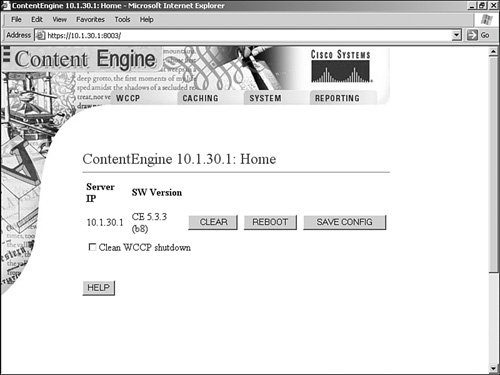 To configure the RealProxy, under the "Caching" tab, select "Real Proxy." If you enabled RealProxy in the previous configuration step with the rtsp proxy media-real enable command, you can click the "ADMIN" button to enter the RealProxy configuration interface, as Figure 13-16 illustrates. Figure 13-16. The Cisco CE Web-Interface RealProxy Admin Page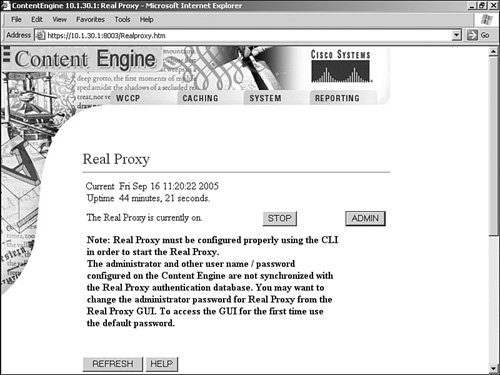 Figure 13-17 shows the screen that you first see in the RealProxy web interface. Figure 13-17. The RealProxy Web-Interface Home Page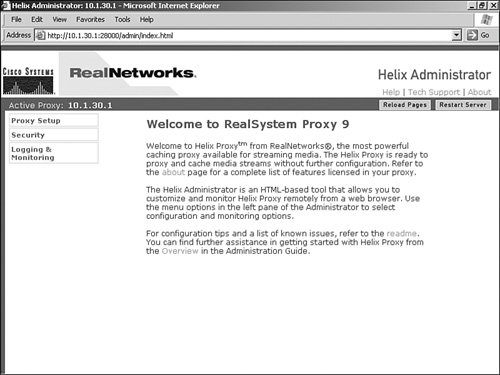 RealProxy Video-on-Demand CachingTo enable or disable VoD caching, choose the "Cache" option in the left control pane, as Figure 13-18 illustrates. VoD caching is enabled by default. Figure 13-18. Configuring RealProxy VoD Caching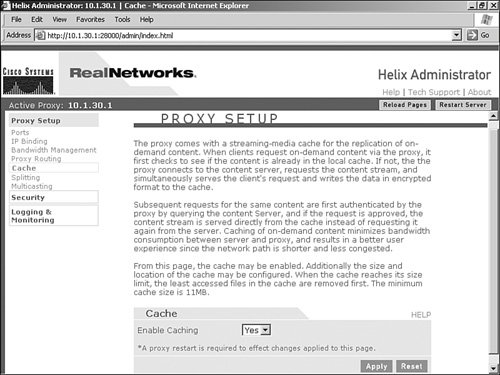 Like the WMT proxy, clients use the IP address or the domain name of the origin server in the publishing URL to request the live stream from the RealProxy. Therefore, you must configure WCCP redirection or configure the client media player's proxy settings to point to the CE for RTSP requests (using service group 80). Then, to request a VoD from the Helix Universal Server, you can use a publishing URL similar to the following URL: rtsp://helix.cisco.com/sales_training.rm RealProxy Pull-SplittingRealProxy supports unicast-pull for live stream splitting. That is, when users request a live stream, the RealProxy requests the live stream from the Helix origin server using unicast and splits the stream to clients using either unicast or back-channel multicast delivery. Like the WMT proxy, the RealProxy does not support multicast-to-unicast or multicast-to-multicast. However, as you learned previously, you can manually configure these combinations using the internal WMS server. To enable live stream splitting on the RealProxy, make sure you enable splitting in the "Splitting" screen, as Figure 13-19 illustrates. Live stream splitting is enabled by default. Figure 13-19. Configuring RealProxy Live Splitting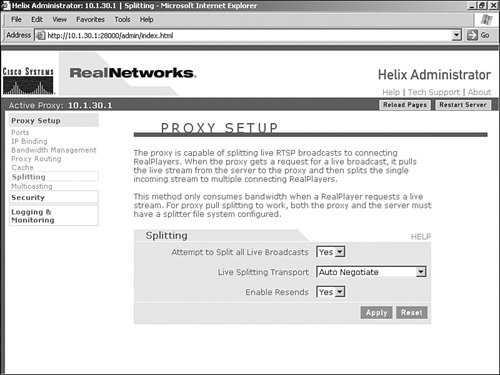 To request a live stream from the Helix Universal Server, which you can configure your WCCP router to redirect to your CE, you can use a publishing URL similar to the following URL: rtsp://helix.cisco.com/broadcast/live Users can use this URL to request the stream for either unicast or multicast deliverythe type of delivery depends on how you configure the RealProxy. To deliver the live stream using multicast, the RealProxy uses back-channel multicast. With back-channel multicast, a control connection is maintained between the client and RealProxy. The client uses the control connection for authentication, for sending RTSP commands, and for providing statistics to Helix Universal Server. Figure 13-20 illustrates how to configure back-channel multicast. Back-channel multicast is enabled by default, but you must configure multicast addresses for back-channel multicast to work. Figure 13-20. Configuring RealProxy Back-Channel Multicast Splitting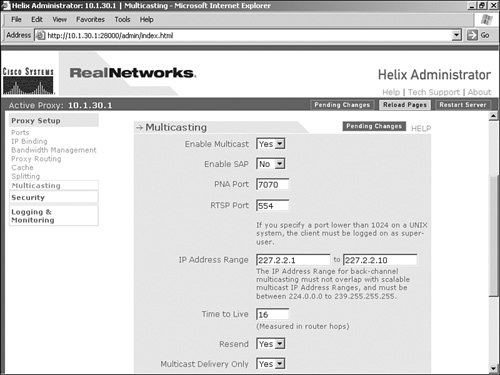 Note If you want to enable standard multicast (without maintaining the back-end multicast control connection), you can configure your Helix server to multicast directly to your clients. Refer to your Helix documentation for more information on configuring unicast or multicast live broadcasts. |
EAN: 2147483647
Pages: 178