You can save your project as a web page so that you can share your project information over the Internet or even a company's intranet. That way, the people involved with your project can view its information from anywhere in the world!
Select File  The Save As dialog box appears.
Note the current location that's open; this is where the web page will be saved.
Click the Save button.
The Export Wizard appears. The wizard helps you specify what information you want to appear in the page, asks questions about what you want to do, automatically maps the fields in the project, and then allows you to verify the results.
Note: A map simply identifies which information to include in a web page.
Click Next.
If you're new to mapping information, or aren't sure what information you want to include in the web page, use an existing map.
Select the Use existing map option and click Next.
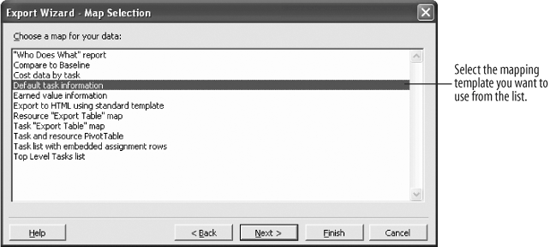
The Export Wizard - Map Selection dialog box appears, as shown in Figure 11-9.
Now, decide which map template you want to use.
Select the Default task information option.
If you were creating your own map for your data or wanted to further define the web page data, you could continue and click Next.
Since we're using a predefined map, we can skip ahead and finish the wizard.
Click the Finish button.
The dialog box closes, and the web page is saved in the location you specified.
To get an idea of what the report looks like as a web page, we've created and saved a web page report similar to the one you created in the previous steps. We'll use this file to see how the report looks as a web page.
Open your Internet browser program.
Internet Explorer will work best for viewing any type of web page file generated by a Microsoft program.
Select File  Browse button.
The Microsoft Internet Explorer dialog box appears.
Now, open the file from the Practice folder. (This is not the file you created in previous steps of this lesson).
Navigate to your Practice folder. Select the Project Personal Trainer file and click Open.
The HTML file appears in the browser, as shown in Figure 11-10.
Close the browser without saving any changes.


