If you want to delete records from multiple tablesfor example, a customer and all of that customer's ordersyou need to do a few things first:
LeAnne Chang, one of North Shore Travel's managers, decides to open her own competing travel agency across the street, and being the vindictive person she is, takes all her customers with her. In this lesson you will create a delete query to delete all the tours sold by LeAnne Chang.
From the Database window, click the Queries icon in the Objects bar and click the New button.
The New Query dialog box appears.
Select Design View and click OK.
The query design window and Show Table dialog box both appear. You have to select the tables and/or queries you want to use in the delete query.
Click the tblEmployees table and click Add.
A field list for the tblEmployees table appears in the top half of the query design window.
Add the tblCustomerTours table and tblTours table to the query.
When you have finished adding the tables and/or queries, you can close the Show Table dialog box.
Click Close.
If the tables are related, Access automatically connects their common fields with a join line. If the tables aren't related, you will have to manually join them by dragging a field from one table's field list to the matching field in the other table's field list.
You need to connect the tblEmployees table with the tblCustomerTours table.
Click the EmployeeID field in the tblEmployees field list and drag and drop it onto the Employee field in the tblCustomerTours field list.
Now you need to tell Access that this is a delete query.
Click the  Query Type button list arrow on the toolbar and select Delete Query from the list.
Tip: Another way to change the type of query is to select Query from the menu and select the type of query from the list.
Access converts the select query to a delete query and displays the Delete row in the query design grid. Now you have to tell Access what you want to delete.
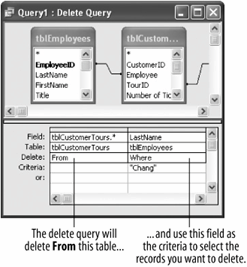
Drag the asterisk (*) from the top of the tblCustomerTours field list into the design grid.
Notice that From appears in the Delete cell for the asterisk field, indicating that the records will be deleted from the tblCustomerTours table. Unless you want the query to delete each and every record in the tblCustomerTours table, you will need to add some limiting criteria. You decide to use the last name Chang as the limiting criteria.
Drag the LastName field from the tblEmployees field list into the design grid.
This time Where appears in the Delete cell for the LastName field, indicating that the LastName field will be used as the criteria to select which records will be deleted from the tblCustomerTours table.
Click the LastName column's Criteria row and type Chang.
Access will add the "quotation marks" around the text string Chang for you, as shown in Figure 6-29. That's all there is to creating a delete query.
Note: Before you run a delete query, you should always preview the results in Datasheet view first. Click the View button on the toolbar to display the delete query in Datasheet view.
Click the View button on the toolbar to preview the results of the delete query in Datasheet view.
The delete query displays the results of the delete query. Let's switch back to Design view.
Click the View button on the toolbar to return to Design view.
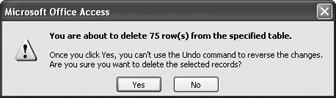
Let's run the delete query and delete the selected records.
Click the Run button on the toolbar.
Ever-cautious Access asks if you really want the delete query to delete the records, as shown in Figure 6-30.
Click Yes.
Access silently deletes all 75 tour records for LeAnne Chang.
Close the query without saving your changes and open the qryToursByName query.
Notice that all the tours for LeAnne Chang are gone.
Close the qryToursByName query.