Recipe 8.5. Creating a Self-Signed SSL Certificate
ProblemYou need to create a secure web site, but don't wantor needto pay for an SSL certificate generated by a third party. SolutionGenerate your own self-signed certificate and install it on your web server:
DiscussionA SSL certificate is a must-have for any online enterprise that asks its visitors to submit confidential information, such as credit card or Social Security numbers, through forms on its web site. When combined with an SSL-enabled web server, a certificate signed by a third-party certificate authority assures visitors that the personal information they are sharing will be sent to the company or organization operating the web site over an encrypted connection. But SSL certificates are not cheap, and they must be renewed every year or two. The cost may seem high for what typically amounts to just two or three encrypted files on your web server, but the real value to the web site ownerand the justification for the money spentcomes from having the certificate authority's seal of approval. Web browsers know that an SSL certificate issued by VeriSign, Thawte, or GeoTrust is legitimate, and that means the visitor can trust the certified web site. In certain scenarios, you can bypass the middleman, become your own certificate authority, generate your own certificate, and tell your web server to use it for encrypted connections. Most modern browsers will allow a user to view and accept an SSL certificate, even if it is signed by the web site owner him or herself. If your web site operates within a closed network, such as an intranet, or you have a small, focused audience of regular visitors with whom you have already established the trusting relationship that would otherwise come with using a third-party certificate, you may be able to create a self-signed certificate and save yourself a bit of money. If, however, you have a large, public audience of infrequent visitors who come to your web site to transact business with credit card numbers and other private information, then a third-party certificate is by far the better choice. To create a self-signed SSL certificate, use the Unix-based openssl command-line tool on your own computer or through shell access to your web hosting account. Create a certificate authority keyIn the first step, you will bless yourself as a certificate authority (CA) by using openssl to create a public key with 1024-bit RSA encryption and Triple-DES. You will be prompted to enter a password for the key, which can be anything you choose, but don't forget what it is: openssl genrsa -des3 -out ca.key 1024 This command generates output like this: Generating RSA private key, 1024 bit long modulus .....++++++ ............. .++++++ e is 65537 (0x10001) Enter pass phrase for ca.key: password Verifying - Enter pass phrase for ca.key: confirm_password Create a self-signed certificate authority certificateNext, you will create a self-signed CA certificate with the key and password you created in step one. Here, you must enter some information about your mock certificate authority, most of which is self-explanatory. One line is crucial: the Common Name must be the hostname or IP address of your web server. openssl req -new -x509 -days 365 -key ca.key -out ca.crt The output from this command looks like this: Enter pass phrase for ca.key: password You are about to be asked to enter information that will be incorporated into your certificate request. What you are about to enter is what is called a Distinguished Name or a DN. There are quite a few fields but you can leave some blank For some fields there will be a default value, If you enter '.', the field will be left blank. ----- Country Name (2 letter code) [AU]:US State or Province Name (full name) [Some-State]:Texas Locality Name (eg, city) []:Austin Organization Name (eg, company :Doug Addison Web Productions Organizational Unit Name (eg, section) []:Web Site Cookbook Common Name (eg, YOUR name) []:localhost Email Address []:doug@daddison.com For a detailed explanation of the information you will be asked to provide for the self-signed certificate, see Table 8-1.
Generate two private web server keys: one with a password and one withoutWith your certificate authority established, now you must create two private keys for your web server: openssl genrsa -des3 -out web server.key 1024 This command creates a key that you will use in the next two steps. You will be prompted to enter a password and confirm the password. Now copy the first key, which is password protected, to another key, which doesn't require a password: openssl rsa -in web server.key -out web server.nopassword.key You will tell your Apache web server to use the second key when starting up, so you won't need to enter the key password every time you restart Apache. Protect the no-password version of your private key by changing the permissions on the file with chmod so only you can read it: chmod 400 web server.nopassword.key
Generate a certificate requestNow, use the first web server private key to create a certificate request. Enter the key password when prompted, and again, when prompted for a Common Name, enter the hostname or IP number for your web server: openssl req -new -key web server.key -out web server.csr This command will prompt you for the password for web server.key, as well as the same type of information you entered for the mock certificate authority certificate you've already created. Again, since this is a self-signed certificate, you can enter anything you want at the prompts. Be sure to enter your web server's hostname or IP address form Common Name. You can skip the last two prompts for challenge password and optional company name: Enter pass phrase for web server.key: You are about to be asked to enter information that will be incorporated into your certificate request. What you are about to enter is what is called a Distinguished Name or a DN. There are quite a few fields but you can leave some blank For some fields there will be a default value, If you enter '.', the field will be left blank. ----- Country Name (2 letter code) [AU]:US State or Province Name (full name) [Some-State]Texas Locality Name (eg, city) []:Austin Organization Name (eg, company) :Doug Addison Web Productions Organizational Unit Name (eg, section) []:Web Site Cookbook Common Name (eg, YOUR name) []:localhost Email Address []:doug@daddison.com Please enter the following 'extra' attributes to be sent with your certificate request A challenge password []: An optional company name []: Sign the certificate requestFinally, sign the certificate using the keys and request file that you just created. Enter the key passwords when prompted. The command below also includes a flag to serialize the certificate: openssl x509 -req -days 365 -in web server.csr -CA ca.crt -CAkey ca.key -signkey web server.key -set_serial 01 -out web server.crt This command requires the passwords you entered earlier for the certificate authority key and the web server key. The output looks like this: Signature ok subject=/C=US/ST=Texas/L=Austin/O=Doug Addison Web Productions/ OU=Web Site Cookbook/CN=localhost/emailAddress=doug@daddison.com Getting CA Private Key Enter pass phrase for ca.key:CApassword Getting Private key Enter pass phrase for web server.key:WSpassword Because the certificate you're creating expires after 365 days, you will have to generate a new one within a year. Serializing your certificates ensures that browsers with cached versions of an expired certificate will check for a newer certificate that is valid. You should have six files when you're done:
Enable SSL on the web serverYour Apache web server may not be configured to respond to SSL connections by default, and you may need to upgrade your hosting account or pay extra for a web server that will. If you have access to the Apache configuration file, typically httpd.conf, you can enable the SSL functionality by uncommenting two lines that refer to apache's SSL module. Make sure the following two lines are not preceded by a #: LoadModule ssl_module libexec/httpd/libssl.so AddModule mod_ssl.c Add SSL directives to the Apache configuration fileMove the signed certificate file (web server.crt) and the no-password web server key (web server.nopassword.key) to a location on your web server where Apache can find them. Then modify the Apache configuration file to begin using the certificate.
First, make sure the ServerName directive matches the Common Name entered for the mockup certificate: ServerName: localhost Then add this below the last line of the configuration file: <IfModule mod_ssl.c> Listen 80 Listen 443 SSLRandomSeed startup builtin SSLRandomSeed connect builtin <VirtualHost localhost:443> SSLEngine on ServerName localhost ServerAdmin youremailaddress ErrorLog /var/log/httpd/error_log SSLCipherSuite ALL:!ADH:!EXPORT56:RC4+RSA:+HIGH:+MEDIUM:!LOW:!SSLv2:!EXP:!eNULL SSLCertificateFile /absolute/path/to/web server.crt SSLCertificateKeyFile /absolute/path/to/web server.nopassword.key SSLCACertificateFile /absolute/path/to/ca.crt </VirtualHost> </IfModule> After completing these steps, restart your web server (see Recipe 1.9 for details). To check your work, request a secure connection to your web site by preceding the web site URL with https://. Your browser should warn you not to trust the site because it can't verify the certificate. You can choose to accept the certificate permanently or, if you like repeat viewings of warning messages, just temporarily for this visit to your site (see Figure 8-4). Further examination of the certificate (see Figure 8-5) shows the detailed outcome of our little ruse. Figure 8-4. A browser warning when making a secure connection to a web site using a self-signed certificate is a likely outcome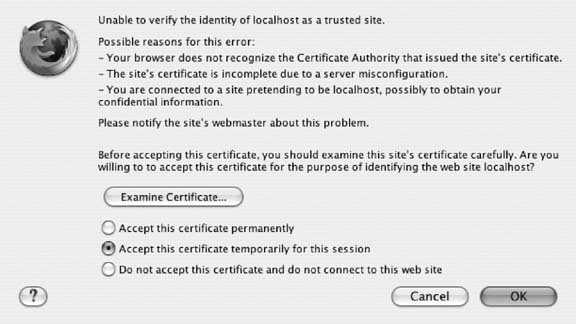 Figure 8-5. Examining the self-signed certificate in a browser reveals the imaginary certificate authority and web site owner to whom it was issued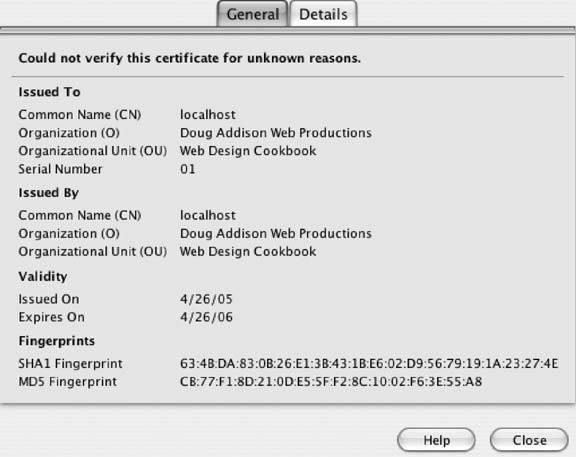 See AlsoFor more information about using openssl see http://www.openssl.org/. RedHat Linux also has a guide to creating a self-signed certificate at http://www.redhat.com/docs/manuals/linux/RHL-7.3-Manual/custom-guide/s1-installation-selfsigned.html. For information on creating a self-signed certificate for Microsoft IIS see http://www.xenocafe.com/tutorials/self_signed_cert_IIS/self_signed_cert_IIS-part1.php. |

EAN: 2147483647
Pages: 144
- Enterprise Application Integration: New Solutions for a Solved Problem or a Challenging Research Field?
- Context Management of ERP Processes in Virtual Communities
- Data Mining for Business Process Reengineering
- Healthcare Information: From Administrative to Practice Databases
- A Hybrid Clustering Technique to Improve Patient Data Quality