Server Farm Operations
The server farm operations interface is very similar in Windows SharePoint Services and SharePoint Server. Therefore, in this chapter we discuss server farm operations together, with the differences noted as required. As you progress through the many screens of SharePoint Products management, notice the numerous breadcrumb trail and navigation options that are provided.
After installing Windows SharePoint Services, you must enable several services for full functionality of your server farm. Choosing to disable these services can leave portions of your installation, such as Help, inoperable. Figure 3-1 shows the navigation to access these services.
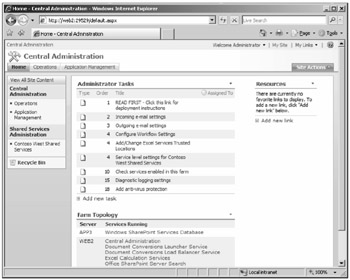
Figure 3-1: To access Windows SharePoint Services topology settings, browse from the Home tab and select a server to view under the Farm Topology Web Part.
The default services after installation are described below:
-
Central Administration The Central Administration service is started by default and is required to manage your installation. It is not required, however, for your server farm to serve Web content. Although it is possible to stop the Central Administration Service, doing so removes any way to manage your installation. If you need to stop Central Administration for specialized reasons, you must re-run the SharePoint Products and Technologies Configuration Wizard.
-
Windows SharePoint Services Help search This is the only Windows SharePoint Services service that requires configuration before it can be started. The configuration items were covered in Chapter 2.
-
Windows SharePoint Services incoming e-mail The incoming e-mail service is started by default and should only be stopped if you do not require inbound e-mails. Stopping it removes the ability for document libraries to be e-mail integrated, but might be required for security in some organizations.
-
Windows SharePoint Services Web application The Windows SharePoint Services Web application service is started by default, but can stop if errors are encountered during or after setup. Therefore, it is always wise to verify that this service is running before creating Web applications or modifying IIS settings.
Defining SharePoint Server 2007 Farm Services
After installing SharePoint Server, you must enable several services in Central Administration. You may access these services through either the Farm Topology Web Part in Home as shown in Figure 3-1 or through Central Administration > Operations > Topology And Services > Services On Server as shown in Figure 3-2.
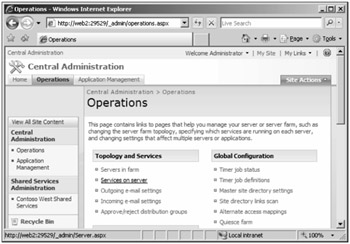
Figure 3-2: To access SharePoint Server 2007 Services, browse to the Services On Server option under Topology And Services.
Once in the Services On Server options page, you can change the current server as shown in Figure 3-3 or select the type of server you want to configure.
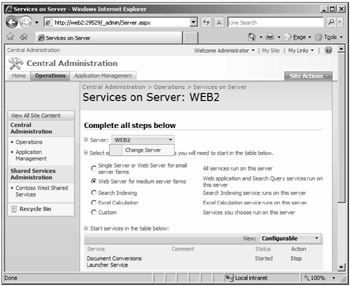
Figure 3-3: Verify that you are managing the correct server before starting or stopping services.
Always verify that you are working with the intended server before changing service status because modifying the incorrect server can cause service outages. Changing the radio button to another server role only modifies the suggested services view; it does not start or stop services.
There are several server roles in SharePoint Server 2007:
-
Single Server or Web Server When selecting the Single Server or Web Server server role, you are presented with all service options, except Central Administration. If you wish to run all Windows SharePoint Services services on this machine, except SQL Server, select this radio button and verify that all required services are running. Selecting too many services does not affect base functionality for users, but could affect performance when CPU-intensive roles like Excel Calculation Services are used extensively.
-
Web Server The Web Server role for medium server farms is identical to the Single Server option, with the exception of Excel Calculation Services. Although this service can be enabled on a Web front-end (WFE) server, it is usually placed on a dedicated server in medium and large server farms. To function correctly, the Web Server role must have Document Conversions, Document Conversions Load Balancer (if required), Office SharePoint Server Search, Windows SharePoint Services Help Search, and Windows SharePoint Services Web Application configured and enabled.
-
Search Indexing A server servicing the Search Indexing role can be dedicated to provide CPU-intensive processes, like ranking relevancy, compiling indexes, and serving queries; it can enable uninhibited processing without affecting other services. Note that the query and index functions can be further isolated on separate hardware. Refer to Chapter 13, "Scaling Out to a SharePoint Technologies Server Farm," for more information on adding Index and Query servers.
-
Excel Calculation The Excel Calculation server role is intended for medium-to large-enterprise implementations that require dedicated Excel Calculation Services. If you enable Excel Calculation Services on an enterprise basis or plan to serve large spreadsheets, consider enabling a dedicated server for this function.
-
Custom From the Custom server role view, you have the ability to start and stop all services, including, most notably, the Central Administration service. Never turn off this service unless you promote another server in the farm to the Central Administration server. There is no way to turn it back on, so stopping the service removes your ability to manage your server farm. To re-enable this service, run the SharePoint Products and Technologies Configuration Wizard on any farm server, thereby re-associating that server with the Central Administration content database and configuration database.
Tip To see a list of all running Web and server services, run stsadm.exe -o enumservices from the command line.
E-mail Configuration
There are three places to configure your e-mail, two of which are here in farm operations management; the third is in Application Management and is covered in Application Management settings.
Outgoing E-mail Settings
Outgoing e-mail is required for alerts and other e-mail services to function properly. Configuring outgoing e-mail is a straightforward process. You must enter an outbound SMTP server and desired e-mail addresses. The only caveat is that the SMTP server selected for outbound e-mail must allow relaying from the WFE's primary IP address. SharePoint Products and Technologies do not allow for authenticated outbound e-mail.
Incoming E-mail Settings
Incoming e-mail allows documents to be sent directly to document libraries, tasks to be sent from e-mail to task lists, or calendar events to be sent to calendar lists. To implement correctly, incoming e-mail configuration requires several configuration steps. You must (1) make Active Directory Changes when using the Directory Management Service, (2) configure your WFE, and (3) correctly configure incoming e-mail in Central Administration.
| Caution | Verify that the server used for incoming e-mail never changes. The contact and list information created in Active Directory are set to a single server address (for instance, doclib2@wfe01.contoso.msft), not the farm. Therefore, if you lose that server in the farm, all incoming e-mail flow stops instantly. The incoming e-mail server has to be brought back up with the same name, the SMTP service needs to be installed, and related IIS settings made before incoming e-mail will start working again. |
To enable incoming mail, do the following:
-
Configure Active Directory If you wish to integrate with the Directory Management Service (DMS), you must create an Active Directory Organizational Unit (OU). The server farm account defined in setup should be delegated full control in this OU. Figure 3-4 shows an example of an OU created for the purpose of storing e-mail distribution lists and contacts. If you have enabled DMS, these distribution lists can be created automatically when implementing document libraries and lists. If you have not enabled DMS, you must create manually an entry for each mail-enabled document library and list you wish to receive e-mail. There is an option to set the e-mail address on creation of a document library or list. When not using DMS, you should document the address and add the e-mail address to your global address list.
-
Configure Web front-end server Although it is possible to use any SMTP server, it is easier to install and use the Windows Server component SMTP (Simple Mail Transfer Protocol) service. If you choose to use a third-party SMTP service, you must follow the instructions for configuring in Advanced Mode, which are found later in this chapter. The SMTP service is responsible for receiving list-based e-mail. Don't forget to allow mail relaying in IIS Manager so you can accept mail from other SMTP servers.
For detailed instructions on installing the SMTP service, browse to http://www.microsoft.com/technet/prodtechnol/WindowsServer2003/Library/IIS/.mspx.
-
Configure incoming e-mail in Central Administration To configure incoming e-mail, browse to Central Administration > Operations > Topology And Services > Incoming E-mail Settings. There are two settings when enabling sites to receive e-mail:
-
Automatic mode This mode configures your system automatically for inbound e-mail. It is the preferred method and should only be changed when you are using a service other than the Windows Server SMTP service to receive incoming e-mail.
-
Advanced mode This mode requires that you specify a drop folder that inbound e-mail will populate. The SPTimer will look every 30 seconds for e-mails in that folder and, when found, will send them to the associated Document Library or list. When using third-party e-mail products, refer to their documentation for e-mail drop folders. The account used for the SPTimer service needs NTFS modify permissions on the drop folder.
-
-
Configure Directory Management Service To enable the automatic creation of contacts in Active Directory for your document libraries and lists, as well as to create SharePoint distribution lists, you must configure the Directory Management Service. This service defines the connection to your Active Directory, allowing distribution lists and contacts to be created automatically in the OU that you specified previously. This service allows users to find these e-mail-enabled Document Libraries and lists in the global address book (GAL). If you do not enable the Directory Management Service, users will be unable to find the e-mail-enabled lists in the GAL unless you add them manually.
Tip You can synchronize entire Web applications or individual sites with Active Directory using stsadm -o refreshdms -url <web application> or stsadm -o refreshsitedms -url <web application/path/sitecollection>
When choosing to use the local server farm for the Directory Management Service, you must enter the OU specified earlier. For the example SharePointOU, the correct Active Directory container entry would be OU=SharePointOU, DC=Contoso,DC=msft. Although the SMTP mail server entry for incoming mail should be populated automatically, the entry should be the fully qualified domain name (FQDN) for this machine. Figure 3-5 shows an example of a configuration.
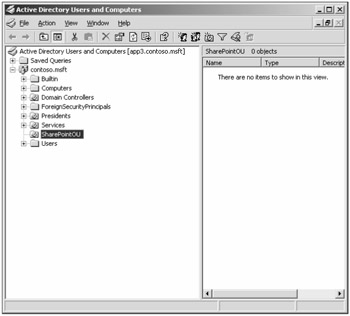
Figure 3-4: You need to create an Organizational Unit in Active Directory for the Directory Management service to create contacts that correlate to Document Libraries and lists.
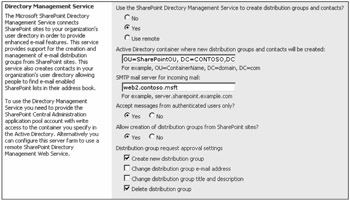
Figure 3-5: Carefully enter the location for the OU to contain distribution lists and contacts, and always use the FQDN for the incoming mail SMTP server.
The following choices must also be made, but unless you are in a highly secure environment, the defaults are usually sufficient.
-
Accept Messages From Authenticated Users Only? The default is Yes. If you wish to accept messages from nontrusted authentication domains, you may need to change this default.
-
Allow Creation Of Distribution Groups From SharePoint Sites? The default is Yes. Choosing No disables the creation of distribution lists for e-mail-enabled lists.
-
Distribution Group Request Approval Settings By default, Create New and Delete Distribution Group are selected. Consider carefully whether to select the change option, because selecting that causes any previous e-mails sent on the distributions list to bounce when replied to.
-
Incoming E-mail Server Display Address You may change the address of the domain displayed to make it friendlier to your users or to conform to DNS and firewall policies.
-
Safe E-mail Servers By default, mail is accepted from all e-mail servers. To prevent e-mail from other sources from being sent directly to document libraries and lists, you should specify your primary e-mail server as the only safe server. For example, if you want all mail routed through your Exchange Server, you may only want to specify your Exchange Server host as a safe server.
Managing Service Accounts
New in Windows SharePoint Services and SharePoint Server 2007 is the ability to change service and application pool credentials from Central Administration. Exceptions are services managed directly from a dedicated interface, such as Windows SharePoint Search and SharePoint Server Search; these service accounts are managed directly from their respective interfaces. Both of these services are modified by accessing the corresponding hyperlink from Central Administration > Operations > Services On Server. By default, you can manage three Windows Service Accounts from Service Account management:
-
Document Conversions Launcher Service
-
Document Conversions Launcher Load Balancer Service
-
Single Sign-on Service
As a general rule, these services run as the server farm account. They can be changed if you are in an environment that requires frequent password changes or if you develop a customized single sign-on service with specific authentication requirements.
You can also define the username and password for your IIS web application pools. Although it can be done from the IIS Manager snap-in, Central Administration provides a centralized interface on which to make changes. You first need to select a Web service and then the application pool identity you wish to modify. Figure 3-6 shows an example of selecting a Web application pool for modification.
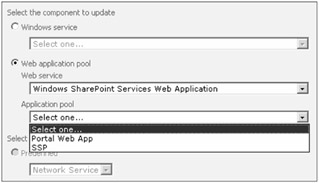
Figure 3-6: To change an application pool identity, first select a Web service and then the desired application pool.
After selecting an application pool identity to manage, you have two choices:
-
Predefined defaults are Network Service and Local. With the exception of Basic or Stand-alone installations, you should use dedicated accounts for Web application pool identities.
-
Configurable accounts should have proper access to SQL Server databases and Windows Server services. These permissions were assigned automatically during installation. Changing these identities to accounts not defined during installation can cause service failure. For detailed information on required security account permissions, see Chapter 2.
Tip You can modify the server farm account using stsadm -o updatefarmcredentials -identitytype <configurableid | networkservice> -userlogin <domain\name> -password <password>. You must manually perform an IISreset on all members of the farm to update credential caches.
Enabling Information Rights Management
SharePoint Products and Technologies can be integrated with Windows Rights Management Services (RMS). The optional use of an RMS server can restrict the access and distribution of sensitive documents by attaching a security policy, thus limiting the availability of the content to others. RMS integrates with Microsoft Office, Windows SharePoint Services, SharePoint Server, and Exchange Server. RMS, in conjunction with Windows SharePoint Services and SharePoint Server, can create a seamless transition from a client working in a Microsoft Office application to creating a secure workplace in a SharePoint site collection. When a user creates a document workspace in a site collection, the users and their associated rights defined in the document's security policy are transferred to the document workspace created. To configure Information Rights Management correctly, you must do the following:
-
Install the RMS Client, with at least SP2, on every Web front-end server (WFE) in your server farm.
-
Decide if you will connect to your default RMS server or if you will use an RMS server in another location. Most organizations use the default RMS server specified in Active Directory.
Updating the Farm Administrator's Group
Use caution when adding users to the Farm Administrator's group. Users added to this group can access Central Administration and disable services, causing widespread service outages. When you open the People and Groups interface, you see that the server administrator, server administrator group, and the farm account are administrators. You can add local users and groups or preferably add Active Directory users and groups.
| Important | If you decide to use local accounts for Administrative access, be sure to create these accounts on each server in your farm. |
The safest course of action is to add only administrators to this group, giving them Full Control (Farm Administrators) access. Never modify the default Farm Administrator's group settings. Because Central Administration is simply a specialized site collection, it is possible to granularly control access, but it should be reserved for Site Designers or a custom group.
| Note | Central Administration is a site collection and can therefore be modified to extend the interface with your implementation-specific software, or customized to meet your organization's design requirements. Always have a backup of the server farm before modifying the Central Administration site collection. |
It might also be used for restricted Helpdesk access or temporary personnel. Figure 3-7 shows the default view when adding users to the Farm Administrator's group.
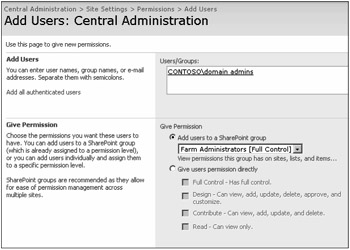
Figure 3-7: Use caution when adding or customizing permissions for server Farm Administrators.
| Tip | You can use the CTRL+K combination to verify user and group items. |
Understanding Timer Jobs
The Windows SharePoint Services timer, SPTimerV3 (Owstimer.exe), is responsible for scheduling such tasks as notifications, alerts, and content deployment. It is a Windows SharePoint Services application and should always be running on every server in the farm. It should use the server farm account for service log on, with local server administrator privileges. The following is a sample of critical events that are controlled by SPTimerV3:
-
Administration Service Timer Job
-
Bulk Workflow Processing
-
Customer Experience Improvement Program (CEIP) Data Collection
-
Logging And Usage Analysis
-
Immediate Alerting
-
Recycle Bin
-
Content Delivery
-
Configuration Database Refresh
-
Dead Site Deletion
-
Disk Quota Notifications
-
Expiration Policies (SharePoint Server)
-
Indexing Schedules (SharePoint Server)
-
Profiles Import (SharePoint Server)
-
Record Processing (SharePoint Server)
-
Backup And Restore Jobs
-
Workflow Processing
As you can see from this list, SPTimerV3 is crucial to the well-being of your farm. In the event of farm configuration replication errors or other unexplained errors, you should check the SPTimerV3 service first. Verify that the service is running and is using the correct credentials with proper permissions and that the service account is not locked out.
You can access the status and definitions of timer jobs from Central Administration > Operations > Global Configuration. You should select Timer Job Definitions to disable or delete timer jobs, as shown in Figure 3-8.
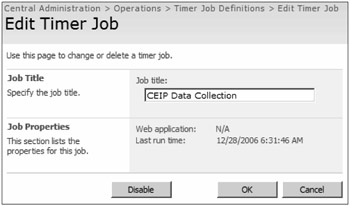
Figure 3-8: You can view and modify current timer job definitions from Central Administration > Operations > Global Settings > Timer Job Definitions.
Alternate Access Mappings
Alternate Access Mappings (AAMs) provide a way to change your Web application URLs, configure Network Load Balanced Web applications, and add additional URLs for alternative access.. For example, if you served content from a single Web application via multiple host headers for security, you would need to map the additional host headers with alternate access URLs. Figure 3-9 shows an example of the Web application http://portal.contoso.msft being served securely and externally as https://external.contoso.msft.
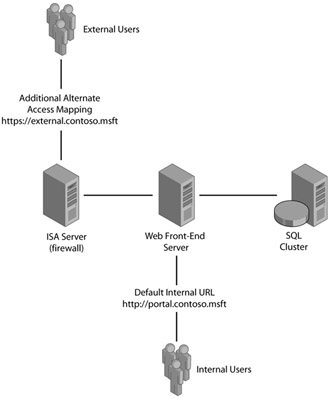
Figure 3-9: You must add an alternate access mapping for each additional URL that you configure for a Web application.
In this example, the internal URL would already exist, but you must add an alternate access mapping for the external URL. If you did not add the alternate access URL, the host field returned in an external user's browser would be incorrect. Therefore, an external user would be returned http://portal.contoso.msft, when in fact the user should be returned https://external.contoso.msft. In addition, the embedded URLS in alert e-mails would be sent incorrectly.
| Caution | Absolute URLs (URLs that are hard coded on a Web page or document) cannot be mapped. |
There are three choices when modifying AAMs:
-
Edit Public URLs You can edit public URLs from the Alternate Access Mapping page, as shown in Figure 3-10. By default, there is no AAM collection selected; this feature is for your protection.
After selecting a collection, you have several options for defining the Public URLs. Public URLs fill in the URI (Uniform Resource Identifier) and Authority to correspond with the originating URL from the browser. For example, if a user inputs http://portal.contoso.msft, that will be the return address in the browser. Conversely, if a user inputs https://external.contoso.msft in the browser, he or she will be directed to that URL. If the user enters a URL that does not exist as an alternate access mapping, the request will fail. For example, if you are using two different IIS virtual servers to publish the same content database(s), and your default internal URL is http://portal and your Extranet URL is https://external.contoso.msft, then you would configure alternate access URLs as follows:
-
Default internal URL is http://portal.contoso.msft.
-
Either Internet, Extranet, or Custom URL should be https://portal.contoso.msft.
When users visit http://portal, they are assumed to be on the internal network and will be returned content to http://portal.contoso.msft. Conversely, if they visit https://portal.contoso.msft, it is assumed that they are coming from an external network and are returned to https://portal.contoso.msft as the correct address.
This being the case, your security should not rely on AAM and zones because they merely supplement your firewall and router policies. Figure 3-11 shows the configuration for the previously defined scenario.
-
-
Edit Default Internal URL/Add Internal URL To edit the default URL, select Add Internal URL, select the AAM collection, and change the URL protocol, host, and port, but do not change the zone. Alternatively, you can simply select the hyperlink of the Web application to reach the same interface. Figure 3-12 shows the hyperlinked selection of an internal URL to edit.
-
Map To External Resources In addition to mapping server farm URLs, you may also map URLs to external resources. Most installations do not use this feature, but it can be enabled to allow access, through SharePoint, to other IIS Web applications.
Tip You may see all alternate domain mappings at the command prompt by running stsadm -o enumalternatedomains.
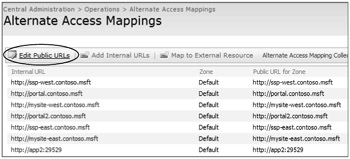
Figure 3-10: To add public URLs for a Web application, choose Edit Public URLs in the Alternate Access Mappings management interface.
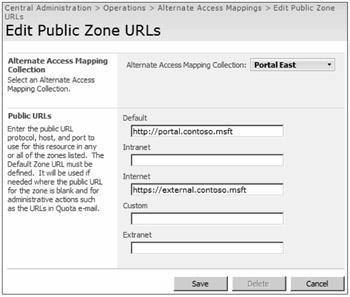
Figure 3-11: You must define an alternate access mapping for every URL to which a Web application will serve content.

Figure 3-12: To edit the default internal URL, simply select the hyperlink of the Web application to modify.
Quiesce Farm
Quiesce Farm is a new feature in this version that allows a graceful method to disallow new connections to the entire farm, without disrupting active sessions. You may define the amount of time to fully quiesce the farm, but be aware that any sessions still open at the end of that time period will be forcibly disconnected. Using the Quiesce Farm feature is useful for routine maintenance or disaster recovery of a farm. You may still back up, restore, and configure application servers and many other items when a farm is in the quiesced state. Note that the time given to be fully quiesced is in UTC (Coordinated Universal Time), and probably not the time zone your server is in. It will continue to show Stop Quiescing until you manually stop.
| Tip | You may quiesce the farm from the command line by running stsadm -o quiescefarm -maxduration <duration in minutes> and see quiesced status by stsadm -o quiescefarmstatus. Note that maxduration refers to the maximum amount of time to continue connections, not the amount of time to remain quiesced. To unquiesce a farm, run stsadm -o unquiescefarm. |
The other options in Central Administration > Operations are covered in their respective chapters. Please refer to the index to find their configuration.
EAN: 2147483647
Pages: 110