Installing the First Windows SharePoint Services Server in the Farm
When installing your first Windows SharePoint Services Server, whether it is standalone or the first in a server farm, you have the option of changing the data location. However, changing this location is strongly discouraged and should only be attempted by an experienced administrator who has very specific requirements.
| Note | When installing SharePoint Server, Windows SharePoint Services is installed automatically during the installation process. Although it is possible to install Windows SharePoint services manually before installing SharePoint Server, you are not required to do so. |
When installing the first server in the farm you are presented with two choices:
-
Basic The Basic option installs all components, including SQL Server 2005 Embedded Edition. If you choose this option, you cannot scale out your farm to multiple servers. However, if you do not have SQL Server 2000 SP3a or later (Standard or Enterprise editions), you must choose this option to install Windows SharePoint Services.
-
Advanced The Advanced option allows you to install the binaries necessary to create a server farm. This option is the preferred installation mode for all Windows SharePoint Services implementations.
Active Directory Account Creation Mode
Windows SharePoint Services allows corresponding accounts to be created automatically in Active Directory (AD) when they are created in SharePoint site collections, in addition to using accounts created by administrators. This installation mode requires site collections to be created from the command-line interface (CLI). SMTP settings also must be configured correctly before you can create site collections. You must create an Organizational Unit (OU) in Active Directory to use during setup, which is where all accounts are automatically created. However, allowing users to create accounts in the Active Directory (AD) is a bad choice for most organizations as it decreases security and complicates user management. Only consider AD account creation mode for Intranet-only applications or perhaps an Internet Service Provider.
Using the Configuration Wizard
After selecting the Basic option you are not prompted to create a Web application or a team site collection, because these are created automatically. Your first site is created in the root of a Web application, with the server name as the Web address. You have little ability to extend or customize a basic install. For this reason, limit the use of Basic or Stand-alone installs to labs or very small groups.
When selecting the Advanced option, choose Web Front End to continue with a farm installation. Selecting the alternate option, Stand-alone, results in a similar installation as Basic, with the exception that you must create the Web application after completing the installation wizard. After the Advanced installation has completed copying the binaries to the machine, you are prompted to run the configuration wizard. You may choose to run it at a later time; doing so allows you to image the server for configuration later, primarily for disaster recovery. After you choose to continue, you are presented with the farm-level configuration wizard. You are then asked to reset IIS and related services and continue with the option of connecting to an existing farm. For the first server in the farm, select No, I Want To Create A New Server Farm as shown in Figure 2-1. The default is Yes, I Want To Connect To An Existing Server Farm.
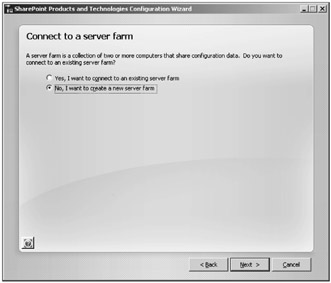
Figure 2-1: To create the first server in a farm, select No, I Want To Create A New Server Farm.
To continue, you must have the server farm username and password combination available. Remember that this account must be a local administrator on this machine. The database server name and database name are also required. If you plan to host multiple SharePoint configuration databases on this SQL Server instance, rename the configuration database to an easily identifiable name for this server farm. Figure 2-2 shows an example when creating a server farm for Human Resources (HR).
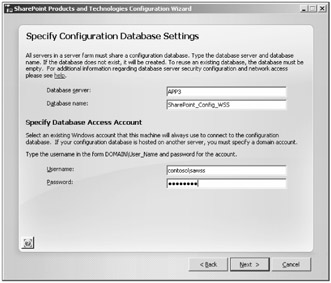
Figure 2-2: Specify unique configuration database settings.
Central Administration Setup
Configuring the SharePoint Central Administration Web application is the next step and must be planned for beforehand. If you are managing your SharePoint farm from remote locations, the TCP port used for administration must be allowed via firewall rules, or you must employ another mechanism such as Windows Remote Desktop for remote access. If you plan to use Kerberos for Central Administration authentication, you must create an Service Principal Name (SPN) before continuing past this point.
| Tip | An SPN is used by Kerberos as a unique identifier for the Web application, thus allowing the Kerberos ticket to be encrypted with a corresponding key. To set an SPN for a Web application, download the Setspn.exe tool from http://downloads.microsoft.com and execute the following from the CLI:
setspn -A HTTP/ServerName Domain\UserName |
Figure 2-3 gives an example of configuring an easy-to-remember port number and using NTLM (default) for authentication.
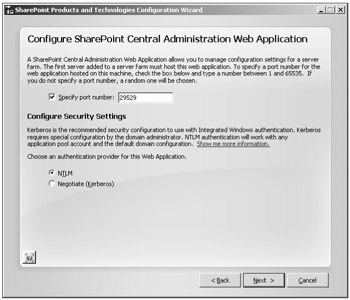
Figure 2-3: Select an easy-to-remember administration TCP port number when configuring the SharePoint Central Administration Web Application.
| Tip | After Installation, you can query the administration port number by running sstadm.exe -o getadminport. You can also get the full URL of Central Administration by using the obsolete command, stsadm.exe -o createadminvs. |
After the installation wizard finishes, you are taken to Central Administration to continue configuring your server farm. Several administrative tasks are listed under the Home navigation tab along with a quick view of the farm topology. You can modify this list as needed, but the following tasks should always be completed after a new install:
Start the Windows SharePoint Services Search Service
From Central Administration > Operations > Topology and Services > Services on Server, select Windows SharePoint Services Search. You must specify an account and password for the service account and the account for default content access. Most implementations use the same account. The account should have a broad scope and have the ability to read all Windows SharePoint Services content. Best practice is using a Read-Only, nonadministrative account. You should create a search database that is easily recognizable, and select the Windows Authentication option in most circumstances. An example is shown in Figure 2-4.
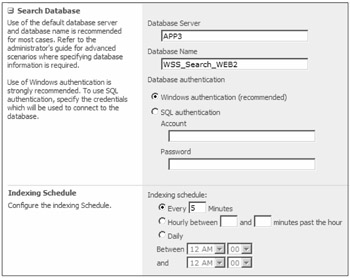
Figure 2-4: Configure the Search Database, Database Authentication, and Indexing Schedule to match your specific requirements.
In the above example, a Windows SharePoint Services Search database was created with a correlating name as the server hosting the service. This practice eases backup, restore, and content recovery should they be necessary in the future. You can also change the Indexing Schedule if desired, but the defaults work quite well for most implementations.
Configure the Farm Administrators Group
From Central Administration > Operations > Security Configuration, select Update Farm Administrator's Group. This option gives you the ability to add or remove users and groups. By default, the account used to install Windows SharePoint Services is a farm administrator, along with local machine administrators and the server farm account that you specified in the installation wizard. Unlike in previous versions of SharePoint Products and Technologies, server farm administrators do not have access to all site collections; they only have access to the Central Administration site collection. You must deliberately specify site administrators or take ownership of a site to allow uninvited access to site collections.
Configure Outgoing E-mail Settings
At a minimum, you should select outgoing mail settings or alerting will not function. Incoming mail settings only need to be enabled when using mail-enabled document libraries. Mail-enabled document libraries allow the e-mailing of files to document libraries. To configure outgoing e-mail settings, select from Central Administration > Operations > Topology and Services > Outgoing E-mail Settings. The SMTP Relay Server, From Address, and Reply To Address must be defined for outgoing e-mail to work.
| Important | The SMTP Server specified in Windows SharePoint Services and SharePoint Server for outgoing e-mail must allow relaying by IP address. SharePoint products do not authenticate outbound e-mail. You must use another method for high-availability, as neither Windows SharePoint Services nor SharePoint Server allows for multiple SMTP server addresses. |
Create a Web Application to Host Site Collections
Unless you chose a Basic/Stand-alone installation, you must create a Web application to host your content. Select Central Administration > Application Management > Create Or Extend Web Application to create your first Web application. Figure 2-5 shows the location and URL for creating a Web application.
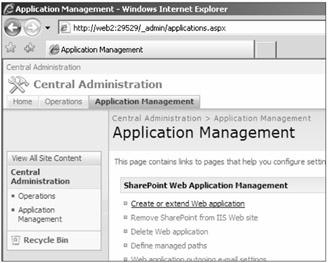
Figure 2-5: Create or extend Web applications in Central Administration > Application Management.
When creating a new Web application it is generally better to use most of the default settings for the URL and host headers, modifying IIS and Central Administration to suit your specific circumstances later. All settings entered in Central Administration are written to the configuration database and will be used whenever you add new servers to the farm. You must define the following items when creating a Web application.
-
Create a new IIS Web site or use an existing Web site You can create IIS Web sites before creating a Web application, but doing so increases the risk for errors. The Central Administration UI creates the IIS virtual servers automatically, and you can change the IP addresses or host headers later. Be aware that the TCP port used for HTTP traffic will be written to the configuration database and automatically assigned to all new servers added to the farm. If you choose this method, you will not need to use host headers, but you must always change the TCP port number in IIS Manager before the Web application will be available from that server.
Tip Whichever method you choose, use an easy-to-recognize IIS description that matches the name of the content database.
-
TCP port used for HTTP traffic If you are using host headers, you may set the TCP port when creating a Web application. If you plan to assign IP addresses, leave the TCP port to default and modify it later in IIS Manager with the correct IP address.
-
Host headers You should always input the Fully Qualified Domain Name (FQDN) of the server as the host header. Even if you assign IP addresses later, the host header will not interfere. The host header information is written to the configuration database and is used when adding a new server to the farm. This new server will then have a Web application created and corresponding host header. If you plan to access this server by more than one FQDN, you must enter additional host headers in the IIS Manager application. Verify that the DNS entry has been created for this entry or your Web application will fail. Pinging the DNS Fully Qualified Domain Name is one method for verifying that the IP address is active.
-
Web site path The path for the Web site should be consistent across your server farm. Creating a new Web site path, c:\WSS\Web1, c:\WSS\Web2, for example, makes managing the associated Web applications easier as your farm grows.
-
Authentication provider If you are creating an Intranet Web application, strongly consider using Kerberos for user authentication. Kerberos is more secure and offers better performance than NTLM. If you have multiple subnets, are separated by firewalls, or the Web application is Internet facing, you should use NTLM (default) for authentication. If users cannot see your KDC (Kerberos Distribution Center) or the time is out of synchronization, Kerberos will fail. It is possible to enable both types of authentication from the command line after installation. See http://support.microsoft.com/kb/326089/en-us for information on enabling Kerberos after the creation of a Web application.
Tip You can change the authentication mechanism for a Web application from the command line by running:
stsadm -o authentication -url <Web application> -type <windows/forms/Websso> -usebasic (only when selecting windows authent) -exclusivelyusentlm (only when selecting windows authent) -allowanonymous
An example of a Web application name portal using Windows integrated authentication and basic authentication follows:
stsadm -o authentication -url http://portal.contoso.msft -type windows -usebasic -usewindowsintegrated
-
Anonymous or non-anonymous access Unless you are serving content for public consumption, you should not allow anonymous access. Although enabling anonymous access is allowed for collaborative site collections via its Web application, it is generally a bad practice. Allowing anonymous access prevents user-level auditing.
-
Load-balanced URL Change the default entry if you are serving content via multiple Web front-end (WFEs) servers or if you plan to publish via a different URL than specified during setup. The load-balanced URL is the domain name (namespace) for all site collections users who have access in this SharePoint Web application. This URL is used in all links shown on pages within the Web application. By default, it is set to your servername and port. Remember to change the port if using SSL; the default TCP Port for SSL is 443. When changing the default load-balanced URL, you must also have a corresponding DNS entry before continuing.
-
Zone The 3.0 version of Windows SharePoint Services gives users the ability to differentiate incoming traffic based on zones. Zones can help "sort" incoming traffic to different extended Web applications with matching URLs. The URL entered in the user's browser is mapped to the correlating zone, allowing greater flexibility in isolating and directing incoming traffic.
Tip stsadm -o [ -addzoneurl | deletezoneurl] can be used to modify and map zones and associated URLs.
-
Application pool creation or reuse If security is important to your organization, you must create an application pool for each Web application. Consider using an existing application pool if you are short on resources OR plan to use the same application pool identity (username) for all Web applications. Creating an application pool requires additional resources such as memory and administrative time, so creating one purely for performance is discouraged. In addition, use a domain account for the identity as doing so eases the pain of scaling to a farm later. Verify that this account is in the local administrators group.
-
Reset Internet Information Services After installation, IIS must be manually reset on this server, regardless of which option is selected. This option is for resetting other WFEs in a server farm. To manually reset IIS, run IISReset /noforce from the CLI on the WFE.
-
Database server For most installations, use the default SQL Server. This server is what was specified during setup for the configuration database. If you have several large Web applications, consider using dedicated SQL Servers for serving content.
-
Database name Always change the default database name to correlate to the Web application name. For example, if the Web application is http://sales.contoso.msft, then use WSS_Content_Sales for the database name. Intelligent naming of Web applications, application pools, and databases greatly eases the management of medium to large Windows SharePoint Services implementations.
-
Database authentication The recommended authentication type is always Windows Authentication. Only use SQL authentication when working in a workgroup environment and when you have selected SQL authentication for all database connections, including the configuration database. The database authentication is the user context currently logged onto the Central Administration UI.
-
Search server Most installations have only one search server listed. You should always associate the search server with the content database of the Web application. It is important to note that the search server associates with the content database, and not the Web application. It is possible to create multiple search servers associated with multiple content databases in the same Web application, but they become impossible to manage.
Create a Site Collection at the Root of the Web Application
If you chose a Basic installation, your site collection was automatically created in the root of the Web application. If you decided to give yourself the ability to scale by choosing Web Front End, then you need to create the first site collection in your newly created Web application. You are prompted to create this first site collection as shown in Figure 2-6.
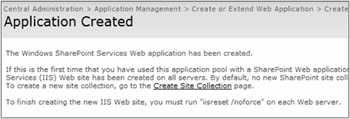
Figure 2-6: You should always create a site collection in the root of a new Web application.
Most organizations create a Team Site in the root (/) of the Web application. We recommend that you always create a site in the root of a Web application to facilitate a collaboration launch point and a place for automated site collection creation. We also recommend an Announcements list to help users find the URL for creating site collections. You must specify at least one Site Collection Administrator, but when creating a root site collection you should specify a secondary Site Collection Administrator as well.
Update IIS Configuration
To assign an IP address to your Web application, you need to configure IIS with the appropriate settings and change the TCP port number in IIS Manager to what was specified during Windows SharePoint Services installation for the load-balanced URL.
Assigning IP Addresses to Web Applications
To assign IP addresses to your Web applications, follow these steps:
-
Add a Host (A Record) in the DNS Management Console.
-
Add the associated IP address to your Windows Server.
-
After an IIS reset, assign the IP address to the Web application in Web site identification, as shown in Figure 2-7.
-
Change the TCP port, if required.
-
Perform an IISreset /noforce from the CLI.
-
Modify the internal URL from Central Administration > Operations > Global Configuration > Alternate Access Mappings, and select the internal URL you defined when creating your first Web application. Figure 2-8 shows an example of the modification.
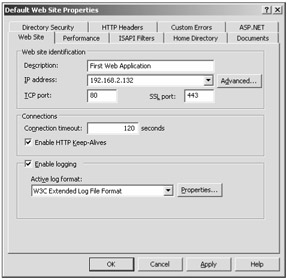
Figure 2-7: To assign an IP Address to a Web application in IIS Manager, right-click on the Web site name, choose Properties, and then choose the Web Site tab.
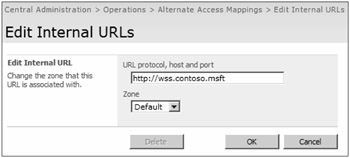
Figure 2-8: If not using the default server name, you should modify the internal URL when assigning IP addresses to Web applications.
Perform a Backup
After your initial configuration is complete and functional, you should perform a backup, including IIS. From Central Administration > Operations > Backup And Restore, create a Full backup using the default settings. Also perform an IIS Metabase backup to a shared location. For details on backing up your server farm, refer to Chapter 14, "Backup and Restore of SharePoint Products and Technologies."
Understanding the Databases Created During Installation
After installation, you will see several databases that are created in SQL Server and that need to be added to your SQL Server maintenance plan:
-
SharePoint configuration The SharePoint configuration database (config DB) holds all of your server farm configuration data and is akin to the Windows Server system registry. Any server that uses this installation's config DB is considered a member of the same server farm.
-
Central Administration content Because the Central Administration Web application is a custom site collection in a dedicated Web application, it has a corresponding content database. Although this Web application and associated database can be re-created without losing content, it is not a simple task and should be avoided by correctly backing up the server for future restoration.
-
First Web application content database During installation the first Web application was created with a corresponding content database. If you installed with the Basic installation type, you were not given the ability to name this content database. Do not try to change this name; simply document the name and be careful to give meaningful names to all future content databases. If you chose the Advanced installation type, you should have given the database a name that is easy to remember and is associated with a similarly named Web application.
-
Windows SharePoint Services search When you started Windows SharePoint Services search, a database was created to support these services. This database does not include the actual crawled content, but only the metadata associated with that content. The actual content is stored on each Windows SharePoint Services search server.
Figure 2-9 is an example of a Standard Edition SQL Server 2005 after installation of Windows SharePoint Services.
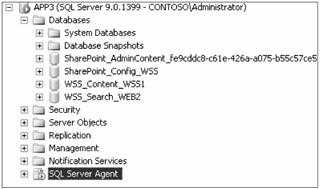
Figure 2-9: Several SQL Server databases are created during Windows SharePoint Services installation.
EAN: 2147483647
Pages: 110